原文地址:https://proandroiddev.com/modern-android-development-with-kotlin-september-2017-part-2-17444fcdbe86
題外話
這兩篇文章覺得越看越有用,寫的實在是太好了,雖然只是簡單的帶你入門的知識,但是對于一直覺得Dagger生兆,ButterKnife,MVVM這種不是特別快速入門的東西谭溉,真的是來一篇這么詳細的文章猶如醍醐灌頂友绝,下面接著翻譯第二篇屎篱。
MVVM architecture + repository pattern + Android Manager Wrappers
請原諒我這個標題不知道怎么更清晰的描述项乒,反正主要就是MVVM架構(gòu)的東西啰劲。
關(guān)于Android世界中的機構(gòu)方面的一些東西,長期以來檀何,Android開發(fā)人員在項目中并沒有明確的架構(gòu)的東西蝇裤,在過去的三年中廷支,Android架構(gòu)如雨后春筍般的冒出來,谷歌發(fā)布了Android Architecture項目栓辜,其中包含了大量的架構(gòu)方面的示例恋拍,在Google I/O 2017上,這一系列的庫啃憎,將使我們的項目具備整潔的代碼和更好的程序結(jié)構(gòu)芝囤,你可以使用這些中的全部或者是一部分似炎,在接下來的內(nèi)容和這一系列的其他文章中辛萍,我們會使用這些庫,首先我會使用最原始的方法編碼羡藐,然后使用這些庫對代碼進行重構(gòu)贩毕,以查看這些庫可以解決哪些問題。
下面有兩種分離代碼的主要架構(gòu):
- MVP
- MVVM
很難說哪一種更好仆嗦,你需要嘗試過后選擇一個更適合你自己的辉阶,我給你個傾向于MVVM,使用lifecycle-aware庫瘩扼,接下來我將會使用它谆甜,如果你也沒有嘗試過MVP,medium上面有很多關(guān)于MVP的有用的文章集绰。
什么事MVVM模式
MVVM模式是一個架構(gòu)模式规辱,它代表Model-View-ViewModel,我認為這個名字會讓開發(fā)者混淆栽燕,如果我是一個為他命名的人罕袋,我會給他命名為View-ViewModel-Model,因為ViewModel是連接View和Model的橋梁碍岔。
View代表你的Activity浴讯,F(xiàn)ragment和其他Android中的自定義View的抽象,不要錯過這個View的重要性蔼啦,View應(yīng)該是愚蠢的榆纽,里面不應(yīng)該有任何邏輯相關(guān)的東西,View不應(yīng)該保存任何數(shù)據(jù)捏肢,他應(yīng)該具有ViewModel實例的引用奈籽,并且需要從ViewModel來獲取所需要的數(shù)據(jù),此外當ViewModel的數(shù)據(jù)被更改時猛计,布局也應(yīng)該被更改唠摹。
ViewModel是持有數(shù)據(jù)的類的抽象,并且具有關(guān)于核實應(yīng)該獲取數(shù)據(jù)以及核實應(yīng)該顯示數(shù)據(jù)的邏輯奉瘤,ViewModel保存當前狀態(tài)勾拉,此外煮甥,ViewModel還持有了一個或多個Model的實例,并且從中獲取所有數(shù)據(jù)藕赞,例如數(shù)據(jù)是從本地數(shù)據(jù)庫獲取還是從遠程服務(wù)器成肘,此外,ViewModel根本不用知道View斧蜕,并且ViewModel也不用去了解Android的架構(gòu)双霍。
Model是我們?yōu)閂iewModel準備數(shù)據(jù)的層,在這里我們將從遠程服務(wù)器獲取數(shù)據(jù)并將其緩存到內(nèi)存中或保存到數(shù)據(jù)庫中批销。他和那些User洒闸,Car這些之持有數(shù)據(jù)的類不一樣,通常他是一個Repository模式的實現(xiàn)均芽,接下來我們會介紹他丘逸。
如果你的MVVM架構(gòu)寫的好的話,他會使我們的代碼更加易于測試和易于維護掀宋。
首先深纲,讓我們創(chuàng)建一個簡單的Model類
class RepoModel {

    fun refreshData() : String {
        return "Some new data"
    }
}
通常獲取數(shù)據(jù)都是異步的,一般需要等一下劲妙,所以我們把上面的代碼做如下的改動:
class RepoModel {

    fun refreshData(onDataReadyCallback: OnDataReadyCallback) {
        Handler().postDelayed({ onDataReadyCallback.onDataReady("new data") },2000)
    }
}

interface OnDataReadyCallback {
    fun onDataReady(data : String)
}
首先我們寫了一個OnDataReadyCallback的接口湃鹊,然后在refreshData方法中實現(xiàn)了他的方法,為了實現(xiàn)等待的效果镣奋,這里使用了Handler币呵,兩秒過后,onDataReady方法會被調(diào)用唆途。
現(xiàn)在我們來下ViewModel
class MainViewModel {
    var repoModel: RepoModel = RepoModel()
    var text: String = ""
    var isLoading: Boolean = false
}
就像你看到的一樣富雅,這里有一個RepoModel的實例,text是用來顯示的肛搬,isLoading是用來保存狀態(tài)的没佑,現(xiàn)在我們加一個refresh的方法用來響應(yīng)獲取數(shù)據(jù)的動作。
class MainViewModel {
    ...

    val onDataReadyCallback = object : OnDataReadyCallback {
        override fun onDataReady(data: String) {
            isLoading.set(false)
            text.set(data)
        }
    }

    fun refresh(){
        isLoading.set(true)
        repoModel.refreshData(onDataReadyCallback)
    }
}
refresh功能實際上是調(diào)用RepoModel實例的refreshData方法温赔,該實例執(zhí)行OnDataReadyCallback的方法蛤奢,每當你想實現(xiàn)一些接口或者擴展一些類而不想創(chuàng)建子類的話,你就可以使用對象申明陶贼,如果你想使用匿名內(nèi)部類的方式啤贩,這種情況下,你不許使用對象表達式
class MainViewModel {
    var repoModel: RepoModel = RepoModel()
    var text: String = ""
    var isLoading: Boolean = false

    fun refresh() {
        repoModel.refreshData( object : OnDataReadyCallback {
        override fun onDataReady(data: String) {
            text = data
        })
    }
}
當我們開始刷新數(shù)據(jù)的時候拜秧,我們界面上會變成加載的狀態(tài)痹屹,當數(shù)據(jù)獲取到之后,加載的狀態(tài)就會消失枉氮。
接著志衍,我們需要把text變成ObservableField<String>,并且isLoading變成ObservableField<Boolean>,ObservableField是Data Binding庫中的一個類暖庄,用來創(chuàng)建一個可觀測的對象,它包裹了我們想要觀察的對象楼肪。
class MainViewModel {
    var repoModel: RepoModel = RepoModel()

    val text = ObservableField<String>()

    val isLoading = ObservableField<Boolean>()

    fun refresh(){
        isLoading.set(true)
        repoModel.refreshData(object : OnDataReadyCallback {
            override fun onDataReady(data: String) {
                isLoading.set(false)
                text.set(data)
            }
        })
    }
}
現(xiàn)在我們用val來代替var培廓,因為我們只改變字段里面的值,而不是字段本身春叫,如果你想要初始化的話:
 val text = ObservableField("old data")
 val isLoading = ObservableField(false)
接下來我們來改變我們的layout文件:
<data>
    <variable
        name="viewModel"
        type="me.fleka.modernandroidapp.MainViewModel" />
</data>
然后肩钠,
- 更改TextView以觀察MainViewModel實例的text字段
- 添加Progressbar,只在isLoading是true的時候顯示
- 添加Button暂殖,用來刷新數(shù)據(jù)价匠,并且只有在isLoading是false的的狀態(tài)下才是可點擊的。
 <TextView
            android:id="@+id/repository_name"
            android:text="@{viewModel.text}"
            ...
            />

        ...
        <ProgressBar
            android:id="@+id/loading"
            android:visibility="@{viewModel.isLoading ? View.VISIBLE : View.GONE}"
            ...
            />

        <Button
            android:id="@+id/refresh_button"
            android:onClick="@{() -> viewModel.refresh()}"
            android:clickable="@{viewModel.isLoading ? false : true}"
            />
當你運行的時候央星,你會發(fā)現(xiàn)有error霞怀,因為View.Visible和View.Gone在沒有導(dǎo)入View的時候是沒辦法直接使用的。
<data>
        <import type="android.view.View"/>

        <variable
            name="viewModel"
            type="me.fleka.modernandroidapp.MainViewModel" />
</data>
現(xiàn)在我們來完成binding的部分莉给,就像我上面說的View需要有一個ViewModel的實例:
class MainActivity : AppCompatActivity() {

    lateinit var binding: ActivityMainBinding

    var mainViewModel = MainViewModel()

    override fun onCreate(savedInstanceState: Bundle?) {
        super.onCreate(savedInstanceState)

        binding = DataBindingUtil.setContentView(this, R.layout.activity_main)
        binding.viewModel = mainViewModel
        binding.executePendingBindings()

    }
}
最后,我們運行一下廉沮。
最后看到old data變成了new data颓遏。
這是最簡單的MVVM示例。
這有一個問題滞时,當你旋轉(zhuǎn)手機的時候叁幢,new data又變成了old data,這是什么情況坪稽?讓我們來看一下Activity的生命周期:

當你旋轉(zhuǎn)屏幕的時候曼玩,Activity會重新創(chuàng)建,并且onCreate方法會被調(diào)用窒百,現(xiàn)在黍判,看一下我們的Activity
class MainActivity : AppCompatActivity() {

    lateinit var binding: ActivityMainBinding

    var mainViewModel = MainViewModel()

    override fun onCreate(savedInstanceState: Bundle?) {
        super.onCreate(savedInstanceState)

        binding = DataBindingUtil.setContentView(this, R.layout.activity_main)
        binding.viewModel = mainViewModel
        binding.executePendingBindings()

    }
}
就像你看到的那樣,當生成了一個新的Activity實例的時候篙梢,也就新生成了一個MainViewModel實例顷帖,怎么做我們才能在Activity重建的時候使用同一個ViewModel實例呢。
lifecycle-aware組件介紹
因為很多人都會面臨這個問題渤滞,ViewModel就是其中一個用來解決這個問題的贬墩,所以我們所有的ViewModel都需要繼承他。
讓我們改造一下我們的MainViewModel妄呕,讓他集成lifecycle-aware組件中的ViewModel陶舞。首先,在我們的build.gradle文件中添加如下配置:
dependencies {
    ...

    implementation "android.arch.lifecycle:runtime:1.0.0-alpha9"
    implementation "android.arch.lifecycle:extensions:1.0.0-alpha9"
    kapt "android.arch.lifecycle:compiler:1.0.0-alpha9"
}
現(xiàn)在绪励,讓MainViewModel繼承ViewModel
package me.fleka.modernandroidapp

import android.arch.lifecycle.ViewModel

class MainViewModel : ViewModel() {
    ...
}
然后肿孵,修改我們的onCreate方法中的代碼:
class MainActivity : AppCompatActivity() {

    lateinit var binding: ActivityMainBinding

    override fun onCreate(savedInstanceState: Bundle?) {
        super.onCreate(savedInstanceState)

        binding = DataBindingUtil.setContentView(this, R.layout.activity_main)
        binding.viewModel = ViewModelProviders.of(this).get(MainViewModel::class.java)
        binding.executePendingBindings()

    }
}
我們沒有創(chuàng)建新的MainViewModel的實例论咏,而是使用ViewModelProviders來獲取的,ViewModelProviders是一個獲取ViewModelProvider的工具類颁井,這個是關(guān)于范圍的厅贪。所以,如果你在Activity中調(diào)用ViewModelProviders.of(this)雅宾,那么你的ViewModel將會是活著的养涮,直到Activity被銷毀(被銷毀而不是被重新創(chuàng)建)。
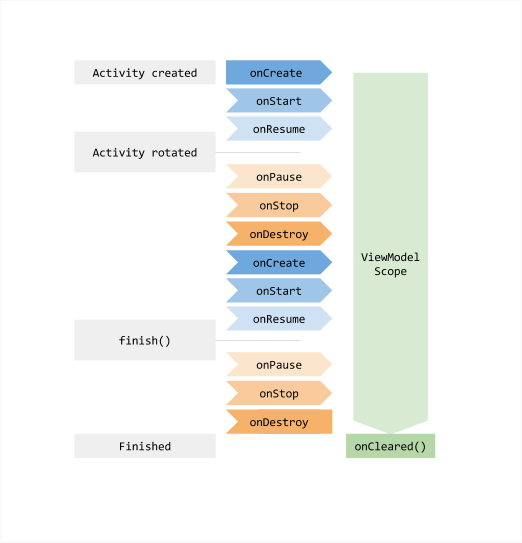
ViewModelProvider負責創(chuàng)建新的實例眉抬,如果它被首次調(diào)用贯吓,或者當你重新創(chuàng)建Activity/Fragment時會返回舊實例。
不要對下面的代碼疑惑:
MainViewModel::class.java
在Kotlin中蜀变,如果你使用下面的代碼
MainViewModel::class
它將返回一個KClass悄谐,它與Java中的Class不同。所以库北,如果我們這樣做:.java爬舰。
在文章的最后,我說過我們會從github上獲取一個數(shù)據(jù)集并且顯示他寒瓦,所以這里我們需要寫一個getRepositories方法并且返回一個數(shù)據(jù)集合情屹。
class RepoModel {

    fun refreshData(onDataReadyCallback: OnDataReadyCallback) {
        Handler().postDelayed({ onDataReadyCallback.onDataReady("new data") },2000)
    }

    fun getRepositories(onRepositoryReadyCallback: OnRepositoryReadyCallback) {
        var arrayList = ArrayList<Repository>()
        arrayList.add(Repository("First", "Owner 1", 100 , false))
        arrayList.add(Repository("Second", "Owner 2", 30 , true))
        arrayList.add(Repository("Third", "Owner 3", 430 , false))

        Handler().postDelayed({ onRepositoryReadyCallback.onDataReady(arrayList) },2000)
    }
}

interface OnDataReadyCallback {
    fun onDataReady(data : String)
}

interface OnRepositoryReadyCallback {
    fun onDataReady(data : ArrayList<Repository>)
}
我們也需要在MainViewModel中添加一個方法用來調(diào)用RepoModel的getRepositories方法。
class MainViewModel : ViewModel() {
    ...
    var repositories = ArrayList<Repository>()

    fun refresh(){
        ...
    }

    fun loadRepositories(){
        isLoading.set(true)
        repoModel.getRepositories(object : OnRepositoryReadyCallback{
            override fun onDataReady(data: ArrayList<Repository>) {
                isLoading.set(false)
                repositories = data
            }
        })
    }
}
最后杂腰,我們需要把這些數(shù)據(jù)顯示在RecyclerView中垃你。我們需要做
- 創(chuàng)建一個rv_item_repository.xml布局
- 添加RecyclerView到activity_main中
- 編寫RepositoryRecyclerViewAdapter
- 給RecyclerView設(shè)置Adapter
編寫rv_item_repository的時候,我們使用CardView喂很,所以我們需要在build.gradle中添加如下配置:
implementation 'com.android.support:cardview-v7:26.0.1'
下面是完整代碼:
<?xml version="1.0" encoding="utf-8"?>
<layout xmlns:android="http://schemas.android.com/apk/res/android"
    xmlns:app="http://schemas.android.com/apk/res-auto"
    xmlns:tools="http://schemas.android.com/tools">

    <data>

        <import type="android.view.View" />

        <variable
            name="repository"
            type="me.fleka.modernandroidapp.uimodels.Repository" />
    </data>

    <android.support.v7.widget.CardView
        android:layout_width="match_parent"
        android:layout_height="96dp"
        android:layout_margin="8dp">

        <android.support.constraint.ConstraintLayout
            android:layout_width="match_parent"
            android:layout_height="match_parent">

            <TextView
                android:id="@+id/repository_name"
                android:layout_width="wrap_content"
                android:layout_height="wrap_content"
                android:layout_marginEnd="16dp"
                android:layout_marginStart="16dp"
                android:text="@{repository.repositoryName}"
                android:textSize="20sp"
                app:layout_constraintBottom_toBottomOf="parent"
                app:layout_constraintHorizontal_bias="0.0"
                app:layout_constraintLeft_toLeftOf="parent"
                app:layout_constraintRight_toRightOf="parent"
                app:layout_constraintTop_toTopOf="parent"
                app:layout_constraintVertical_bias="0.083"
                tools:text="Modern Android App" />

            <TextView
                android:id="@+id/repository_has_issues"
                android:layout_width="wrap_content"
                android:layout_height="wrap_content"
                android:layout_marginEnd="16dp"
                android:layout_marginStart="16dp"
                android:layout_marginTop="8dp"
                android:text="@string/has_issues"
                android:textStyle="bold"
                android:visibility="@{repository.hasIssues ? View.VISIBLE : View.GONE}"
                app:layout_constraintBottom_toBottomOf="@+id/repository_name"
                app:layout_constraintEnd_toEndOf="parent"
                app:layout_constraintHorizontal_bias="1.0"
                app:layout_constraintStart_toEndOf="@+id/repository_name"
                app:layout_constraintTop_toTopOf="@+id/repository_name"
                app:layout_constraintVertical_bias="1.0" />

            <TextView
                android:id="@+id/repository_owner"
                android:layout_width="0dp"
                android:layout_height="wrap_content"
                android:layout_marginBottom="8dp"
                android:layout_marginEnd="16dp"
                android:layout_marginStart="16dp"
                android:text="@{repository.repositoryOwner}"
                app:layout_constraintBottom_toBottomOf="parent"
                app:layout_constraintEnd_toEndOf="parent"
                app:layout_constraintStart_toStartOf="parent"
                app:layout_constraintTop_toBottomOf="@+id/repository_name"
                app:layout_constraintVertical_bias="0.0"
                tools:text="Mladen Rakonjac" />

            <TextView
                android:id="@+id/number_of_starts"
                android:layout_width="wrap_content"
                android:layout_height="wrap_content"
                android:layout_marginBottom="8dp"
                android:layout_marginEnd="16dp"
                android:layout_marginStart="16dp"
                android:layout_marginTop="8dp"
                android:text="@{String.valueOf(repository.numberOfStars)}"
                app:layout_constraintBottom_toBottomOf="parent"
                app:layout_constraintEnd_toEndOf="parent"
                app:layout_constraintHorizontal_bias="1"
                app:layout_constraintStart_toStartOf="parent"
                app:layout_constraintTop_toBottomOf="@+id/repository_owner"
                app:layout_constraintVertical_bias="0.0"
                tools:text="0 stars" />

        </android.support.constraint.ConstraintLayout>

    </android.support.v7.widget.CardView>

</layout>
下一步是惜颇,在activity_main.xml中添加RecyclerView,首先在build.gradle中添加:
implementation 'com.android.support:recyclerview-v7:26.0.1'
<?xml version="1.0" encoding="utf-8"?>
<layout xmlns:android="http://schemas.android.com/apk/res/android"
    xmlns:app="http://schemas.android.com/apk/res-auto"
    xmlns:tools="http://schemas.android.com/tools">

    <data>

        <import type="android.view.View"/>

        <variable
            name="viewModel"
            type="me.fleka.modernandroidapp.MainViewModel" />
    </data>

    <android.support.constraint.ConstraintLayout
        android:layout_width="match_parent"
        android:layout_height="match_parent"
        tools:context="me.fleka.modernandroidapp.MainActivity">

        <ProgressBar
            android:id="@+id/loading"
            android:layout_width="48dp"
            android:layout_height="48dp"
            android:indeterminate="true"
            android:visibility="@{viewModel.isLoading ? View.VISIBLE : View.GONE}"
            app:layout_constraintBottom_toTopOf="@+id/refresh_button"
            app:layout_constraintEnd_toEndOf="parent"
            app:layout_constraintStart_toStartOf="parent"
            app:layout_constraintTop_toTopOf="parent" />

        <android.support.v7.widget.RecyclerView
            android:id="@+id/repository_rv"
            android:layout_width="0dp"
            android:layout_height="0dp"
            android:indeterminate="true"
            android:visibility="@{viewModel.isLoading ? View.GONE : View.VISIBLE}"
            app:layout_constraintBottom_toTopOf="@+id/refresh_button"
            app:layout_constraintEnd_toEndOf="parent"
            app:layout_constraintStart_toStartOf="parent"
            app:layout_constraintTop_toTopOf="parent"
            tools:listitem="@layout/rv_item_repository" />


        <Button
            android:id="@+id/refresh_button"
            android:layout_width="160dp"
            android:layout_height="40dp"
            android:layout_marginBottom="8dp"
            android:layout_marginEnd="8dp"
            android:layout_marginStart="8dp"
            android:layout_marginTop="8dp"
            android:onClick="@{() -> viewModel.loadRepositories()}"
            android:clickable="@{viewModel.isLoading ? false : true}"
            android:text="Refresh"
            app:layout_constraintBottom_toBottomOf="parent"
            app:layout_constraintEnd_toEndOf="parent"
            app:layout_constraintStart_toStartOf="parent"
            app:layout_constraintTop_toTopOf="parent"
            app:layout_constraintVertical_bias="1.0" />

    </android.support.constraint.ConstraintLayout>

</layout>
button按鈕出發(fā)getRepositories的方法用來替代refresh的方法
<Button
    android:id="@+id/refresh_button"
    android:onClick="@{() -> viewModel.loadRepositories()}"
    ...
    />
刪除MainViewModel中的refresh方法少辣,因為我們用不到了凌摄,接下來我們編寫Adapter
class RepositoryRecyclerViewAdapter(private var items: ArrayList<Repository>,
                                    private var listener: OnItemClickListener)
    : RecyclerView.Adapter<RepositoryRecyclerViewAdapter.ViewHolder>() {

    override fun onCreateViewHolder(parent: ViewGroup?, viewType: Int): ViewHolder {
        val layoutInflater = LayoutInflater.from(parent?.context)
        val binding = RvItemRepositoryBinding.inflate(layoutInflater, parent, false)
        return ViewHolder(binding)
    }

    override fun onBindViewHolder(holder: ViewHolder, position: Int)
            = holder.bind(items[position], listener)

    override fun getItemCount(): Int = items.size

    interface OnItemClickListener {
        fun onItemClick(position: Int)
    }

    class ViewHolder(private var binding: RvItemRepositoryBinding) :
            RecyclerView.ViewHolder(binding.root) {

        fun bind(repo: Repository, listener: OnItemClickListener?) {
            binding.repository = repo
            if (listener != null) {
                binding.root.setOnClickListener({ _ -> listener.onItemClick(layoutPosition) })
            }

            binding.executePendingBindings()
        }
    }

}
請注意,ViewHolder接收RvItemRepositoryBinding類型的實例毒坛,而不是View類型望伦,因此我們可以對ViewHolder中的每個item實現(xiàn)數(shù)據(jù)綁定。不要為下面的一行代碼困惑:
override fun onBindViewHolder(holder: ViewHolder, position: Int) = holder.bind(items[position], listener)
他只是下面這兩行代碼的簡寫
override fun onBindViewHolder(holder: ViewHolder, position: Int){
    return holder.bind(items[position], listener)
}
另外一個能讓你疑惑的點:
binding.root.setOnClickListener({ _ -> listener.onItemClick(layoutPosition) })
你可以替換參數(shù)為_煎殷,是不是很棒屯伞。
我們已經(jīng)有了Adapter,但是我們還沒有設(shè)置給RecyclerView.
class MainActivity : AppCompatActivity(), RepositoryRecyclerViewAdapter.OnItemClickListener {

    lateinit var binding: ActivityMainBinding

    override fun onCreate(savedInstanceState: Bundle?) {
        super.onCreate(savedInstanceState)

        binding = DataBindingUtil.setContentView(this, R.layout.activity_main)
        val viewModel = ViewModelProviders.of(this).get(MainViewModel::class.java)
        binding.viewModel = viewModel
        binding.executePendingBindings()

        binding.repositoryRv.layoutManager = LinearLayoutManager(this)
        binding.repositoryRv.adapter = RepositoryRecyclerViewAdapter(viewModel.repositories, this)
    }

    override fun onItemClick(position: Int) {
        TODO("not implemented") //To change body of created functions use File | Settings | File Templates.
    }
}
運行一下豪直,會發(fā)現(xiàn)一個很奇怪的地方劣摇,數(shù)據(jù)沒有顯示,當我們旋轉(zhuǎn)屏幕弓乙,發(fā)現(xiàn)數(shù)據(jù)此時卻顯示出來了末融。
- Activity創(chuàng)建了钧惧,adapter也創(chuàng)建了,但是repositories是空的勾习。
- 我們點擊按鈕
- loadRepositories方法被調(diào)用了
- 此時repositories是有數(shù)據(jù)的浓瞪,但是我們沒有調(diào)用notifyDatasetChanged方法
- 當我們旋轉(zhuǎn)屏幕的時候,activity重新創(chuàng)建了巧婶,adapter也重新創(chuàng)建了乾颁,但是repositories其實是已經(jīng)有數(shù)據(jù)了。
所以MainViewModel如何通知MainActivity有新數(shù)據(jù)了艺栈,所以我們需要調(diào)用notifyDatasetchanged方法英岭。
這是不可能的。
重要的一點是MainViewModel不需要知道MainActivity的存在湿右。
MainActivity是具有MainViewModel實例的诅妹,因此它應(yīng)該是監(jiān)聽更改并通知adapter有關(guān)更改的。
但是毅人,如何做呢吭狡?
我么可以觀察repositories,一旦數(shù)據(jù)改變了堰塌,我們就可以改變我們的adapter赵刑。
讓我們看一下下面的情況:
- 在MainActivity中,我們監(jiān)聽repositories场刑,一旦改變,我們?nèi)?zhí)行notifyDatasetChanged
- 點擊按鈕
- 當我們等待數(shù)據(jù)加載的時候蚪战,Activity會因為配置的改變從而導(dǎo)致重建牵现。
- 我們的MainViewModel還是存活的狀態(tài).
- 兩秒之后,我們獲取到了新的數(shù)據(jù)邀桑,然后通知觀察者數(shù)據(jù)改變了
- 觀察者嘗試去調(diào)用不存在的adapter的notifyDatasetChanged方法瞎疼,因為Activity重新創(chuàng)建了。
所以我們的解決方法并不好壁畸。
介紹LiveData
LiveData是lifecycle-aware組件中的另外一個類贼急,他是基于觀察者的,可以知道View的生命周期捏萍,一旦Activity由于配置改變而銷毀的時候太抓,LiveData是知道的,所以他也會銷毀觀察者
讓我們在MainViewModel中實現(xiàn)它
class MainViewModel : ViewModel() {
    var repoModel: RepoModel = RepoModel()

    val text = ObservableField("old data")

    val isLoading = ObservableField(false)

    var repositories = MutableLiveData<ArrayList<Repository>>()

    fun loadRepositories() {
        isLoading.set(true)
        repoModel.getRepositories(object : OnRepositoryReadyCallback {
            override fun onDataReady(data: ArrayList<Repository>) {
                isLoading.set(false)
                repositories.value = data
            }
        })
    }
}
然后改變MainActivity
class MainActivity : LifecycleActivity(), RepositoryRecyclerViewAdapter.OnItemClickListener {

    private lateinit var binding: ActivityMainBinding
    private val repositoryRecyclerViewAdapter = RepositoryRecyclerViewAdapter(arrayListOf(), this)


    override fun onCreate(savedInstanceState: Bundle?) {
        super.onCreate(savedInstanceState)

        binding = DataBindingUtil.setContentView(this, R.layout.activity_main)
        val viewModel = ViewModelProviders.of(this).get(MainViewModel::class.java)
        binding.viewModel = viewModel
        binding.executePendingBindings()

        binding.repositoryRv.layoutManager = LinearLayoutManager(this)
        binding.repositoryRv.adapter = repositoryRecyclerViewAdapter
        viewModel.repositories.observe(this,
                Observer<ArrayList<Repository>> { it?.let{ repositoryRecyclerViewAdapter.replaceData(it)} })

    }

    override fun onItemClick(position: Int) {
        TODO("not implemented") //To change body of created functions use File | Settings | File Templates.
    }
}
如何理解it令杈,如果一些方法只有一個參數(shù)的時候走敌,該參數(shù)可以被it訪問,所以我們可以使用lambda表達式來替代:
((a) -> 2 * a)
為
(it * 2)
我們再運行一下逗噩,就會發(fā)現(xiàn)一切正常了掉丽。
為什么相比MVP我更喜歡MVVM
- 沒有令人厭煩的View的接口跌榔,因為ViewModel不需要引用View
- 沒有令人厭煩的Presenter相關(guān)的接口,因為不需要
- 更容易處理配置的更改
- 使用MVVM捶障,我們在Activity和Fragment中將實現(xiàn)更少的代碼
Repository模式
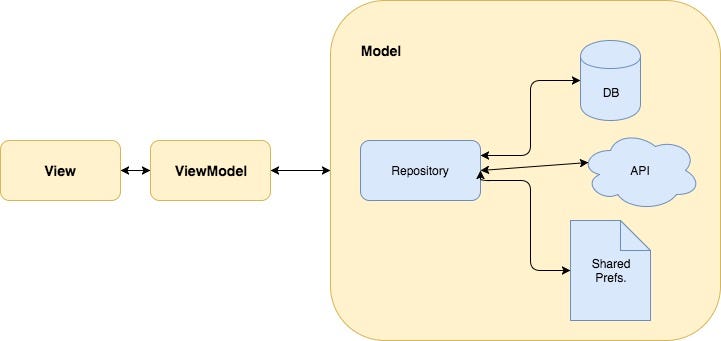
如前所述僧须,Model只是我們準備數(shù)據(jù)的層的一個抽象名稱。通常它包含存儲庫和數(shù)據(jù)類项炼。每個實體(數(shù)據(jù))類應(yīng)該有相應(yīng)的Repository類担平。例如,如果我們有User和Post數(shù)據(jù)類芥挣,我們也應(yīng)該有UserRepository和PostRepository驱闷。所有數(shù)據(jù)都應(yīng)該直接來自它。我們不應(yīng)該從View或ViewModel調(diào)用SharePreference實例或數(shù)據(jù)庫實例空免。
所以我們可以重命名我們的RepoModel為GitRepoRepository空另,GitRepo來自GitHub Repository,而Repository來自Repository模型蹋砚。
class GitRepoRepository {

    fun getGitRepositories(onRepositoryReadyCallback: OnRepositoryReadyCallback) {
        var arrayList = ArrayList<Repository>()
        arrayList.add(Repository("First", "Owner 1", 100, false))
        arrayList.add(Repository("Second", "Owner 2", 30, true))
        arrayList.add(Repository("Third", "Owner 3", 430, false))

        Handler().postDelayed({ onRepositoryReadyCallback.onDataReady(arrayList) }, 2000)
    }
}

interface OnRepositoryReadyCallback {
    fun onDataReady(data: ArrayList<Repository>)
}
MainViewModel從GitHubRepository中獲取Github的Repository列表扼菠,但是GitRepoRepositories從哪來?
您可以直接在存儲庫中調(diào)用客戶端實例或數(shù)據(jù)庫實例坝咐,但這仍然不是一個好習慣循榆。您的應(yīng)用程序應(yīng)盡可能多地進行模塊化。如果您決定使用不同的客戶端墨坚,用Retrofit替換Volley秧饮?如果你有一些邏輯,那就很難重構(gòu)泽篮。您的存儲庫不需要知道您正在使用哪個客戶端來獲取遠程數(shù)據(jù)盗尸。
- repository只需要知道的就是數(shù)據(jù)是從remote還是local過來的,不需要知道他如何獲取這些數(shù)據(jù)
- ViewModel需要知道的就是數(shù)據(jù)
- View只需要用來顯示數(shù)據(jù)
當我開始Android開發(fā)時帽撑,我想知道應(yīng)用程序如何脫機工作以及數(shù)據(jù)同步的工作原理泼各。應(yīng)用程序的良好體系結(jié)構(gòu)使我們能夠輕松實現(xiàn)這個功能。例如亏拉,當調(diào)用ViewModel中的loadRepositories時扣蜻,如果有Internet連接,GitRepoRepositories可以從遠程數(shù)據(jù)源獲取數(shù)據(jù)并將其保存在本地數(shù)據(jù)源中及塘。當手機處于脫機模式時莽使,GitRepoRepository可以從本地數(shù)據(jù)源獲取數(shù)據(jù)。所以磷蛹,Repository應(yīng)該具有RemoteDataSource和LocalDataSource的實例以及處理數(shù)據(jù)應(yīng)該來自哪里的邏輯吮旅。
添加本地數(shù)據(jù)源:
class GitRepoLocalDataSource {

    fun getRepositories(onRepositoryReadyCallback: OnRepoLocalReadyCallback) {
        var arrayList = ArrayList<Repository>()
        arrayList.add(Repository("First From Local", "Owner 1", 100, false))
        arrayList.add(Repository("Second From Local", "Owner 2", 30, true))
        arrayList.add(Repository("Third From Local", "Owner 3", 430, false))

        Handler().postDelayed({ onRepositoryReadyCallback.onLocalDataReady(arrayList) }, 2000)
    }

    fun saveRepositories(arrayList: ArrayList<Repository>){
        //todo save repositories in DB
    }
}

interface OnRepoLocalReadyCallback {
    fun onLocalDataReady(data: ArrayList<Repository>)
}
兩個方法,第一個是獲取數(shù)據(jù),第二個是保存數(shù)據(jù)
添加遠程數(shù)據(jù)源
class GitRepoRemoteDataSource {

    fun getRepositories(onRepositoryReadyCallback: OnRepoRemoteReadyCallback) {
        var arrayList = ArrayList<Repository>()
        arrayList.add(Repository("First from remote", "Owner 1", 100, false))
        arrayList.add(Repository("Second from remote", "Owner 2", 30, true))
        arrayList.add(Repository("Third from remote", "Owner 3", 430, false))

        Handler().postDelayed({ onRepositoryReadyCallback.onRemoteDataReady(arrayList) }, 2000)
    }
}

interface OnRepoRemoteReadyCallback {
    fun onRemoteDataReady(data: ArrayList<Repository>)
}
只有一個方法就是獲取數(shù)據(jù)庇勃。
現(xiàn)在我們添加一下邏輯到我們的Repository
class GitRepoRepository {

    val localDataSource = GitRepoLocalDataSource()
    val remoteDataSource = GitRepoRemoteDataSource()

    fun getRepositories(onRepositoryReadyCallback: OnRepositoryReadyCallback) {
       remoteDataSource.getRepositories( object : OnRepoRemoteReadyCallback {
           override fun onDataReady(data: ArrayList<Repository>) {
               localDataSource.saveRepositories(data)
               onRepositoryReadyCallback.onDataReady(data)
           }

       })
    }
}

interface OnRepositoryReadyCallback {
    fun onDataReady(data: ArrayList<Repository>)
}
因此檬嘀,分離數(shù)據(jù)源可以輕松地在本地保存數(shù)據(jù)。 如果您只需要網(wǎng)絡(luò)中的數(shù)據(jù)责嚷,您還需要使用存儲庫模式鸳兽?是。它使您的代碼更容易測試罕拂,其他開發(fā)人員可以更好地了解您的代碼揍异,您可以更快地維護您的代碼憾股! :)
Android Manager Wrappers
如果你想檢查GitRepoRepository中的網(wǎng)絡(luò)連接問題阶捆,那么你知道從哪個數(shù)據(jù)源獲取數(shù)據(jù)嗎魄懂?我們已經(jīng)說過仍翰,我們不應(yīng)該在ViewModels和Models中放置任何Android相關(guān)的代碼,那么如何處理這個問題呢脱衙? 我們來做互聯(lián)網(wǎng)連接的包裝:
class NetManager(private var applicationContext: Context) {
    private var status: Boolean? = false

    val isConnectedToInternet: Boolean?
        get() {
            val conManager = applicationContext.getSystemService(Context.CONNECTIVITY_SERVICE) as ConnectivityManager
            val ni = conManager.activeNetworkInfo
            return ni != null && ni.isConnected
        }
}
上面的代碼只會在我們添加如下權(quán)限的時候工作:
<uses-permission android:name="android.permission.INTERNET" />
<uses-permission android:name="android.permission.ACCESS_NETWORK_STATE" />
<uses-permission android:name="android.permission.ACCESS_WIFI_STATE" />
但是如何在Repository中創(chuàng)建實例露乏,因為我們沒有Context衍菱?我們可以在構(gòu)造函數(shù)中請求他枢舶?
class GitRepoRepository (context: Context){

    val localDataSource = GitRepoLocalDataSource()
    val remoteDataSource = GitRepoRemoteDataSource()
    val netManager = NetManager(context)

    fun getRepositories(onRepositoryReadyCallback: OnRepositoryReadyCallback) {
        remoteDataSource.getRepositories(object : OnRepoRemoteReadyCallback {
            override fun onDataReady(data: ArrayList<Repository>) {
                localDataSource.saveRepositories(data)
                onRepositoryReadyCallback.onDataReady(data)
            }

        })
    }
}

interface OnRepositoryReadyCallback {
    fun onDataReady(data: ArrayList<Repository>)
}
我們在ViewModel中創(chuàng)建了一個新的GitRepoRepository實例懦胞。 NetManager在ViewModel中如何才能使用NetManager?您可以使用具有上下文的Lifecycle-aware組件庫中的AndroidViewModel凉泄。這個上下文是應(yīng)用程序的上下文躏尉,而不是一個Activity:
class MainViewModel : AndroidViewModel  {

    constructor(application: Application) : super(application)

    var gitRepoRepository: GitRepoRepository = GitRepoRepository(NetManager(getApplication()))

    val text = ObservableField("old data")

    val isLoading = ObservableField(false)

    var repositories = MutableLiveData<ArrayList<Repository>>()

    fun loadRepositories() {
        isLoading.set(true)
        gitRepoRepository.getRepositories(object : OnRepositoryReadyCallback {
            override fun onDataReady(data: ArrayList<Repository>) {
                isLoading.set(false)
                repositories.value = data
            }
        })
    }
}
在這一行:
constructor(application: Application) : super(application)
我們正在為MainViewModel定義構(gòu)造函數(shù)。這是必需的后众,因為AndroidViewModel在其構(gòu)造函數(shù)中要求Application實例胀糜。所以在我們的構(gòu)造函數(shù)中,我們稱之為super方法蒂誉,所以我們的類將擴展的AndroidViewModel的構(gòu)造函數(shù)被調(diào)用僚纷。
將代碼替換成一行的:
class MainViewModel(application: Application) : AndroidViewModel(application) {
...
}
現(xiàn)在,當我們在GitRepoRepository中有NetManager的實例時拗盒,我們可以檢查互聯(lián)網(wǎng)連接:
class GitRepoRepository(val netManager: NetManager) {

    val localDataSource = GitRepoLocalDataSource()
    val remoteDataSource = GitRepoRemoteDataSource()

    fun getRepositories(onRepositoryReadyCallback: OnRepositoryReadyCallback) {

        netManager.isConnectedToInternet?.let {
            if (it) {
                remoteDataSource.getRepositories(object : OnRepoRemoteReadyCallback {
                    override fun onRemoteDataReady(data: ArrayList<Repository>) {
                        localDataSource.saveRepositories(data)
                        onRepositoryReadyCallback.onDataReady(data)
                    }
                })
            } else {
                localDataSource.getRepositories(object : OnRepoLocalReadyCallback {
                    override fun onLocalDataReady(data: ArrayList<Repository>) {
                        onRepositoryReadyCallback.onDataReady(data)
                    }
                })
            }
        }


    }
}

interface OnRepositoryReadyCallback {
    fun onDataReady(data: ArrayList<Repository>)
}
所以如果我們有網(wǎng)絡(luò)連接,我們將獲得遠程數(shù)據(jù)并保存在本地锥债。另一方面陡蝇,如果我們沒有網(wǎng)絡(luò)連接,我們將獲得本地數(shù)據(jù)哮肚。
Kotlin Note:操作符let檢查可空性登夫,并在it中返回一個值.
終于翻譯完了,累死姐了允趟,原作者太有良心了恼策,每篇文章都是從原始的代碼到一步步優(yōu)化,真的是寫的很棒,希望對看到的每一個人都有所幫助涣楷。
資源
https://developer.android.com/topic/libraries/architecture/lifecycle.html
