Handler、Looper拴测、MessageQueue 初始化
- 1.在 UI 線程創(chuàng)建 Handler乓旗,通常直接new Handler;
private Handler mHandler = new Handler() {
        @Override
        public void handleMessage(Message msg) {
            super.handleMessage(msg);
            }
        }
UI Thread 初始Handler化時 對Looper進行初始化過程, main()是在 UI Thread 啟動時調用

```
 public static void main(String[] args) {
        SamplingProfilerIntegration.start();

        CloseGuard.setEnabled(false);

        Environment.initForCurrentUser();

        EventLogger.setReporter(new EventLoggingReporter());

        Security.addProvider(new AndroidKeyStoreProvider());

        final File configDir = Environment.getUserConfigDirectory(UserHandle.myUserId());
        TrustedCertificateStore.setDefaultUserDirectory(configDir);

        Process.setArgV0("<pre-initialized>");

        Looper.prepareMainLooper();

        ActivityThread thread = new ActivityThread();
        thread.attach(false);

        if (sMainThreadHandler == null) {
            sMainThreadHandler = thread.getHandler();
        }

        if (false) {
            Looper.myLooper().setMessageLogging(new
                    LogPrinter(Log.DEBUG, "ActivityThread"));
        }

        Looper.loop();

        throw new RuntimeException("Main thread loop unexpectedly exited");
    }
```
查看一下代碼集索,主要關注一下:Looper.prepareMainLooper();

```
public static void prepareMainLooper() {
        prepare(false);
        synchronized (Looper.class) {
            if (sMainLooper != null) {
                throw new IllegalStateException("The main Looper has already been prepared.");
            }
            sMainLooper = myLooper();
        }
    }

public static void prepare() {
        prepare(f);
    }

private static void prepare(boolean quitAllowed) {
        if (sThreadLocal.get() != null) {
            throw new RuntimeException("Only one Looper may be created per thread");
        }
       _ sThreadLocal.set(new Looper(quitAllowed));
_    }
```
以上是UI Thread 初始化new Handler 調用過程
-
2.接下來看一下 Other Thread 初始化調用屿愚。
Looper.prepare();
private Handler mHandler = new Handler() {
        @Override
        public void handleMessage(Message msg) {
            super.handleMessage(msg);
            }
        }
查看下Looper.prepare();
public static void prepare() {
        prepare(true);
    }

private static void prepare(boolean quitAllowed) {
        if (sThreadLocal.get() != null) {
            throw new RuntimeException("Only one Looper may be created per thread");
        }
       _ sThreadLocal.set(new Looper(quitAllowed));
_    }
- 3.其他用法: 在其他地方需要用到Handler,并且需要刷新UI時,不通過Looper.prepare();調用务荆,通過Looper.getMainLooper()也可以妆距;
` Handler mHandler = new Handler(Looper.getMainLooper());

class Looper{
    public static Looper getMainLooper() {
        synchronized (Looper.class) {
            return sMainLooper;
        }
    }
} `
-
4.MessageQueue 初始化
private Looper(boolean quitAllowed) { mQueue = new MessageQueue(quitAllowed); mThread = Thread.currentThread(); } ``` Looper 在初始化時創(chuàng)建一個關聯(lián)MessageQueue,一個線程中對應一個Looper & MessageQueue -
Handler 初始化
// 常用構造
public Handler(Callback callback) {
    this(callback, false);
}

 public Handler(Callback callback, boolean async) {
    if (FIND_POTENTIAL_LEAKS) {
        final Class<? extends Handler> klass = getClass();
        if ((klass.isAnonymousClass() || klass.isMemberClass() || klass.isLocalClass()) &&
                (klass.getModifiers() & Modifier.STATIC) == 0) {
            Log.w(TAG, "The following Handler class should be static or leaks might occur: " +
                klass.getCanonicalName());
        }
    }

    mLooper = Looper.myLooper();
    if (mLooper == null) {
        throw new RuntimeException(
            "Can't create handler inside thread that has not called Looper.prepare()");
    }
    mQueue = mLooper.mQueue;
    mCallback = callback;
    mAsynchronous = async;
}
    ```


從這里我們基本可以看到Handler 初始化時函匕,關聯(lián)了線程唯一的Looper & MessageQueue娱据。
UI Thread 和 其他 Thread 初始完Looper和MessageQueue后,會調用Looper.loop(),來輪詢分發(fā)消息盅惜。
-
5.梳理一下調用關系吸耿,來張流程圖理解一下;
UI Thread:
ActivityThread.main() -->Looper.prepareMainLooper() --> prepare(false) --> new Looper(quitAllowed) --> new MessageQueue(quitAllowed)Other Thread:
prepare() --> prepare(true) --> new Looper(quitAllowed) --> new MessageQueue(quitAllowed)
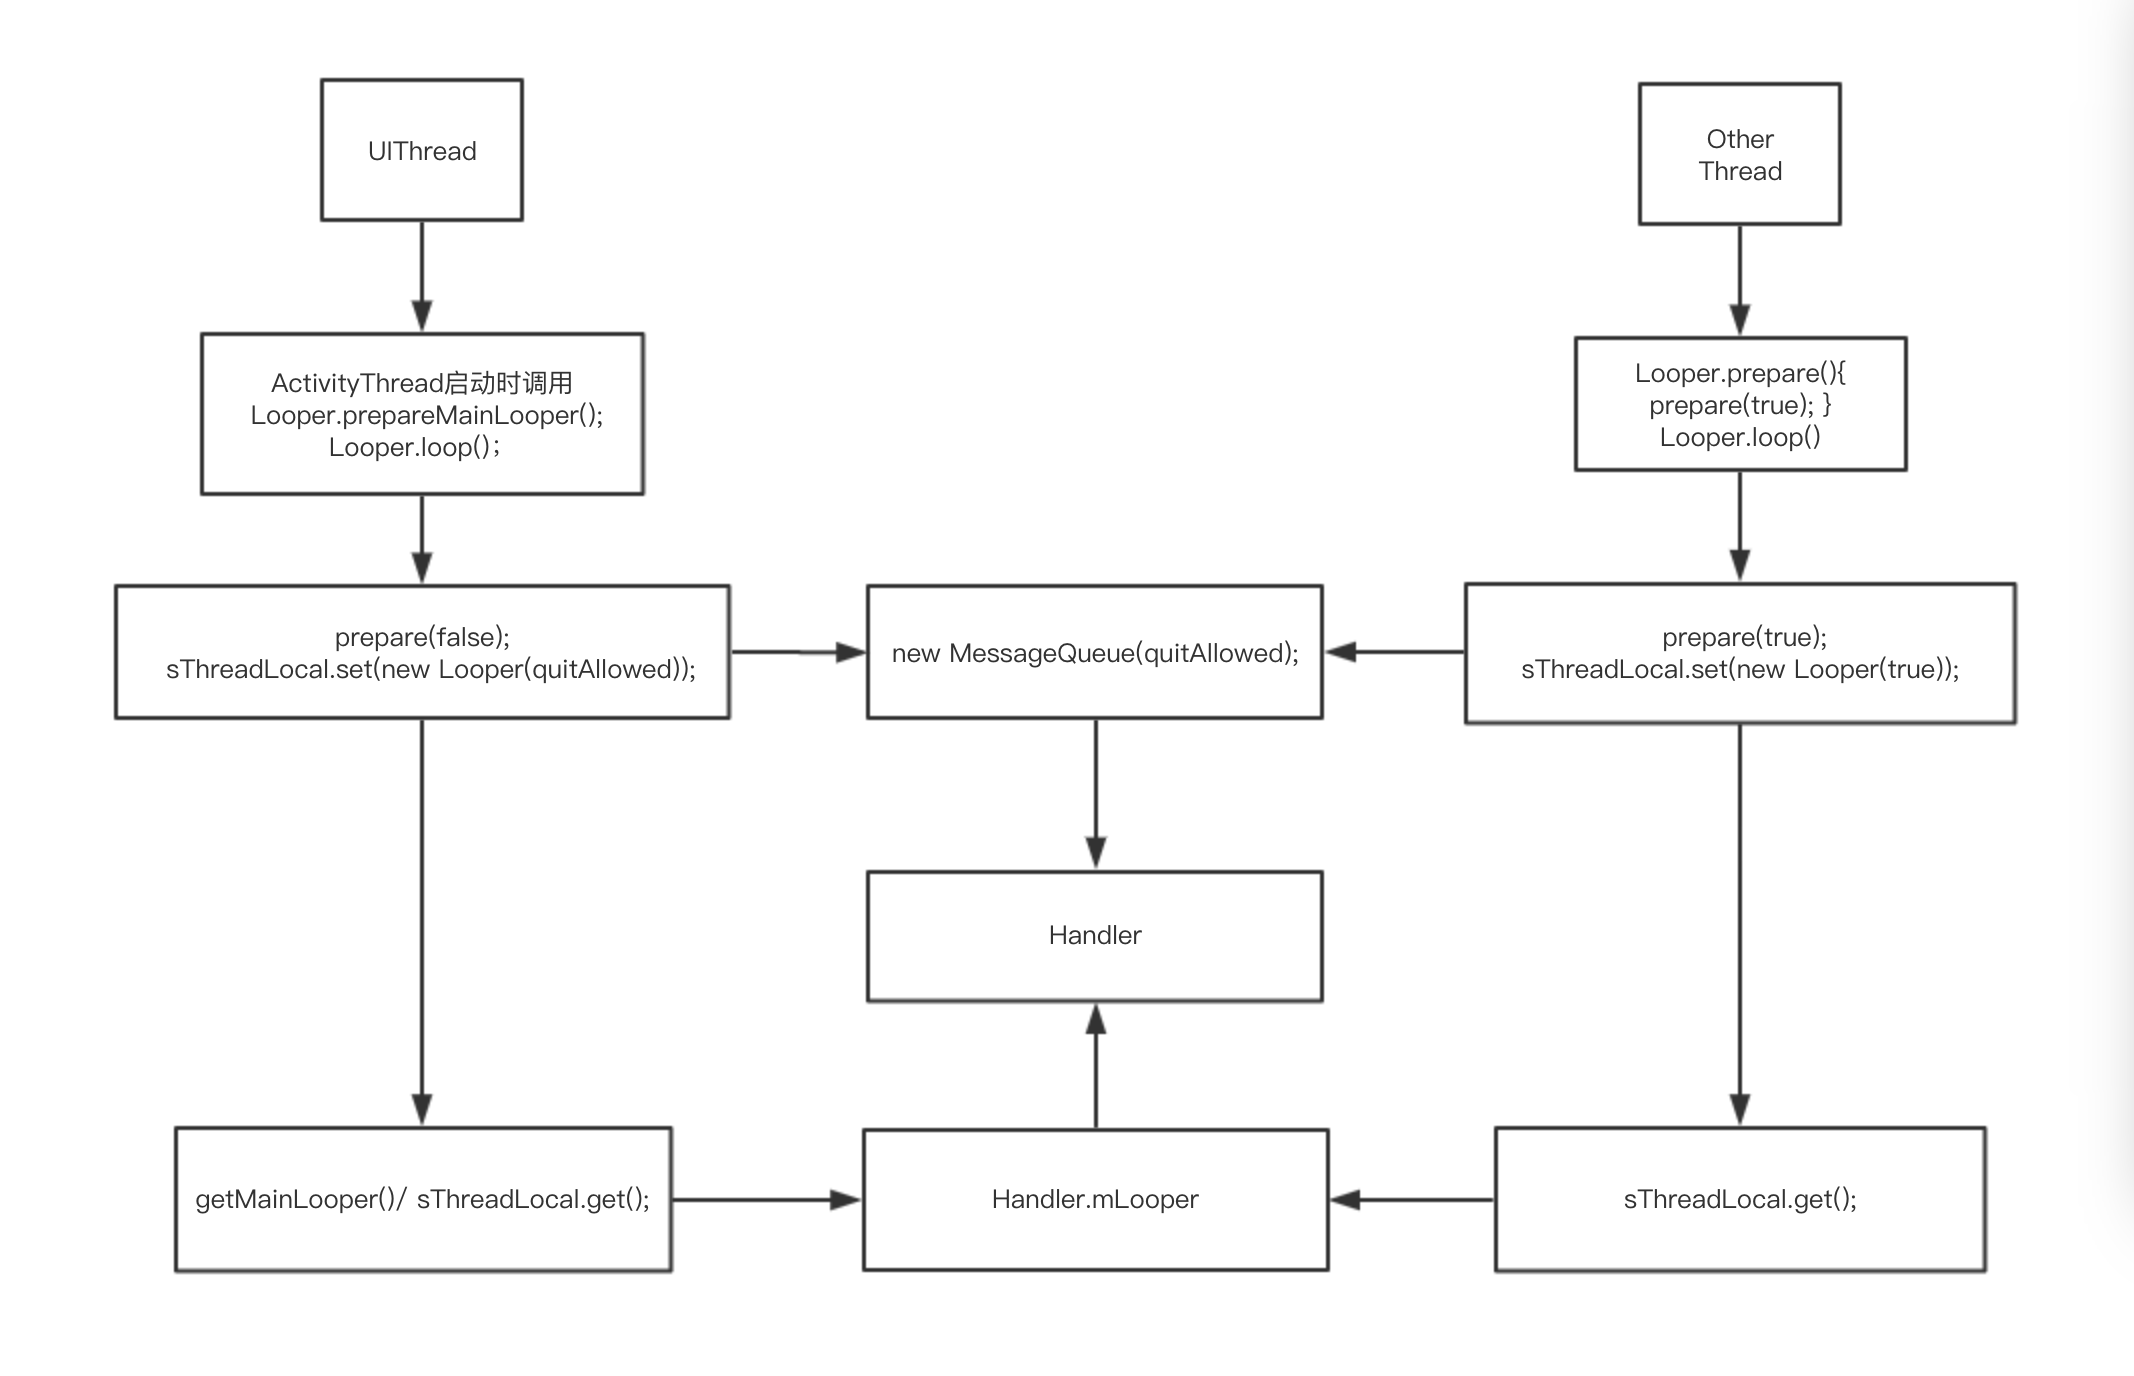
Handler-Looper-MessageQueue流程圖
異步消息
-
1.調用,存儲消息
mHandler.sendMessage(new Message()); mHandler.post(); mHandler.postDelay();追蹤一下不難發(fā)現(xiàn)酷窥,最后都走的一個地方
    private boolean enqueueMessage(MessageQueue queue, Message msg, long uptimeMillis) {
            msg.target = this;
            if (mAsynchronous) {
                msg.setAsynchronous(true);
            }
            return queue.enqueueMessage(msg, uptimeMillis);
        }
這樣看msg.target = this;msg.target就是Handler自己咽安,而MessageQueue就是Looper中關聯(lián)的對象,而enqueueMessage()中是對message保存蓬推,進行Message.next()按時間排序妆棒。
- 2.消費
Looper.loop()是對MessageQueue的消費
     public static void loop() {
        final Looper me = myLooper();
        if (me == null) {
            throw new RuntimeException("No Looper; Looper.prepare() wasn't called on this thread.");
        }
        final MessageQueue queue = me.mQueue;

        // Make sure the identity of this thread is that of the local process,
        // and keep track of what that identity token actually is.
        Binder.clearCallingIdentity();
        final long ident = Binder.clearCallingIdentity();

        for (;;) {
            Message msg = queue.next(); // might block
            if (msg == null) {
                // No message indicates that the message queue is quitting.
                return;
            }

            // This must be in a local variable, in case a UI event sets the logger
            Printer logging = me.mLogging;
            if (logging != null) {
                logging.println(">>>>> Dispatching to " + msg.target + " " +
                        msg.callback + ": " + msg.what);
            }

            msg.target.dispatchMessage(msg);

            if (logging != null) {
                logging.println("<<<<< Finished to " + msg.target + " " + msg.callback);
            }

            // Make sure that during the course of dispatching the
            // identity of the thread wasn't corrupted.
            final long newIdent = Binder.clearCallingIdentity();
            if (ident != newIdent) {
                Log.wtf(TAG, "Thread identity changed from 0x"
                        + Long.toHexString(ident) + " to 0x"
                        + Long.toHexString(newIdent) + " while dispatching to "
                        + msg.target.getClass().getName() + " "
                        + msg.callback + " what=" + msg.what);
            }

            msg.recycleUnchecked();
        }
    }
看到loop()中,添加了一個死循環(huán)沸伏,不斷去輪訓MessageQueue中的隊列是否為null糕珊,返回或者取出來繼續(xù)執(zhí)行 msg.target.dispatchMessage(msg);在最開始我們看到msg.target就是Handler本身
    public static Handler mHandler = new Handler() {
            @Override
            public void handleMessage(Message msg) {
                if (msg.what == 101) {
                    Log.i(TAG, "接收到handler消息...");
                }
            }
        };
而handleMessage就是我們重寫的回調方法。
-
3.一張圖梳理一下流程
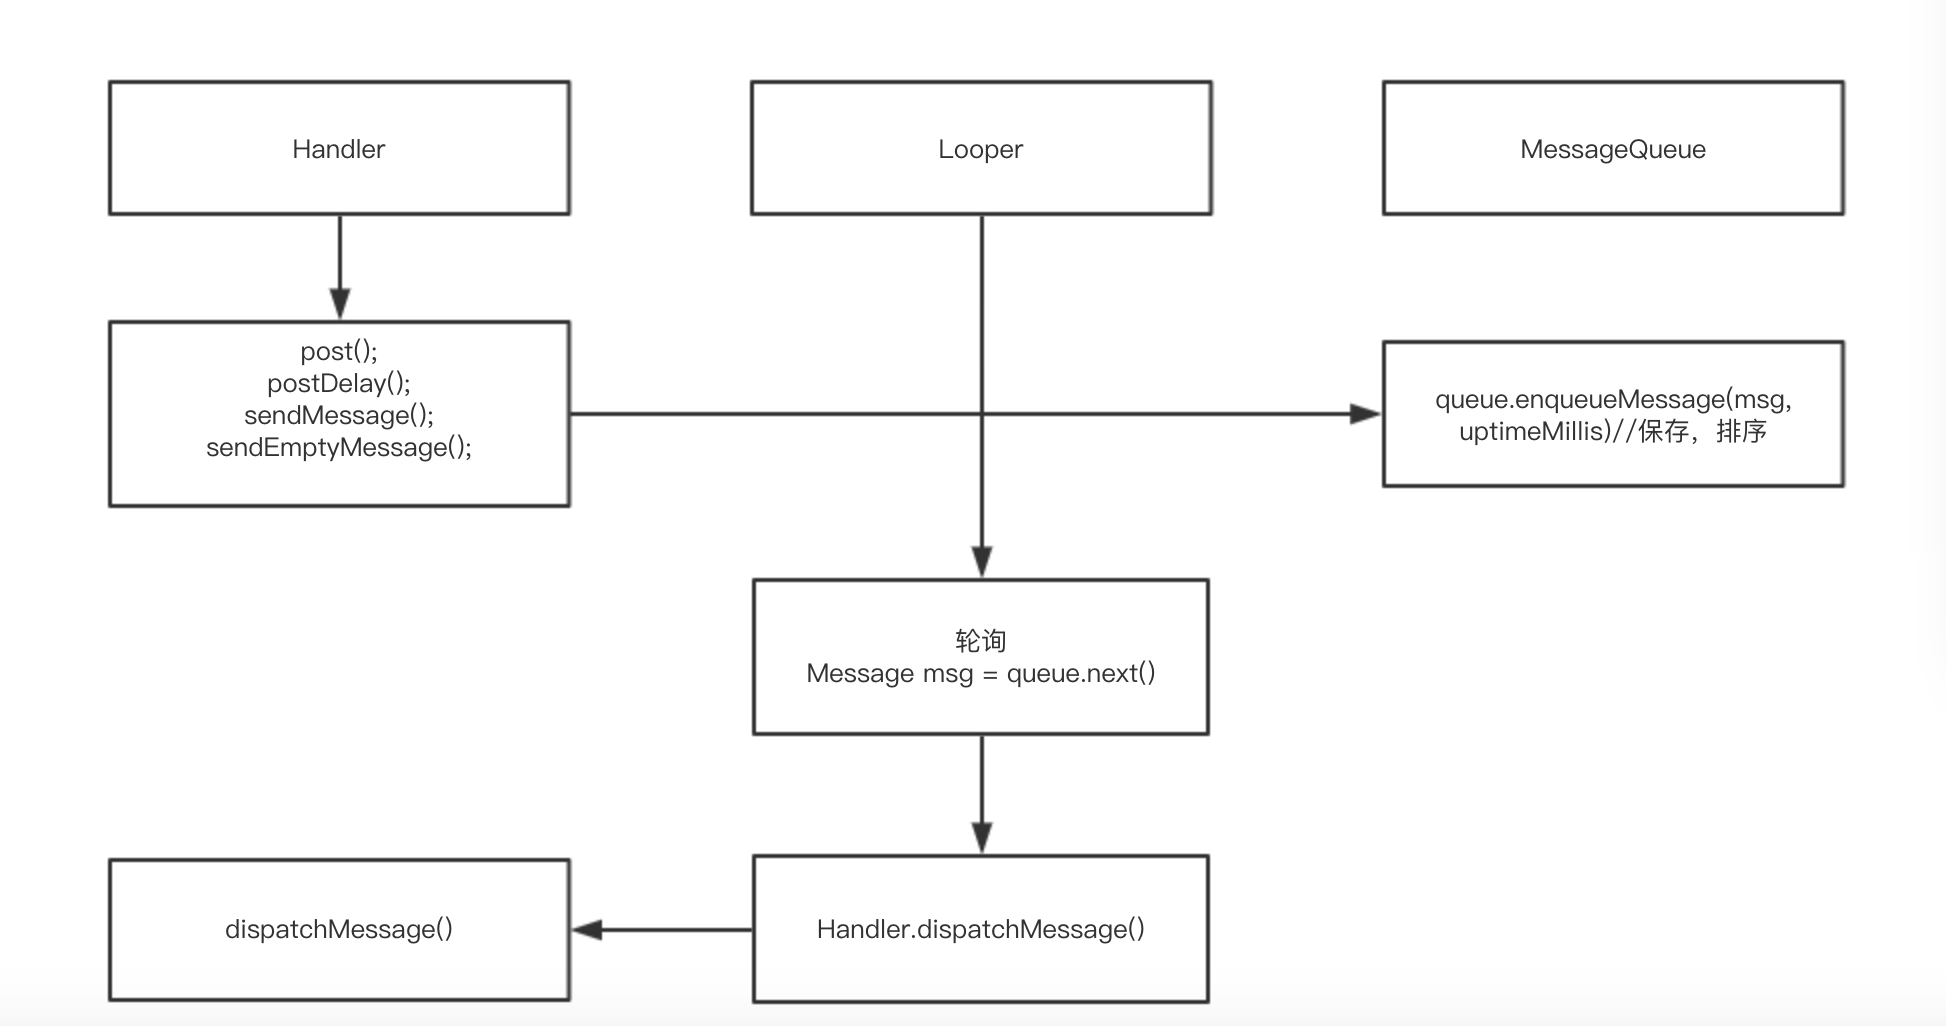 流程圖
流程圖
