Setting up for scene kit
open storyboard -> locate the view controller that use to present the 3D content.
select the view go to Identity inspector. change the class to SCNView
go to view controller's source code.
add
import SceneKit
set background. add code in the implementation of viewDidLoad.
let sceneView = self.view as! SCNView
sceneView.backgroundColor = UIColor(white: 0.6, alpha: 1.0)
Creating a Scene Kit scene
creat an SCNScene and tell SCNView to render it.
let scene = SCNScene()
sceneView.scene = scene
In Scene Kit, the 3D content are grouped into scene. Each sene contains a number of nodes, with contain the 3D objects that you want to show.
It\’s great to divide the game into different scene.
Showing a 3D object
Way to render a 3D object
First define a geometry object
let capsule = SCNCapsule(capRadius: 2.5, height: 6)
//it’s a capsule shape. a cylindrical body with both end link to a hemisphere.
then creat a Node with it, set a position. Add it to the scene.
let capsulNode = SCNNode(geometry: capsule)
capsuleNode.position = SCNVector3(x: 0, y: 0, z: 0)
scene.rootNode.addChildNode(capsuleNode)
//add capsuleNode to the sene by calling addChildNode on the scene’s root node
SCNCapsule:

Nodes are invisible that occupy a positon in space. We attach object to the nodes. e.g. geometry(3D Object, camera, light...). Nodes can attach to node, it’s a way to pair objects together. If a node was moved, all the node and object attach to it will move with it.
Working with Scene Kit Cameras
First, create an SCNCamera object
let camera = SCNCamera()
camera.xFov = 45
camera.yFov = 45//xFov, yFov are not available anymore, default value is 60. Indicate the angle of the view in x and y axis
then attach the camera to a node, position it and add to the scene
let cameraNode = SCNNode()
cameraNode.camera = camera//create camera node

cameraNode.position = SCNVector3(x: 0, y: 0, z: 20) //position camera

scene.rootNode.addChildNode(cameraNode)//add to the scene root node
SCNCamera:
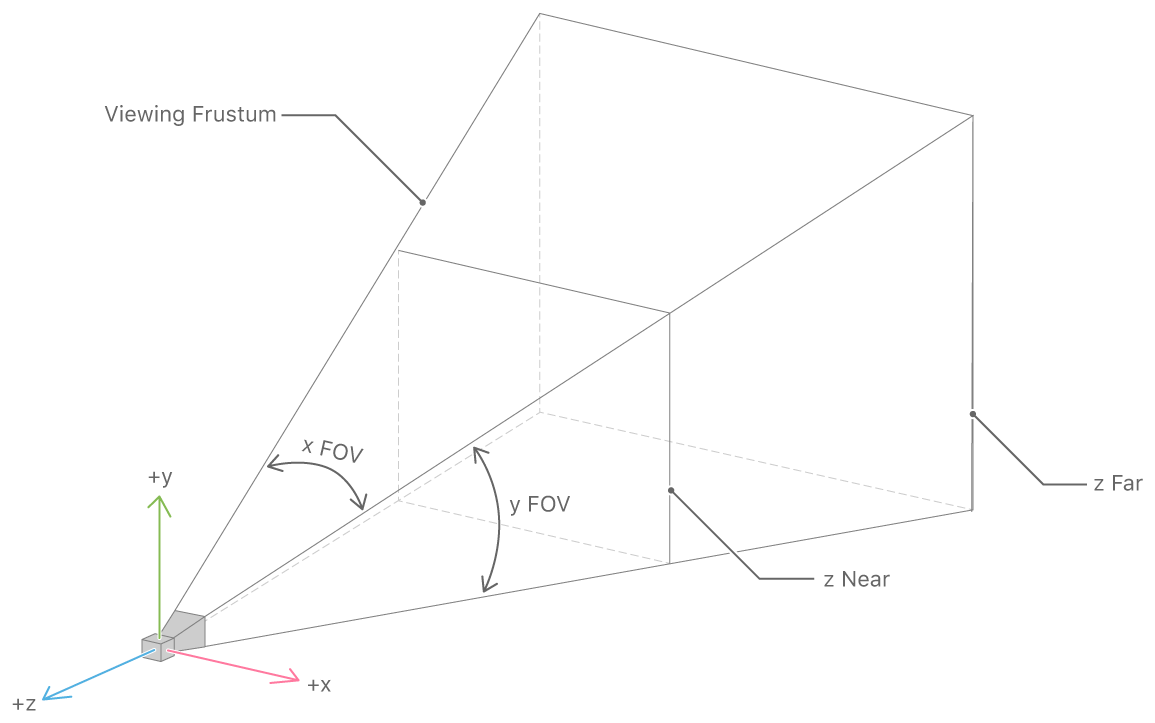
Two kinds of camera:
- perspective: just like normal camera
- orthographic: object don't get smaller when move away to the object
If you don't need the camera control, change it in the line in
setupView(). Otherwise you can use finger to change the viewing angel and zoom-in or out.
scnView.allowsCameraControl = false
Creating lights
First create a light object and attach it to a node.
There’re three kinds of light:
- Omni light: light from a single point, in all direction
- Directional lights: light in a single direction, have no positon.(just like sun)
- Spot light: light from a single potion and direct to a single direction. Angle can be change, so that the light cone will change
- Ambient light: light that have no position or direction, light from all directions
//adding a ambient light
let ambientLight = SCNLight()
ambientLight.type = SCNLightTypeAmbient
ambientLight.color = UIColor(white: 0.25, alpha: 1.0)

let ambientLightNode = SCNNode()
ambientLightNode.light = ambientLight

scene.rootNode.addChildNode(ambientLightNode)

//adding a point light
let omniLight = SCNLight()
omniLight.type = SCNLightTypeOmni
omniLight.color = UIColor(white: 0.25, alpha: 1.0)

let omniLightNode = SCNNode()
omniLightNode.light = omniLight
omniLightNode.position = SCNVector(x: -5, y: 8, z: 5)

scene.rootNode.addChildNode(omniLightNode)
Animating Objects
To move the object in Scene, we use the animation class from Core Animation.
First define propertie of the animation, then create a animation object.
//indicate the way of the animation: changing the position
let moveUpDownAnimation = CABasicAnimation(keyPath: “position”)

//how it move
moveUpDownAnimation.byValue =
    NSValue(SCNVector3: SCNVector3(x: 0, y: 3, z: 0))
//NSValue is a container for C or OBJ-C data item.
moveUpDownAnimation.timingFunction =
    CAMediaTimingFunction(name: kCAMediaTimingFunctionEaseInEaseOut)
//to add a slow in slow out effect

//animation automatically move back to start point
moveUpDownAnimation.autoReverse = true

//how many times should it repeat
moveUpDownAnimation.repeatCount = Float.infinity

//duration of the animation
moveUpDownAnimation.duration = 2.0

//apply to the node
capsuleNode.addAnimation(moveUpDownAnimation, forKey: “updown”)
//func addAnimation(_ animation: SCNAnimationProtocol, forkey key: String?)
//first parameter is the animation object
//second parameter is a string identifying the animation for later retrieval. can be nil
we can use not only CABasicAnimation but also CAKayframeAnimation to control the animation.
For detail, check the documentation for SCNNode and SCNMaterial, if the property have Animateble then it can be animated.
Working with Text Nodes
To render 3D text on the scene
First create a 3D geometry object, use SCNText class and attach it to a node.
let text = SCNText(string: “Text”, extrusionDepth: 0.2)

//geometry setting
text.font = UIFont.systemFontOfSize(2)
//default: Helvetica 36, font size is Scene Kit units, not screen point
let textNode = SCNNode(geometry: text)
//position relative to capsule
textNode.position = SCNVector3(x: -2, y: 6, z: 0)

//add node to the capsule node(not the scene root node!)
capsuleNode.addChildNode(textNode)//capsuleNode was defined earlier
Customizing Materials
To control the way the object react to light.
First create a material using SCNMaterial class
let greenMaterial = SCNMaterial()
greenMaterial.diffuse.contents = UIColor.greenColor()//diffusion
greenMaterial.specular.contents = UIColor.whiteColor()//reflection
greenMaterial.shininess = 1.0//sharpeness of the hightlight.

//attach to a node
capsule.materials = [greenMaterial]
//capsule is a SCNCapsule object we created ealier
There are lots of element that control the apperence of the surface.
e.g.
diffuse: control the base color of the material
specular: reflection, schiny effect. control the brightness and color of the effect.
emissive: self glowing, shining without light
transparent: area of the transpanrency, amount of transparency
normal: control the "unebenheit"
diffuse and specular can set to be a color or a image, or a CALayer or a file, or a URL, or a Sprite Kit scene or an SKTexture
Textureing Objects
To apply a texture to an object.
First get a texture, e.g. load a file. Then set it to the diffuse component of the material.
//loading a file
let loadedTexture = SKTexture(imageNamed: "Ball")

//set texture
let textureMaterial = SCNMaterial()
textureMaterial.diffuse.contents = loadedTexture

text.materials = [textureMaterial]

//generate noise using Sprite Kit
let noiseTexture = SKTexture(noiseWithSmoothness: 0.25,
    size: CGSize(width: 512, height: 512), grayscale: true)
// noiseWithSmoothness: 0.0 and 1.0. A value of 1.0 generates a smooth surface.
//size: size of the new texture
//grayscale: noise is colorful or gray
Normal Mapping
To make surface looks roughened. It change the way how the light bounce. Makes a simple object that appears to be having more detail. That's to apply a Normal Map to the material.
Source can be a texture, or generated by Sprite Kit.
//first generate texture
let noiseNormalMapTexture =
    noiseTexture.textureByGeneratingNormalMapWithSmoothness(0.1, contrast: 1.0)
//parameter of textureByGeneratingNormalMapWithSmoothness: smoothness and contrast
//smoothness 0~1: 0 means not smooth at all
//contrast 0~1: 1 means no magnification

//then apply to the normal property
greenMaterial.normal.contents = noiseNormalMapTexture
Constraining Objects
Make the object tied to other objects. So that their movement will be constrained.
First create the object, then create a constrain object and add it to the object.
//create a object
let pointer = SCNPyramid(width: 0.5, height: 0.9, length: 4.0)//geometry
let pointerNode = SCNNode(geometry: pointer)//Node
pointerNode.position = SCNVector3(x: -5, y: 0, z: 0)//set position

scene.rootNode.addChildNode(pointerNode)//add it to scene

// create a constraint object
let lookAtConstraint = SCNLookAtConstraint(target: capsuleNode)// target is always a node
// When enabled, the constraint will try to rotate
// around only a single axis
lookAtConstraint.gimbalLockEnabled = true
pointerNode.constraints = [lookAtConstraint]
SCNPyramid:

3 different kinds of constraints:
-
Look At:
SCNLookAtConstraintpoint towards a node -
Transform:
SCNTransformConstraintrun a calculation before render the scene. e.g. using a 4x4 transform matrix -
Inverse kinematics:
SCNIKConstraintAn IK constraint moving a chain of nodes toward a target point
 SCNIKConstraint
Loading COLLADA file
We can not only create a modell with code, but also by importing a COLLADA file. COLLADA file can be created by other 3D modelling software e.g. Blender.
First load the file, and then reconstruct object from the file.
//loading
let critterDataURL =
    NSBundle.mainBundle().URLForResource("Critter",
    withExtension: "dae")
let critterData = SCNSceneSource(URL: critterDataURL!, options: nil)

// Find the node called 'Critter'; if it exists, add it
let critterNode =
    critterData?.entryWithIdentifier("Critter",
    withClass: SCNNode.self) as? SCNNode
if critterNode != nil {
    critterNode?.position = SCNVector3(x: 5, y: 0, z: 0)
    scene.rootNode.addChildNode(critterNode!)
}
Using 3D Physics
Adding physical behiavor.
We should provide the shape ( geometry ) with SCNPhysicsShape and the body with SCNPhysicsBody.
Then we add the body to a node.
//create shape, or say a geometry
var critterPhysicsShape: SCNPhysicsShape?
if let geometry = critterNode?.geometry {
    critterPhysicsShape =
        SCNPhysicsShape(geometry: geometry,
            options: nil)
}

//create body, add shape to body
let critterPhysicsBody =
    SCNPhysicsBody(type: SCNPhysicsBodyType.Dynamic,
        shape: critterPhysicsShape)

//add body to a node
critterNode?.physicsBody = critterPhysicsBody
Body can be:
-
dynamic: body that can be affected by forces and collisions -
kinematic: unaffected by forces or collisions but that can cause collisions affecting other bodies - ```static` ``: unaffected by forces or collisions and that cannot move
Adding Force and Torque to the object
Add the code after the physics body for geometryNode inside spawnShape
// create random force
let randomX = Float.random(min: -2, max: 2)
let randomY = Float.random(min: 10, max: 18)
let force = SCNVector3(x: randomX, y: randomY , z: 0)

// set the position where where the force apply to
let position = SCNVector3(x: 0.05, y: 0.05, z: 0.05)

// apply the force to the physics body
geometryNode.physicsBody?.applyForce(force, atPosition: position, impulse: true)
Add the Torque using applyTorque(_: impulse:)
func applyTorque(_ torque: SCNVector4,
        asImpulse impulse: Bool)
just like applyForce but torque using a SCNVector4, which indicate the rotation axis and the rotation angle, or say, the magnitude of the torque.
Adding a reflective ground
Ground that reflect what's in the scene
We use a SCNFloor object:
let floor = SCNFloor()
let floorNode = SCNNode(geometry: floor)
floorNode.position = SCNVector3(x: 0, y: -5, z: 0)
scene.rootNode.addChildNode(floorNode)

//if you want the ground to be a physical body that object can fall onto
let floorPhysicsBody =
    SCNPhysicsBody(type: SCNPhysicsBodyType.Static,
        shape: SCNPhysicsShape(geometry: floor, options: nil))
floorNode.physicsBody = floorPhysicsBody
Hit-Testing the Scene
Return information of the object being tapped.
Using hitTest function
// Find the object that was tapped
let sceneView = self.view as! SCNView
let hits = sceneView.hitTest(locationToQuery,
    options: nil) as! [SCNHitTestResult]
for hit in hits {
    println("Found a node: \(hit.node)")
}
// locationToQuery is a CGPoint in view-space
This can return lots of nodes. option of hitTestcan be change. For detail check SCNHitTestOption
SceneKit Editor
First new file adding. Right click the folder and click New File.... Template for new file: SceneKit Scne File. Then you are in the SceneKit Editor.
There're 6 area. You will be able to control the node, element, child-parent relationship, properties of the node or object and action. You can see how the scene is like, you can add object from the library. In Node Inspector, you can set your node to suit your need. For different object there's always something different.
In camera inspector, there are some interesting properties to discover:
- HDR
- Explosure: control the darkness and brightness of the scene
- Bloom: control the hazy effect around the bright area
- Adaption: simulate the effect that human goes from a dark place to a bright place, or goes from a bright place to a dark place.
-
Post processing
- Vignettin: lightening around the edge of the scene
- Color Fringe: color mixing
- Color Grading: overal saturation
- Motion Blur
Rendering Loop
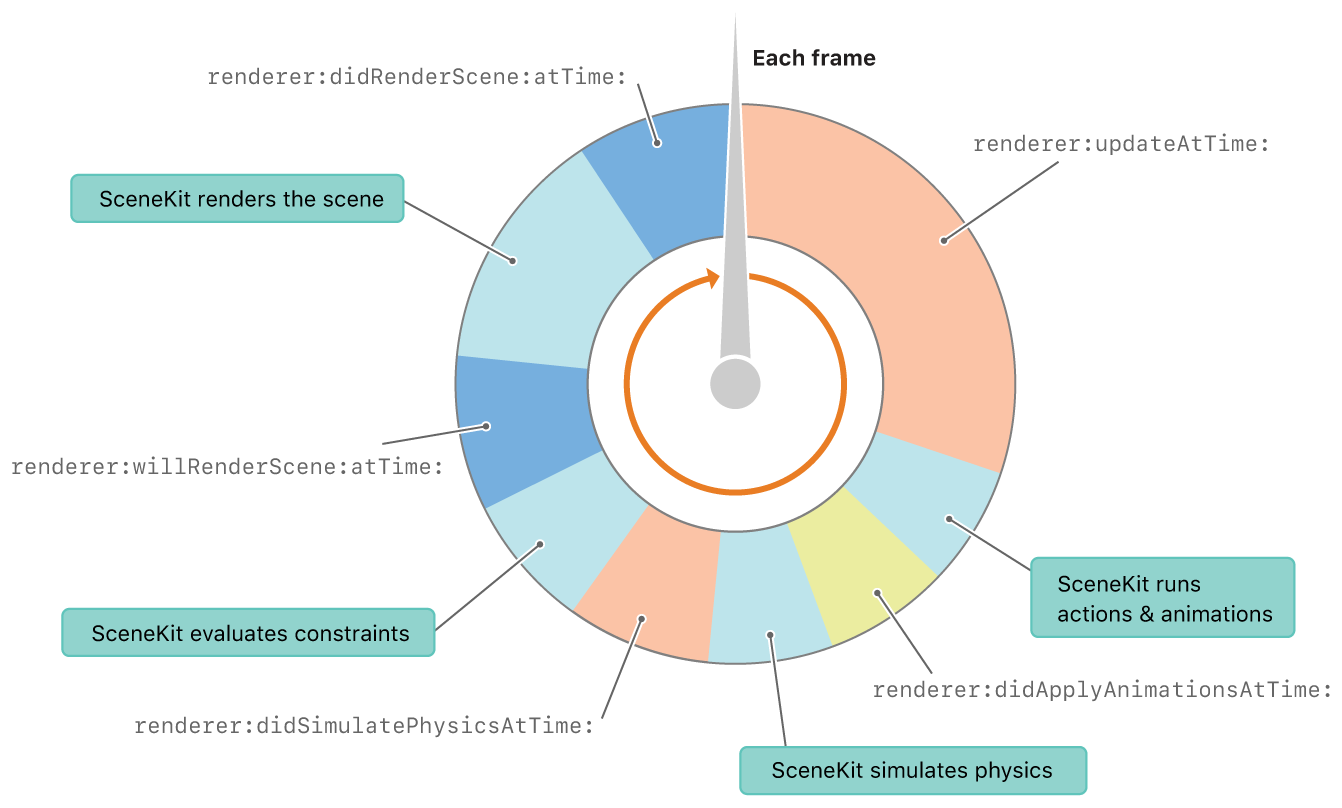
For example, you can add
spawnShape() function to the renderer sothat every time it update, it will execute spawnShape()
//add a extension to GameViewController
extension GameViewController: SCNSceneRendererDelegate {
  func renderer(renderer: SCNSceneRenderer, updateAtTime time: NSTimeInterval) {
    spawnShape()
  }
}
remember to remove the object as long as it don't need to be appear once again.
add the code to the end of GameViewController class, right below spawnShape()
//set a function that go through all the childNodes to the rootNode, if the potition is out of the screen, then remove it from the parentNode.
func cleanScene() {
  for node in scnScene.rootNode.childNodes {
    if node.presentationNode.position.y < -2 {
      node.removeFromParentNode()
    }
  }
}
then add cleanScene to the renderer(_: updatedAtTime: )
Be aware that if there's nothing on the scree to show, the Scene Kit will enter "paused" state. To prevent this, we have to enable the playing property, by adding code to setupView(), sothat it will be a endless game.
scnView.playing = true
Adding Touch Handling
What we do to a touch event?
1. get touch location
2. convert to view coordinate
3. fire a ray for a hit test(all the things in the normal direction)
here we check if the user touch a node that was labeled "Good"
//this part is in spawnShape()
//label the node according to color
if color == UIColor.blackColor() {
  geometryNode.name = "BAD"
} else {
  geometryNode.name = "GOOD"
}

//this part is following to GameViewController, right below handleTouchFor(_:)
//how the score change according to BAD and GOOD node
func handleTouchFor(node: SCNNode) {
  if node.name == "GOOD" {
    game.score += 1
    node.removeFromParentNode()
  } else if node.name == "BAD" {
    game.lives -= 1
    node.removeFromParentNode()
  }
}

//thispard is following to GameViewController, right below handleTouchFor(_")
//capture the touch and do hit test
override func touchesBegan(touches: Set<UITouch>, withEvent event: UIEvent?) {
    let touch = touches.first!
    let location = touch.locationInView(scnView)//catch first touch and transform the location to scnView coordinate
    let hitResults = scnView.hitTest(location, options: nil)
    if hitResults.count > 0 {
        let result = hitResults.first!
        handleTouchFor(result.node)
  }//do hitTest and return the first hit
}
