2015年9月10日,蘋果在新品發(fā)布會上宣布了3D-Touch功能着降。這是一種立體觸控技術,屏幕可感應不同的感壓力度觸控,很明顯這種技術給APP的交互又增添了樣式棠绘。Hann作為一名iOS開發(fā)者自然對這種新技術感到好奇,經過一番的資料搜集與學習再扭,成功的將這種功能添加到正在開發(fā)的APP中氧苍。將3DTouch有關的知識點記錄下來以供自己查閱,也給有需求的開發(fā)人員提供一些參考泛范。
3DTouch的使用
開發(fā)者應該關注哪幾部分让虐?
- 外部啟動標簽(Home Screen Quick Actions)
- peek、pop以及action的使用
外部啟動標簽(Home Screen Quick Actions)
外部啟動標簽給快速使用APP的某些特定功能提供了便利罢荡,按壓具有3DTouch功能的APP圖標可以激活標簽赡突。外部標簽的添加上分為兩種:靜態(tài)添加標簽、動態(tài)添加標簽区赵。靜態(tài)標簽是直接在項目的info.plist配置惭缰,動態(tài)標簽需要在AppDelegate啟動入口進行添加。下面是兩種方式的添加笼才,以及添加所涉及到的類漱受、類型介紹。
靜態(tài)標簽
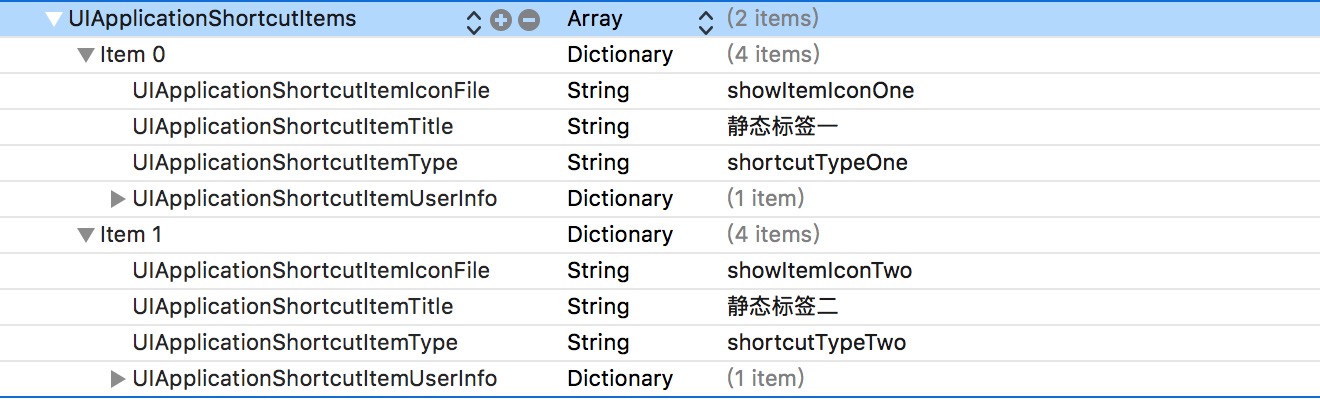
上圖所示為靜態(tài)標簽在info.plist中的配置內容骡送,即在plist中添加Array類型的UIApplicationShortcutItems以及字典類型的標簽實體昂羡,下面對這些key和value進行介紹:
// info.plist

UIApplicationShortcutItems[{

UIApplicationShortcutItemIconFile:圖標名,(如果使用系統(tǒng)圖標key為UIApplicationShortcutItemIconType)

UIApplicationShortcutItemTitle:標簽名稱摔踱,(必須設置)

UIApplicationShortcutItemSubtitle:子標簽名稱虐先,

UIApplicationShortcutItemType:標簽的ID,(必須設置)

{UIApplicationShortcutItemUserInfo[{key:value}...](附加信息)

}...]
動態(tài)標簽
在添加動態(tài)標簽之前我們先來了解幾個相關的類:
UIApplicationShortcutIcon標簽圖標類
@interface UIApplicationShortcutIcon : NSObject <NSCopying>

// 使用系統(tǒng)icon時用這個API創(chuàng)建UIApplicationShortcutIcon對象.
+ (instancetype)iconWithType:(UIApplicationShortcutIconType)type;

// 使用提供的圖片自定義UIApplicationShortcutIcon對象昌渤,templateImageName為圖片名.
+ (instancetype)iconWithTemplateImageName:(NSString *)templateImageName;
@end
UIApplicationShortcutItem標簽類
@interface UIApplicationShortcutItem : NSObject <NSCopying, NSMutableCopying>
/**
  * type: 標簽ID
  * localizedTitle: 標簽名稱
  * localizedSubtitle: 子標題名稱
  * icon: 標簽圖標對象
  * userInfo: 附加信息
  */
- (instancetype)initWithType:(NSString *)type localizedTitle:(NSString *)localizedTitle localizedSubtitle:(nullable NSString *)localizedSubtitle icon:(nullable UIApplicationShortcutIcon *)icon userInfo:(nullable NSDictionary *)userInfo;

// 圖標對象
@property (nullable, nonatomic, copy, readonly) UIApplicationShortcutIcon *icon;

// 對應靜態(tài)標簽的UIApplicationShortcutItemUserInfo.
@property (nullable, nonatomic, copy, readonly) NSDictionary<NSString *, id <NSSecureCoding>> *userInfo;
@end
在了解這兩個類后我們來看看動態(tài)添加標簽的代碼:
// AppDelegate.m
// - (BOOL)application:didFinishLaunchingWithOptions:
// 動態(tài)添加快捷啟動
    UIApplicationShortcutIcon *iconThree = [UIApplicationShortcutIcon iconWithTemplateImageName:@"showItemIconThree"];
    UIApplicationShortcutItem *itemThree = [[UIApplicationShortcutItem alloc] initWithType:@"shortcutTypeThree" localizedTitle:@"動態(tài)標簽" localizedSubtitle:nil icon:iconThree userInfo:nil];
    [[UIApplication sharedApplication] setShortcutItems:@[itemThree]];
現在你可以使用靜態(tài)赴穗、動態(tài)以及混合方式創(chuàng)建快捷啟動標簽,注意啟動標簽最多可以有4個膀息。下面就是我們創(chuàng)建的三個標簽:

標簽的點擊事件交互
// AppDelegate.m
- (void)application:(UIApplication *)application performActionForShortcutItem:(UIApplicationShortcutItem *)shortcutItem completionHandler:(void (^)(BOOL))completionHandler {

    UINavigationController *nav = (UINavigationController *)self.window.rootViewController;
    BSDetailViewController *detailVC = [[BSDetailViewController alloc] init];

    if ([shortcutItem.type isEqualToString:@"shortcutTypeOne"]) {
        detailVC.navTitle = @"靜態(tài)標簽一";

    } else if ([shortcutItem.type isEqualToString:@"shortcutTypeTwo"]) {
        detailVC.navTitle = @"靜態(tài)標簽二";

    } else if ([shortcutItem.type isEqualToString:@"shortcutTypeThree"]) {
        detailVC.navTitle = @"動態(tài)標簽";

    }

    [nav pushViewController:detailVC animated:YES];
}
到此外部啟動標簽的創(chuàng)建以及處理事件都已經介紹完了般眉,如果看文章比較枯燥請配合demo源碼進行查看.
peek、pop & action
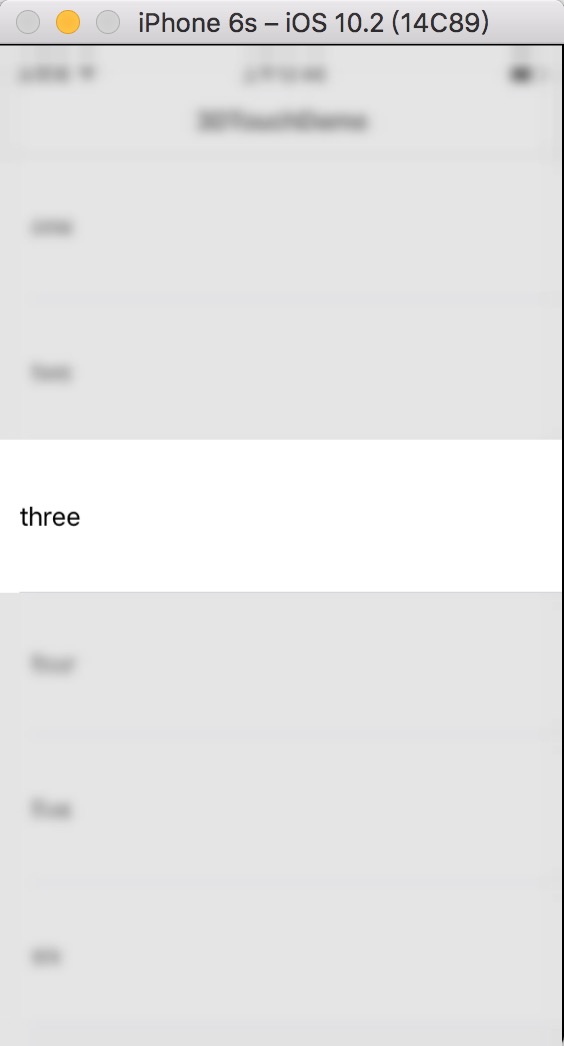
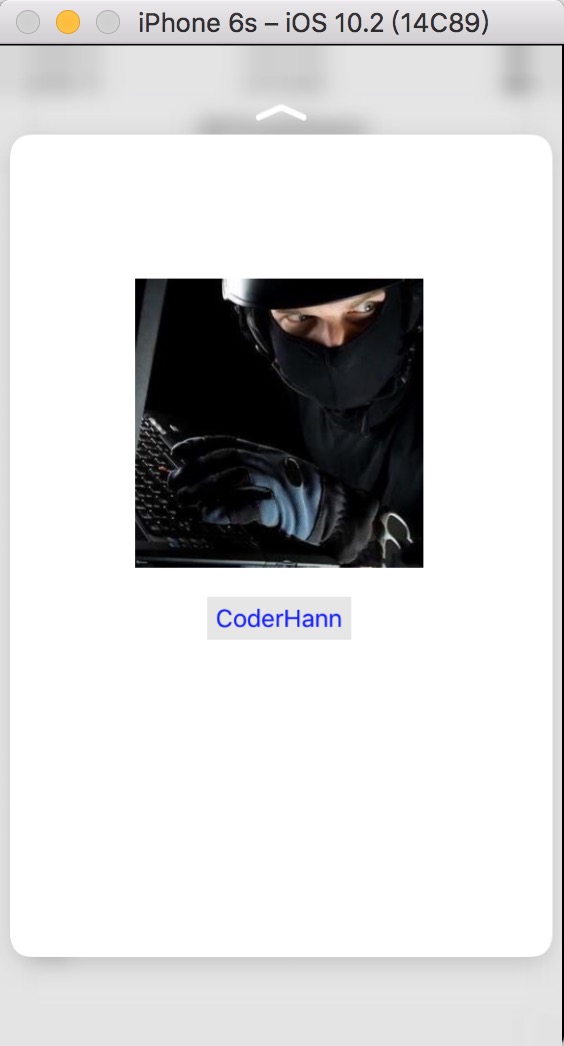
在設置了具有peek潜支、pop的頁面跟用戶交互的時候主要有三個階段:①輕按:提示用戶這個有預覽功能甸赃,即被選中的空間會凸顯出來周圍變得模糊。②加大力度:進入peek預覽模式冗酿,如果設置了該預覽模式下的一些操作可以向上滑動顯示actions埠对。③更大力度:激活pop络断,該階段一般是跳到指定的控制器。
輕按狀態(tài):
peek預覽:
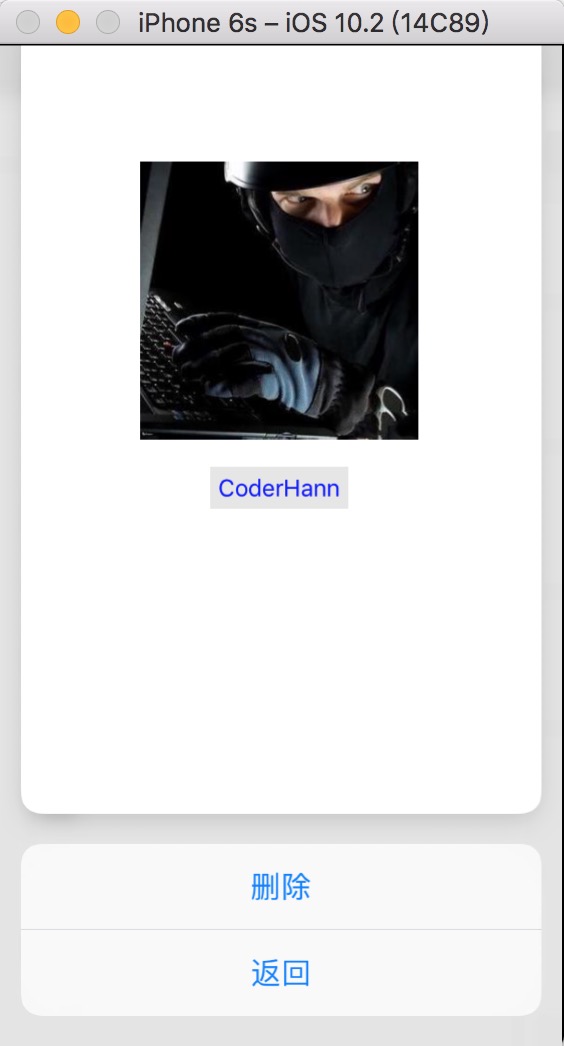
actions:
pop激活:
要達到上述效果项玛,在開發(fā)中都需要做什么呢斤彼?下面一步一步揭曉!
peek & pop
首先我們將能觸發(fā)peek盆顾、pop功能的控制器遵守UIViewControllerPreviewingDelegate協(xié)議
// BSTableViewController.m
@interface BSTableViewController()<UIViewControllerPreviewingDelegate,BSDetailViewControllerDelegate>
@end
然后注冊該控制器作為peek和pop預覽的代理以及提供預覽視圖容器
// BSTableViewController.m
// 重要
[self registerForPreviewingWithDelegate:self sourceView:self.view];
實現代理方法:
// BSTableViewController.m
// UIViewControllerPreviewingDelegate
- (UIViewController *)previewingContext:(id<UIViewControllerPreviewing>)previewingContext viewControllerForLocation:(CGPoint)location {
    self.selectedCell = [self searchCellWithPoint:location];
    previewingContext.sourceRect = self.selectedCell.frame;

    NSLog(@"peek");
    BSDetailViewController *detailVC = [[BSDetailViewController alloc] init];
    detailVC.delegate = self;
    detailVC.navTitle = self.selectedCell.textLabel.text;
    return detailVC;
}

- (void)previewingContext:(id<UIViewControllerPreviewing>)previewingContext commitViewController:(UIViewController *)viewControllerToCommit {
    NSLog(@"pop");
    [self tableView:self.tableView didSelectRowAtIndexPath:[self.tableView indexPathForCell:self.selectedCell]];
}
actions
上面的一步操作使我們的主界面BSTableViewController有了輕按跪腹、peek以及pop的功能,還有個是action开伏,這個action不屬于主界面而是詳情界面BSDetailViewController的事件,在demo里面膀跌,詳情將事件代理了主界面去處理事情。
BSDetailViewController生成事件方法:
// BSDetailViewController.m
- (NSArray<id<UIPreviewActionItem>> *)previewActionItems {
    //
    UIPreviewAction *action1 = [UIPreviewAction actionWithTitle:@"刪除" style:UIPreviewActionStyleDefault handler:^(UIPreviewAction * _Nonnull action, UIViewController * _Nonnull previewViewController) {
        if ([self.delegate respondsToSelector:@selector(detailViewController:DidSelectedDeleteItem:)]) {
            [self.delegate detailViewController:self DidSelectedDeleteItem:self.navTitle];
        }
    }];
    //
    UIPreviewAction *action2 = [UIPreviewAction actionWithTitle:@"返回" style:UIPreviewActionStyleDefault handler:^(UIPreviewAction * _Nonnull action, UIViewController * _Nonnull previewViewController) {
        if ([self.delegate respondsToSelector:@selector(detailViewControllerDidSelectedBackItem:)]) {
            [self.delegate detailViewControllerDidSelectedBackItem:self];
        }
    }];

    NSArray *actions = @[action1,action2];

    return actions;
}
好了固灵,上面將peek捅伤、pop以及action也介紹完了,看到這你應該對3DTouch的使用有了一定的認識巫玻,還想更深入的學習有關3Dtouch請查看官方文檔丛忆,想看本博客demo源碼的點擊我CoderHann進行查看。
