作者:王芃 wpcfan@gmail.com
第一節(jié):初識(shí)Angular-CLI
第二節(jié):登錄組件的構(gòu)建
第三節(jié):建立一個(gè)待辦事項(xiàng)應(yīng)用
第四節(jié):進(jìn)化攒磨!模塊化你的應(yīng)用
第五節(jié):多用戶版本的待辦事項(xiàng)應(yīng)用
第六節(jié):使用第三方樣式庫及模塊優(yōu)化用
第七節(jié):給組件帶來活力
Rx--隱藏在Angular 2.x中利劍
Redux你的Angular 2應(yīng)用
第八節(jié):查缺補(bǔ)漏大合集(上)
第九節(jié):查缺補(bǔ)漏大合集(下)
第三節(jié):建立一個(gè)待辦事項(xiàng)應(yīng)用
這一章我們會(huì)建立一個(gè)更復(fù)雜的待辦事項(xiàng)應(yīng)用造挽,當(dāng)然我們的登錄功能也還保留十偶,這樣的話我們的應(yīng)用就有了多個(gè)相對(duì)獨(dú)立的功能模塊蚂会。以往的web應(yīng)用根據(jù)不同的功能跳轉(zhuǎn)到不同的功能頁面。但目前前端的趨勢(shì)是開發(fā)一個(gè)SPA(Single Page Application 單頁應(yīng)用)作岖,所以其實(shí)我們應(yīng)該把這種跳轉(zhuǎn)叫視圖切換:根據(jù)不同的路徑顯示不同的組件唆垃。那我們?cè)趺刺幚磉@種視圖切換呢?幸運(yùn)的是鳍咱,我們無需尋找第三方組件降盹,Angular官方內(nèi)建了自己的路由模塊。
建立routing的步驟
由于我們要以路由形式顯示組件谤辜,建立路由前蓄坏,讓我們先把src\app\app.component.html中的<app-login></app-login>刪掉。
- 第一步:在
src/index.html中指定基準(zhǔn)路徑丑念,即在<head>中加入<base href="/">涡戳,這個(gè)是指向你的index.html所在的路徑,瀏覽器也會(huì)根據(jù)這個(gè)路徑下載css脯倚,圖像和js文件渔彰,所以請(qǐng)將這個(gè)語句放在 head 的最頂端。 - 第二步:在
src/app/app.module.ts中引入RouterModule:import { RouterModule } from '@angular/router'; - 第三步:定義和配置路由數(shù)組推正,我們暫時(shí)只為login來定義路由恍涂,仍然在
src/app/app.module.ts中的imports中
  imports: [
    BrowserModule,
    FormsModule,
    HttpModule,
    RouterModule.forRoot([
      {
        path: 'login',
        component: LoginComponent
      }
    ])
  ],
注意到這個(gè)形式和其他的比如BrowserModule、FormModule和HTTPModule表現(xiàn)形式好像不太一樣植榕,這里解釋一下再沧,forRoot其實(shí)是一個(gè)靜態(tài)的工廠方法,它返回的仍然是Module尊残,下面的是Angular API文檔給出的RouterModule.forRoot的定義炒瘸。
forRoot(routes: Routes, config?: ExtraOptions) : ModuleWithProviders
為什么叫forRoot呢?因?yàn)檫@個(gè)路由定義是應(yīng)用在應(yīng)用根部的寝衫,你可能猜到了還有一個(gè)工廠方法叫forChild顷扩,后面我們會(huì)詳細(xì)講。接下來我們看一下forRoot接收的參數(shù)慰毅,參數(shù)看起來是一個(gè)數(shù)組隘截,每個(gè)數(shù)組元素是一個(gè){path: 'xxx', component: XXXComponent}這個(gè)樣子的對(duì)象。這個(gè)數(shù)組就叫做路由定義(RouteConfig)數(shù)組汹胃,每個(gè)數(shù)組元素就叫路由定義婶芭,目前我們只有一個(gè)路由定義。路由定義這個(gè)對(duì)象包括若干屬性:
- path:路由器會(huì)用它來匹配路由中指定的路徑和瀏覽器地址欄中的當(dāng)前路徑统台,如 /login 雕擂。
- component:導(dǎo)航到此路由時(shí)啡邑,路由器需要?jiǎng)?chuàng)建的組件贱勃,如
LoginComponent。 - redirectTo:重定向到某個(gè)path,使用場(chǎng)景的話贵扰,比如在用戶輸入不存在的路徑時(shí)重定向到首頁仇穗。
- pathMatch:路徑的字符匹配策略
- children:子路由數(shù)組
運(yùn)行一下,我們會(huì)發(fā)現(xiàn)出錯(cuò)了
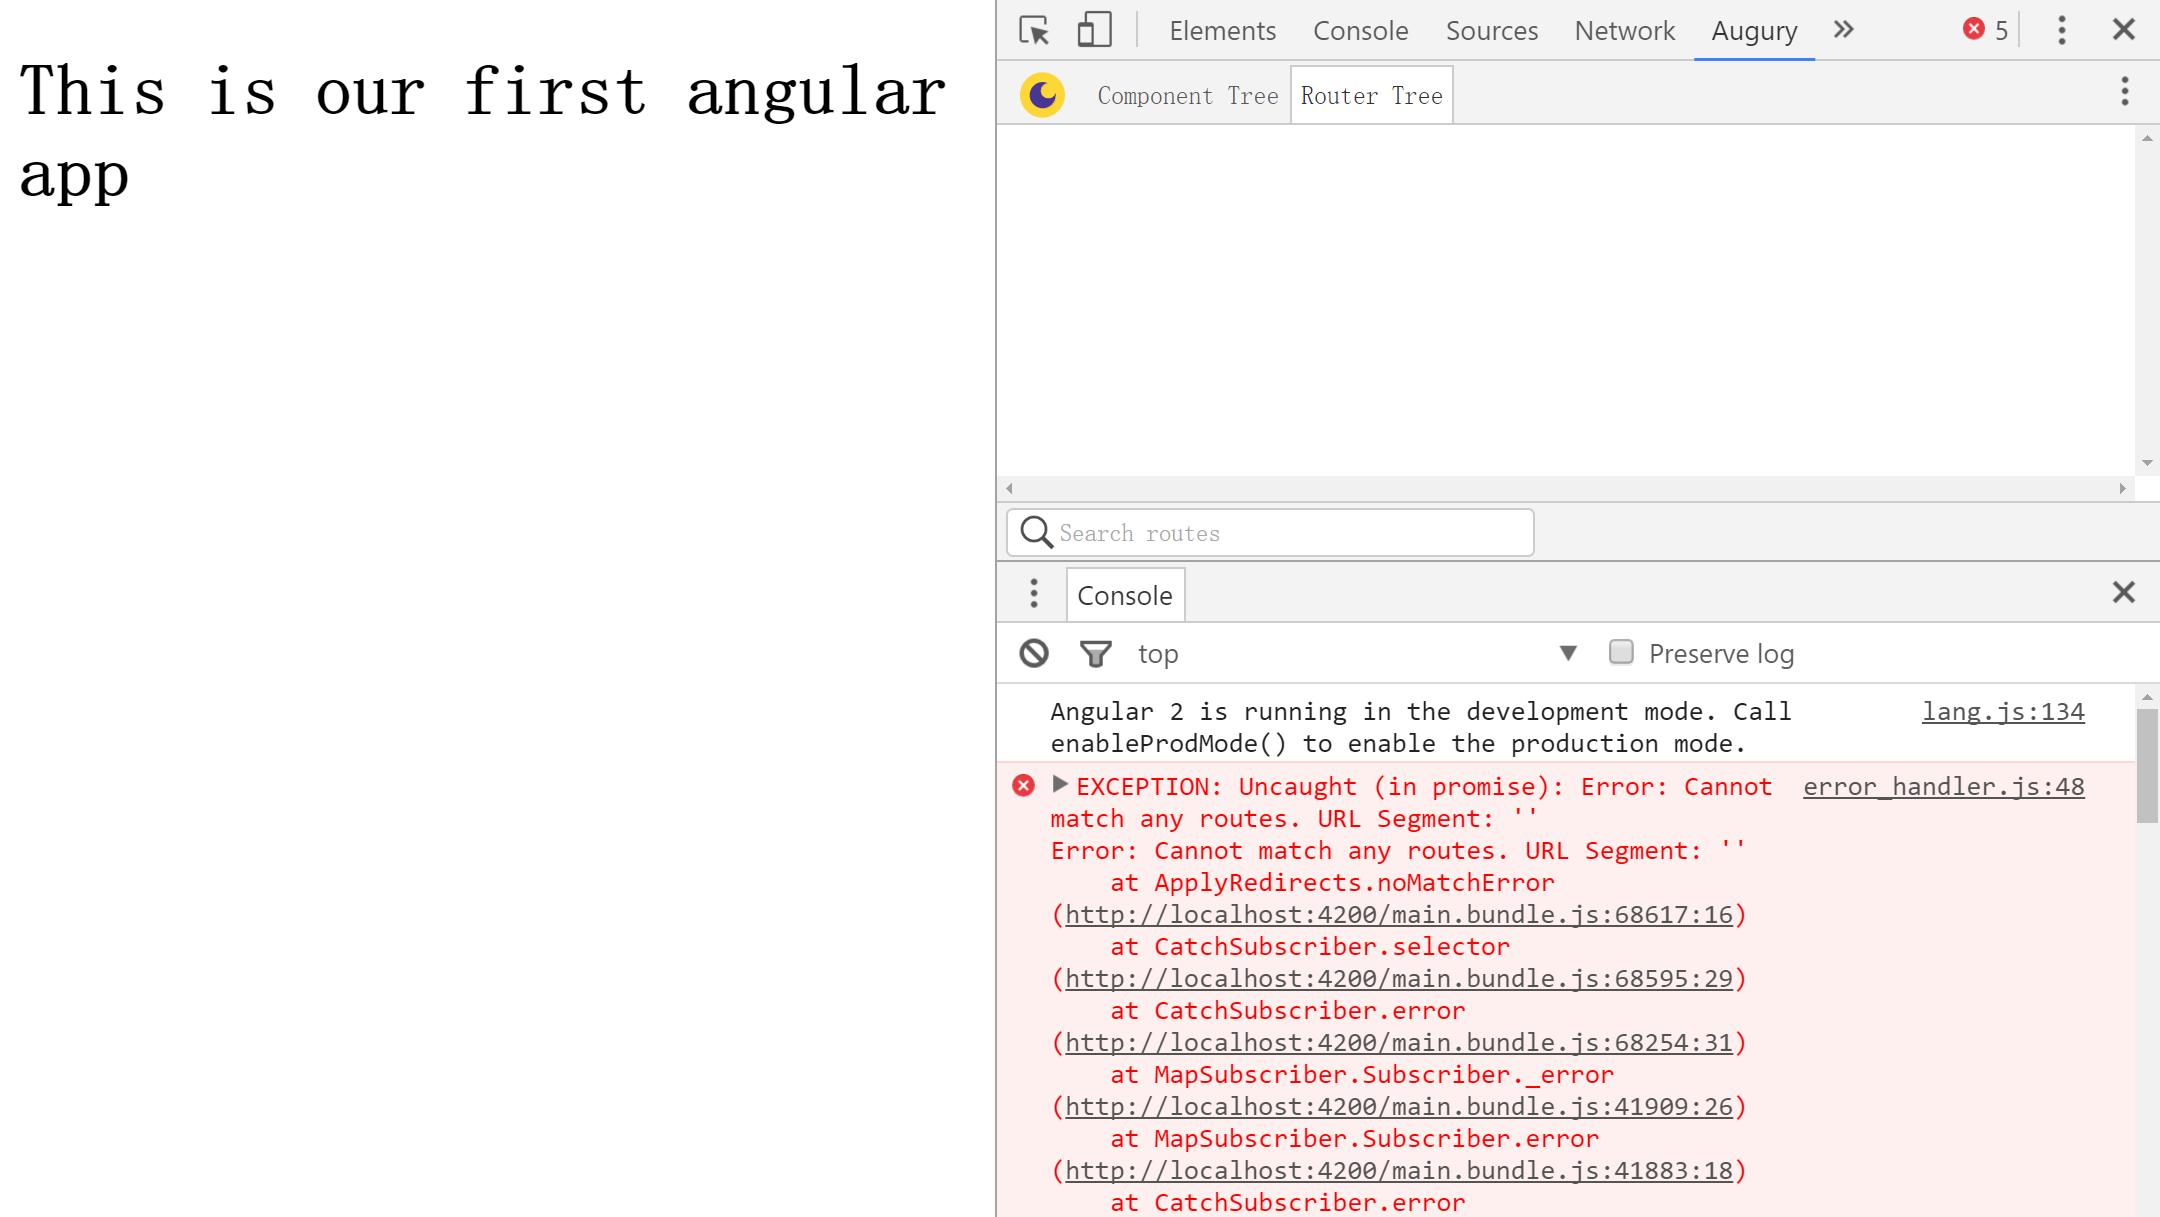 image_1b0hgdsiu87n1lha1kcahl51ckb9.png-233.2kB
這個(gè)錯(cuò)誤看上去應(yīng)該是對(duì)于''沒有找到匹配的route戚绕,這是由于我們只定義了一個(gè)'login'纹坐,我們?cè)僭囋囋跒g覽器地址欄輸入:http://localhost:4200/login。這次仍然出錯(cuò)舞丛,但錯(cuò)誤信息變成了下面的樣子耘子,意思是我們沒有找到一個(gè)outlet去加載LoginComponent。對(duì)的球切,這就引出了router outlet的概念谷誓,如果要顯示對(duì)應(yīng)路由的組件,我們需要一個(gè)插頭(outlet)來裝載組件吨凑。
error_handler.js:48EXCEPTION: Uncaught (in promise): Error: Cannot find primary outlet to load 'LoginComponent'
Error: Cannot find primary outlet to load 'LoginComponent'
    at getOutlet (http://localhost:4200/main.bundle.js:66161:19)
    at ActivateRoutes.activateRoutes (http://localhost:4200/main.bundle.js:66088:30)
    at http://localhost:4200/main.bundle.js:66052:19
    at Array.forEach (native)
    at ActivateRoutes.activateChildRoutes (http://localhost:4200/main.bundle.js:66051:29)
    at ActivateRoutes.activate (http://localhost:4200/main.bundle.js:66046:14)
    at http://localhost:4200/main.bundle.js:65787:56
    at SafeSubscriber._next (http://localhost:4200/main.bundle.js:9000:21)
    at SafeSubscriber.__tryOrSetError (http://localhost:4200/main.bundle.js:42013:16)
    at SafeSubscriber.next (http://localhost:4200/main.bundle.js:41955:27)
下面我們把<router-outlet></router-outlet>寫在src\app\app.component.html的末尾捍歪,地址欄輸入http://localhost:4200/login重新看看瀏覽器中的效果吧,我們的應(yīng)用應(yīng)該正常顯示了鸵钝。但如果輸入http://localhost:4200時(shí)仍然是有異常出現(xiàn)的糙臼,我們需要添加一個(gè)路由定義來處理。輸入http://localhost:4200時(shí)相對(duì)于根路徑的path應(yīng)該是空恩商,即''变逃。而我們這時(shí)希望將用戶仍然引導(dǎo)到登錄頁面,這就是redirectTo: 'login'的作用痕届。pathMatch: 'full'的意思是必須完全符合路徑的要求韧献,也就是說http://localhost:4200/1是不會(huì)匹配到這個(gè)規(guī)則的,必須嚴(yán)格是http://localhost:4200
    RouterModule.forRoot([
      {
        path: '',
        redirectTo: 'login',
        pathMatch: 'full'
      },
      {
        path: 'login',
        component: LoginComponent
      }
    ])
注意路徑配置的順序是非常重要的研叫,Angular2使用“先匹配優(yōu)先”的原則锤窑,也就是說如果一個(gè)路徑可以同時(shí)匹配幾個(gè)路徑配置的規(guī)則的話,以第一個(gè)匹配的規(guī)則為準(zhǔn)嚷炉。
但是現(xiàn)在還有一點(diǎn)小不爽渊啰,就是直接在app.modules.ts中定義路徑并不是很好的方式,因?yàn)殡S著路徑定義的復(fù)雜申屹,這部分最好還是用單獨(dú)的文件來定義』嬷ぃ現(xiàn)在我們新建一個(gè)文件src\app\app.routes.ts,將上面在app.modules.ts中定義的路徑刪除并在app.routes.ts中重新定義哗讥。
import { Routes, RouterModule } from '@angular/router';
import { LoginComponent } from './login/login.component';

export const routes: Routes = [
  {
    path: '',
    redirectTo: 'login',
    pathMatch: 'full'
  },
  {
    path: 'login',
    component: LoginComponent
  }
];

export const routing = RouterModule.forRoot(routes);
接下來我們?cè)?code>app.modules.ts中引入routing嚷那,import { routing } from './app.routes';,然后在imports數(shù)組里添加routing杆煞,現(xiàn)在我們的app.modules.ts看起來是下面這個(gè)樣子魏宽。
import { BrowserModule } from '@angular/platform-browser';
import { NgModule } from '@angular/core';
import { FormsModule } from '@angular/forms';
import { HttpModule } from '@angular/http';

import { AppComponent } from './app.component';
import { LoginComponent } from './login/login.component';
import { AuthService } from './core/auth.service';
import { routing } from './app.routes';

@NgModule({
  declarations: [
    AppComponent,
    LoginComponent
  ],
  imports: [
    BrowserModule,
    FormsModule,
    HttpModule,
    routing
  ],
  providers: [
    {provide: 'auth',  useClass: AuthService}
    ],
  bootstrap: [AppComponent]
})
export class AppModule { }
讓待辦事項(xiàng)變得有意義
現(xiàn)在我們來規(guī)劃一下根路徑''腐泻,對(duì)應(yīng)根路徑我們想建立一個(gè)todo組件,那么我們使用ng g c todo來生成組件队询,然后在app.routes.ts中加入路由定義派桩,對(duì)于根路徑我們不再需要重定向到登錄了,我們把它改寫成重定向到todo蚌斩。
export const routes: Routes = [
  {
    path: '',
    redirectTo: 'todo',
    pathMatch: 'full'
  },
  {
    path: 'todo',
    component: TodoComponent
  },
  {
    path: 'login',
    component: LoginComponent
  }
];
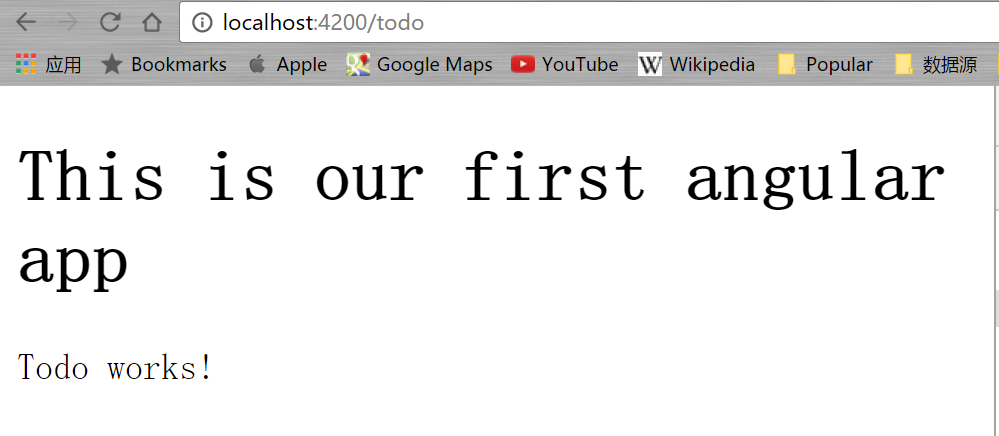
在瀏覽器中鍵入http://localhost:4200可以看到自動(dòng)跳轉(zhuǎn)到了todo路徑铆惑,并且我們的todo組件也顯示出來了。
我們希望的Todo頁面應(yīng)該有一個(gè)輸入待辦事項(xiàng)的輸入框和一個(gè)顯示待辦事項(xiàng)狀態(tài)的列表送膳。那么我們先來定義一下todo的結(jié)構(gòu)员魏,todo應(yīng)該有一個(gè)id用來唯一標(biāo)識(shí),還應(yīng)該有一個(gè)desc用來描述這個(gè)todo是干什么的叠聋,再有一個(gè)completed用來標(biāo)識(shí)是否已經(jīng)完成逆趋。好了,我們來建立這個(gè)todo模型吧晒奕,在todo文件夾下新建一個(gè)文件todo.model.ts
export class Todo {
  id: number;
  desc: string;
  completed: boolean;
}
然后我們應(yīng)該改造一下todo組件了闻书,引入剛剛建立好的todo對(duì)象,并且建立一個(gè)todos數(shù)組作為所有todo的集合脑慧,一個(gè)desc是當(dāng)前添加的新的todo的內(nèi)容魄眉。當(dāng)然我們還需要一個(gè)addTodo方法把新的todo加到todos數(shù)組中。這里我們暫且寫一個(gè)漏洞百出的版本闷袒。
import { Component, OnInit } from '@angular/core';
import { Todo } from './todo.model';

@Component({
  selector: 'app-todo',
  templateUrl: './todo.component.html',
  styleUrls: ['./todo.component.css']
})
export class TodoComponent implements OnInit {
  todos: Todo[] = [];
  desc = '';
  constructor() { }

  ngOnInit() {
  }

  addTodo(){
    this.todos.push({id: 1, desc: this.desc, completed: false});
    this.desc = '';
  }
}
然后我們改造一下src\app\todo\todo.component.html
<div>
  <input type="text" [(ngModel)]="desc" (keyup.enter)="addTodo()">
  <ul>
    <li *ngFor="let todo of todos">{{ todo.desc }}</li>
  </ul>
</div>
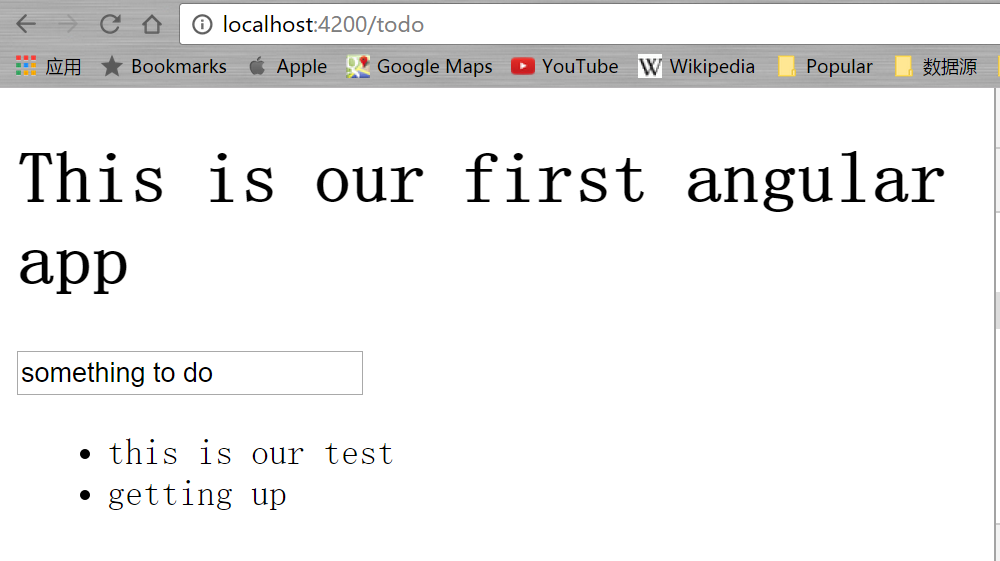
如上面代碼所示坑律,我們建立了一個(gè)文本輸入框,這個(gè)輸入框的值應(yīng)該是新todo的描述(desc)囊骤,我們想在用戶按了回車鍵后進(jìn)行添加操作((keyup.enter)="addTodo())晃择。由于todos是個(gè)數(shù)組,所以我們利用一個(gè)循環(huán)將數(shù)組內(nèi)容顯示出來(<li *ngFor="let todo of todos">{{ todo.desc }}</li>)也物。好了讓我們欣賞一下成果吧
如果我們還記得之前提到的業(yè)務(wù)邏輯應(yīng)該放在單獨(dú)的service中宫屠,我們還可以做的更好一些。在todo文件夾內(nèi)建立TodoService:ng g s todo\todo滑蚯。上面的例子中所有創(chuàng)建的todo都是id為1的浪蹂,這顯然是一個(gè)大bug,我們看一下怎么處理告材。常見的不重復(fù)id創(chuàng)建方式有兩種坤次,一個(gè)是搞一個(gè)自增長(zhǎng)數(shù)列,另一個(gè)是采用隨機(jī)生成一組不可能重復(fù)的字符序列斥赋,常見的就是UUID了缰猴。我們來引入一個(gè)uuid的包:npm i --save angular2-uuid,由于這個(gè)包中已經(jīng)含有了用于typescript的定義文件疤剑,這里就執(zhí)行這一個(gè)命令就足夠了滑绒。由于此時(shí)Todo對(duì)象的id已經(jīng)是字符型了胰舆,請(qǐng)更改其聲明為id: string;。
然后修改service成下面的樣子:
import { Injectable } from '@angular/core';
import {Todo} from './todo.model';
import { UUID } from 'angular2-uuid';

@Injectable()
export class TodoService {

  todos: Todo[] = [];

  constructor() { }

  addTodo(todoItem:string): Todo[] {
    let todo = {
      id: UUID.UUID(),
      desc: todoItem,
      completed: false
    };
    this.todos.push(todo);
    return this.todos;
  }
}
當(dāng)然我們還要把組件中的代碼改成使用service的
import { Component, OnInit } from '@angular/core';
import { Todo } from './todo.model';
import { TodoService } from './todo.service';

@Component({
  selector: 'app-todo',
  templateUrl: './todo.component.html',
  styleUrls: ['./todo.component.css'],
  providers:[TodoService]
})
export class TodoComponent implements OnInit {
  todos: Todo[] = [];
  desc = '';
  constructor(private service:TodoService) { }

  ngOnInit() {
  }

  addTodo(){
    this.todos = this.service.addTodo(this.desc);
    this.desc = '';
  }
}
為了可以清晰的看到我們的成果蹬挤,我們?yōu)閏hrome瀏覽器裝一個(gè)插件,在chrome的地址欄中輸入chrome://extensions棘幸,拉到最底部會(huì)看到一個(gè)“獲取更多擴(kuò)展程序”的鏈接焰扳,點(diǎn)擊這個(gè)鏈接然后搜索“Augury”,安裝即可误续。安裝好后吨悍,按F12調(diào)出開發(fā)者工具,里面出現(xiàn)一個(gè)叫“Augury”的tab蹋嵌。
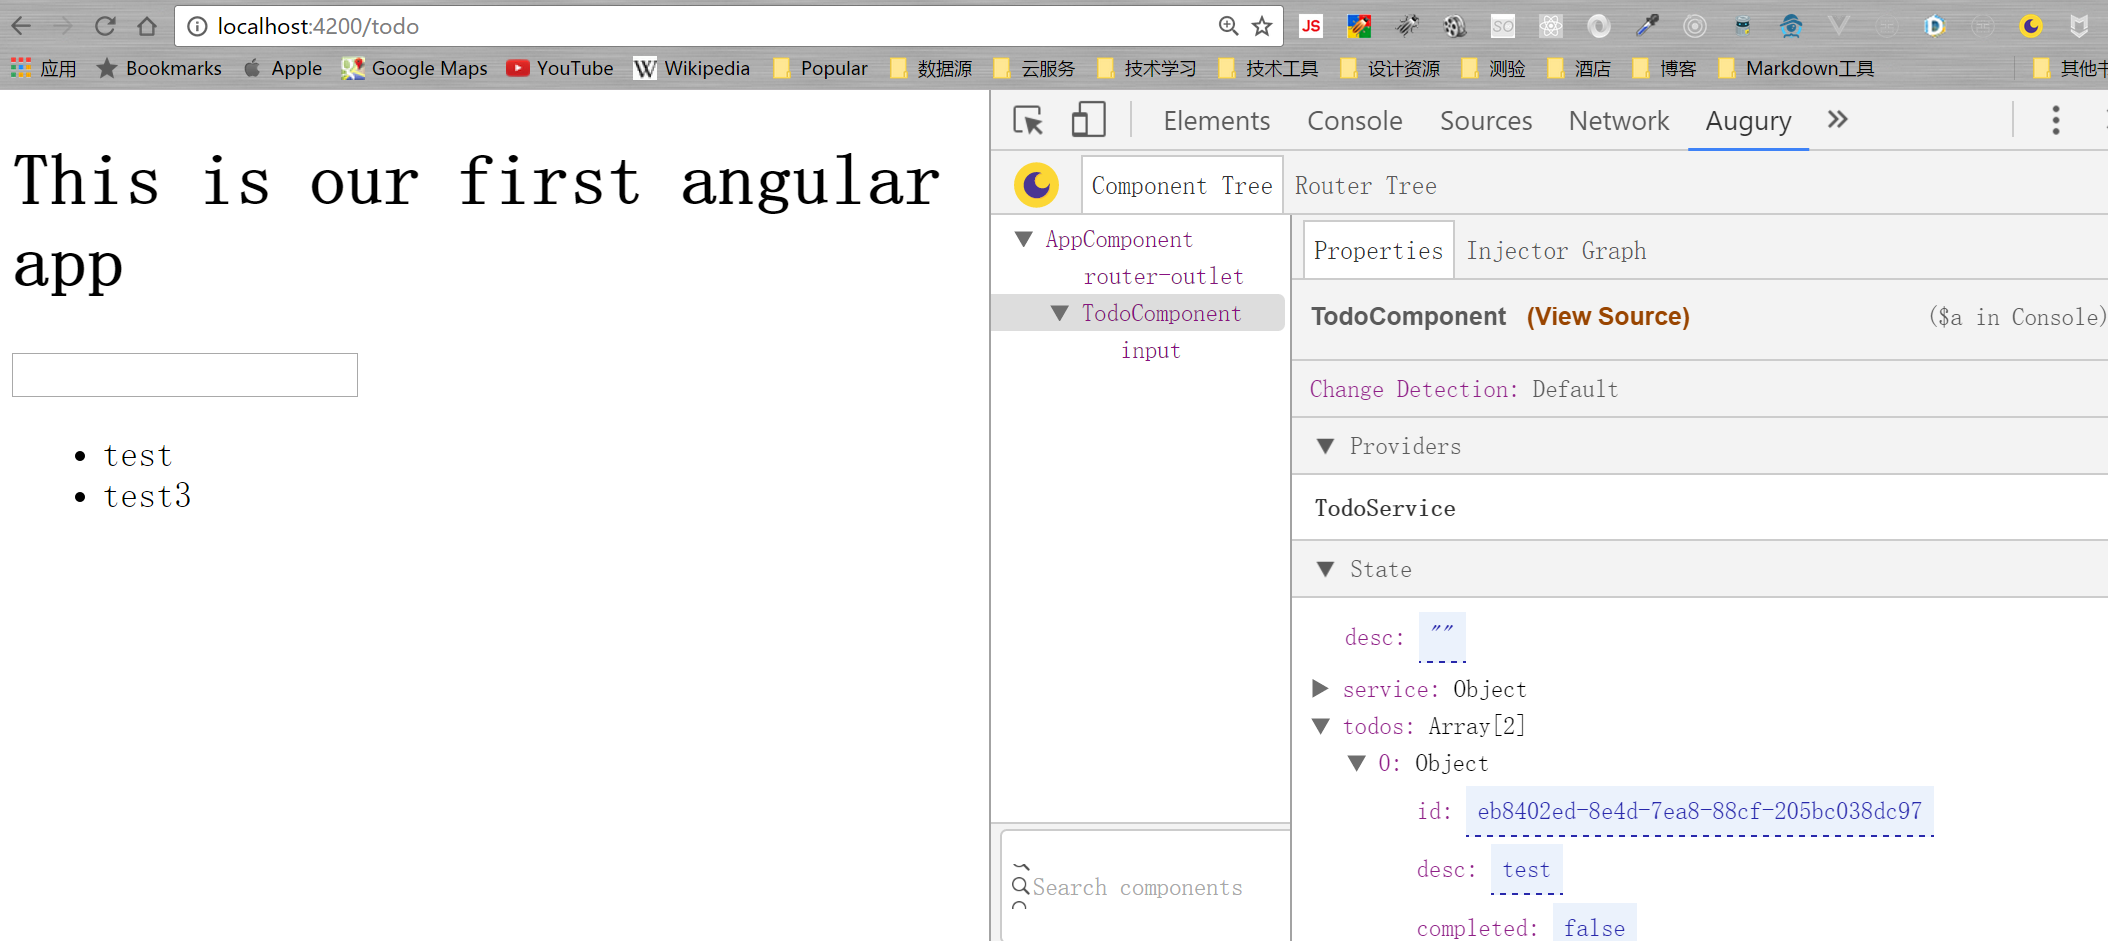
我們可以看到id這時(shí)候被設(shè)置成了一串字符育瓜,這個(gè)就是UUID了。
建立模擬web服務(wù)和異步操作
實(shí)際的開發(fā)中我們的service是要和服務(wù)器api進(jìn)行交互的栽烂,而不是現(xiàn)在這樣簡(jiǎn)單的操作數(shù)組躏仇。但問題來了,現(xiàn)在沒有web服務(wù)啊腺办,難道真要自己開發(fā)一個(gè)嗎焰手?答案是可以做個(gè)假的,假作真時(shí)真亦假怀喉。我們?cè)陂_發(fā)過程中經(jīng)常會(huì)遇到這類問題书妻,等待后端同學(xué)的進(jìn)度是很痛苦的。所以Angular內(nèi)建提供了一個(gè)可以快速建立測(cè)試用web服務(wù)的方法:內(nèi)存 (in-memory) 服務(wù)器躬拢。
一般來說躲履,你需要知道自己對(duì)服務(wù)器的期望是什么,期待它返回什么樣的數(shù)據(jù)聊闯,有了這個(gè)數(shù)據(jù)呢工猜,我們就可以自己快速的建立一個(gè)內(nèi)存服務(wù)器了。拿這個(gè)例子來看菱蔬,我們可能需要一個(gè)這樣的對(duì)象
class Todo {
  id: string;
  desc: string;
  completed: boolean;
}
對(duì)應(yīng)的JSON應(yīng)該是這樣的
{
  "data": [
    {
      "id": "f823b191-7799-438d-8d78-fcb1e468fc78",
      "desc": "blablabla",
      "completed": false
    },
    {
      "id": "c316a3bf-b053-71f9-18a3-0073c7ee3b76",
      "desc": "tetssts",
      "completed": false
    },
    {
      "id": "dd65a7c0-e24f-6c66-862e-0999ea504ca0",
      "desc": "getting up",
      "completed": false
    }
  ]
}
首先我們需要安裝angular-in-memory-web-api域慷,輸入npm install --save angular-in-memory-web-api
然后在Todo文件夾下創(chuàng)建一個(gè)文件src\app\todo\todo-data.ts
import { InMemoryDbService } from 'angular-in-memory-web-api';
import { Todo } from './todo.model';

export class InMemoryTodoDbService implements InMemoryDbService {
  createDb() {
    let todos: Todo[] = [
      {id: "f823b191-7799-438d-8d78-fcb1e468fc78", desc: 'Getting up', completed: true},
      {id: "c316a3bf-b053-71f9-18a3-0073c7ee3b76", desc: 'Go to school', completed: false}
    ];
    return {todos};
  }
}
可以看到,我們創(chuàng)建了一個(gè)實(shí)現(xiàn)InMemoryDbService的內(nèi)存數(shù)據(jù)庫汗销,這個(gè)數(shù)據(jù)庫其實(shí)也就是把數(shù)組傳入進(jìn)去犹褒。接下來我們要更改src\app\app.module.ts,加入類引用和對(duì)應(yīng)的模塊聲明:
import { InMemoryWebApiModule } from 'angular-in-memory-web-api';
import { InMemoryTodoDbService } from './todo/todo-data';
然后在imports數(shù)組中緊挨著HttpModule加上InMemoryWebApiModule.forRoot(InMemoryTodoDbService),弛针。
現(xiàn)在我們?cè)趕ervice中試著調(diào)用我們的“假web服務(wù)”吧
import { Injectable } from '@angular/core';
import { Http, Headers } from '@angular/http';
import { UUID } from 'angular2-uuid';

import 'rxjs/add/operator/toPromise';

import { Todo } from './todo.model';

@Injectable()
export class TodoService {

  //定義你的假WebAPI地址叠骑,這個(gè)定義成什么都無所謂
  //只要確保是無法訪問的地址就好
  private api_url = 'api/todos';
  private headers = new Headers({'Content-Type': 'application/json'});

  constructor(private http: Http) { }

  // POST /todos
  addTodo(desc:string): Promise<Todo> {
    let todo = {
      id: UUID.UUID(),
      desc: desc,
      completed: false
    };
    return this.http
            .post(this.api_url, JSON.stringify(todo), {headers: this.headers})
            .toPromise()
            .then(res => res.json().data as Todo)
            .catch(this.handleError);
  }

  private handleError(error: any): Promise<any> {
    console.error('An error occurred', error);
    return Promise.reject(error.message || error);
  }
}
上面的代碼我們看到定義了一個(gè)api_url = 'api/todos',你可能會(huì)問這個(gè)是怎么來的削茁?分兩部分看宙枷,api/todos中前面的api定義成什么都可以掉房,但后面這個(gè)todos是有講究的,我們回去看一下src\app\todo\todo-data.ts返回的return {todos}慰丛,這個(gè)其實(shí)是return {todos: todos}的省略表示形式卓囚,如果我們不想讓這個(gè)后半部分是todos,我們可以寫成{nahnahnah: todos}诅病。這樣的話我們改寫成api_url = 'blablabla/nahnahnah'也無所謂哪亿,因?yàn)檫@個(gè)內(nèi)存Web服務(wù)的機(jī)理是攔截Web訪問,也就是說隨便什么地址都可以贤笆,內(nèi)存Web服務(wù)會(huì)攔截這個(gè)地址并解析你的請(qǐng)求是否滿足RESTful API的要求
簡(jiǎn)單來說RESTful API中GET請(qǐng)求用于查詢蝇棉,PUT用于更新,DELETE用于刪除芥永,POST用于添加篡殷。比如如果url是api/todos,那么
- 查詢所有待辦事項(xiàng):以GET方法訪問
api/todos - 查詢單個(gè)待辦事項(xiàng):以GET方法訪問
api/todos/id埋涧,比如id是1板辽,那么訪問api/todos/1 - 更新某個(gè)待辦事項(xiàng):以PUT方法訪問
api/todos/id - 刪除某個(gè)待辦事項(xiàng):以DELETE方法訪問
api/todos/id - 增加一個(gè)待辦事項(xiàng):以POST方法訪問
api/todos
在service的構(gòu)造函數(shù)中我們注入了Http,而angular的Http封裝了大部分我們需要的方法棘催,比如例子中的增加一個(gè)todo戳气,我們就調(diào)用this.http.post(url, body, options),上面代碼中的.post(this.api_url, JSON.stringify(todo), {headers: this.headers})含義是:構(gòu)造一個(gè)POST類型的HTTP請(qǐng)求巧鸭,其訪問的url是this.api_url瓶您,request的body是一個(gè)JSON(把todo對(duì)象轉(zhuǎn)換成JSON),在參數(shù)配置中我們配置了request的header纲仍。
這個(gè)請(qǐng)求發(fā)出后返回的是一個(gè)Observable(可觀察對(duì)象)呀袱,我們把它轉(zhuǎn)換成Promise然后處理res(Http Response)。Promise提供異步的處理郑叠,注意到then中的寫法夜赵,這個(gè)和我們傳統(tǒng)編程寫法不大一樣,叫做lambda表達(dá)式乡革,相當(dāng)于是一個(gè)匿名函數(shù)寇僧,(input parameters) => expression,=>前面的是函數(shù)的參數(shù)沸版,后面的是函數(shù)體嘁傀。
還要一點(diǎn)需要強(qiáng)調(diào)的是:在用內(nèi)存Web服務(wù)時(shí),一定要注意res.json().data中的data屬性必須要有视粮,因?yàn)閮?nèi)存web服務(wù)坑爹的在返回的json中加了data對(duì)象细办,你真正要得到的json是在這個(gè)data里面。
下一步我們來更改Todo組件的addTodo方法以便可以使用我們新的異步http方法
  addTodo(){
    this.service
      .addTodo(this.desc)
      .then(todo => {
        this.todos = [...this.todos, todo];
        this.desc = '';
      });
  }
這里面的前半部分應(yīng)該還是好理解的:this.service.addTodo(this.desc)是調(diào)用service的對(duì)應(yīng)方法而已蕾殴,但后半部分是什么鬼笑撞?...這個(gè)貌似省略號(hào)的東東是ES7中計(jì)劃提供的Object Spread操作符岛啸,它的功能是將對(duì)象或數(shù)組“打散,拍平”茴肥。這么說可能還是不懂坚踩,舉例子吧:
let arr = [1,2,3];
let arr2 = [...arr];
arr2.push(4);

// arr2 變成了 [1,2,3,4]
// arr 保存原來的樣子

let arr3 = [0, 1, 2];
let arr4 = [3, 4, 5];
arr3.push(...arr4);
// arr3變成了[0, 1, 2, 3, 4, 5]

let arr5 = [0, 1, 2];
let arr6 = [-1, ...arr5, 3];
// arr6 變成了[-1, 0, 1, 2, 3]
所以呢我們上面的this.todos = [...this.todos, todo];相當(dāng)于為todos增加一個(gè)新元素,和push很像瓤狐,那為什么不用push呢瞬铸?因?yàn)檫@樣構(gòu)造出來的對(duì)象是全新的,而不是引用的芬首,在現(xiàn)代編程中一個(gè)明顯的趨勢(shì)是不要在過程中改變輸入的參數(shù)。第二個(gè)原因是這樣做會(huì)帶給我們極大的便利性和編程的一致性逼裆。下面通過給我們的例子添加幾個(gè)功能郁稍,我們來一起體會(huì)一下。
首先更改src\app\todo\todo.service.ts
//src\app\todo\todo.service.ts
import { Injectable } from '@angular/core';
import { Http, Headers } from '@angular/http';
import { UUID } from 'angular2-uuid';

import 'rxjs/add/operator/toPromise';

import { Todo } from './todo.model';

@Injectable()
export class TodoService {

  private api_url = 'api/todos';
  private headers = new Headers({'Content-Type': 'application/json'});
  constructor(private http: Http) { }
  // POST /todos
  addTodo(desc:string): Promise<Todo> {
    let todo = {
      id: UUID.UUID(),
      desc: desc,
      completed: false
    };
    return this.http
            .post(this.api_url, JSON.stringify(todo), {headers: this.headers})
            .toPromise()
            .then(res => res.json().data as Todo)
            .catch(this.handleError);
  }
  // PUT /todos/:id
  toggleTodo(todo: Todo): Promise<Todo> {
    const url = `${this.api_url}/${todo.id}`;
    console.log(url);
    let updatedTodo = Object.assign({}, todo, {completed: !todo.completed});
    return this.http
            .put(url, JSON.stringify(updatedTodo), {headers: this.headers})
            .toPromise()
            .then(() => updatedTodo)
            .catch(this.handleError);
  }
  // DELETE /todos/:id
  deleteTodoById(id: string): Promise<void> {
    const url = `${this.api_url}/${id}`;
    return this.http
            .delete(url, {headers: this.headers})
            .toPromise()
            .then(() => null)
            .catch(this.handleError);
  }
  // GET /todos
  getTodos(): Promise<Todo[]>{
    return this.http.get(this.api_url)
              .toPromise()
              .then(res => res.json().data as Todo[])
              .catch(this.handleError);
  }
  private handleError(error: any): Promise<any> {
    console.error('An error occurred', error);
    return Promise.reject(error.message || error);
  }
}
然后更新src\app\todo\todo.component.ts
import { Component, OnInit } from '@angular/core';
import { TodoService } from './todo.service';
import { Todo } from './todo.model';

@Component({
  selector: 'app-todo',
  templateUrl: './todo.component.html',
  styleUrls: ['./todo.component.css'],
  providers: [TodoService]
})
export class TodoComponent implements OnInit {
  todos : Todo[] = [];
  desc: string = '';

  constructor(private service: TodoService) {}
  ngOnInit() {
    this.getTodos();
  }
  addTodo(){
    this.service
      .addTodo(this.desc)
      .then(todo => {
        this.todos = [...this.todos, todo];
        this.desc = '';
      });
  }
  toggleTodo(todo: Todo) {
    const i = this.todos.indexOf(todo);
    this.service
      .toggleTodo(todo)
      .then(t => {
        this.todos = [
          ...this.todos.slice(0,i),
          t,
          ...this.todos.slice(i+1)
          ];
      });
  }
  removeTodo(todo: Todo) {
    const i = this.todos.indexOf(todo);
    this.service
      .deleteTodoById(todo.id)
      .then(()=> {
        this.todos = [
          ...this.todos.slice(0,i),
          ...this.todos.slice(i+1)
        ];
      });
  }
  getTodos(): void {
    this.service
      .getTodos()
      .then(todos => this.todos = [...todos]);
  }
}
更新模板文件src\app\todo\todo.component.html
<section class="todoapp">
  <header class="header">
    <h1>Todos</h1>
    <input class="new-todo" placeholder="What needs to be done?" autofocus="" [(ngModel)]="desc" (keyup.enter)="addTodo()">
  </header>
  <section class="main" *ngIf="todos?.length > 0">
    <input class="toggle-all" type="checkbox">
    <ul class="todo-list">
      <li *ngFor="let todo of todos" [class.completed]="todo.completed">
        <div class="view">
          <input class="toggle" type="checkbox" (click)="toggleTodo(todo)" [checked]="todo.completed">
          <label (click)="toggleTodo(todo)">{{todo.desc}}</label>
          <button class="destroy" (click)="removeTodo(todo); $event.stopPropagation()"></button>
        </div>
      </li>
    </ul>
  </section>
  <footer class="footer" *ngIf="todos?.length > 0">
    <span class="todo-count">
      <strong>{{todos?.length}}</strong> {{todos?.length == 1 ? 'item' : 'items'}} left
    </span>
    <ul class="filters">
      <li><a href="">All</a></li>
      <li><a href="">Active</a></li>
      <li><a href="">Completed</a></li>
    </ul>
    <button class="clear-completed">Clear completed</button>
  </footer>
</section>
更新組件的css樣式:src\app\todo\todo.component.css
.todoapp {
    background: #fff;
    margin: 130px 0 40px 0;
    position: relative;
    box-shadow: 0 2px 4px 0 rgba(0, 0, 0, 0.2),
                0 25px 50px 0 rgba(0, 0, 0, 0.1);
}
.todoapp input::-webkit-input-placeholder {
    font-style: italic;
    font-weight: 300;
    color: #e6e6e6;
}
.todoapp input::-moz-placeholder {
    font-style: italic;
    font-weight: 300;
    color: #e6e6e6;
}
.todoapp input::input-placeholder {
    font-style: italic;
    font-weight: 300;
    color: #e6e6e6;
}
.todoapp h1 {
    position: absolute;
    top: -155px;
    width: 100%;
    font-size: 100px;
    font-weight: 100;
    text-align: center;
    color: rgba(175, 47, 47, 0.15);
    -webkit-text-rendering: optimizeLegibility;
    -moz-text-rendering: optimizeLegibility;
    text-rendering: optimizeLegibility;
}
.new-todo,
.edit {
    position: relative;
    margin: 0;
    width: 100%;
    font-size: 24px;
    font-family: inherit;
    font-weight: inherit;
    line-height: 1.4em;
    border: 0;
    color: inherit;
    padding: 6px;
    border: 1px solid #999;
    box-shadow: inset 0 -1px 5px 0 rgba(0, 0, 0, 0.2);
    box-sizing: border-box;
    -webkit-font-smoothing: antialiased;
    -moz-osx-font-smoothing: grayscale;
}
.new-todo {
    padding: 16px 16px 16px 60px;
    border: none;
    background: rgba(0, 0, 0, 0.003);
    box-shadow: inset 0 -2px 1px rgba(0,0,0,0.03);
}
.main {
    position: relative;
    z-index: 2;
    border-top: 1px solid #e6e6e6;
}
label[for='toggle-all'] {
    display: none;
}
.toggle-all {
    position: absolute;
    top: -55px;
    left: -12px;
    width: 60px;
    height: 34px;
    text-align: center;
    border: none; /* Mobile Safari */
}
.toggle-all:before {
    content: '?';
    font-size: 22px;
    color: #e6e6e6;
    padding: 10px 27px 10px 27px;
}
.toggle-all:checked:before {
    color: #737373;
}
.todo-list {
    margin: 0;
    padding: 0;
    list-style: none;
}
.todo-list li {
    position: relative;
    font-size: 24px;
    border-bottom: 1px solid #ededed;
}
.todo-list li:last-child {
    border-bottom: none;
}
.todo-list li.editing {
    border-bottom: none;
    padding: 0;
}
.todo-list li.editing .edit {
    display: block;
    width: 506px;
    padding: 12px 16px;
    margin: 0 0 0 43px;
}
.todo-list li.editing .view {
    display: none;
}
.todo-list li .toggle {
    text-align: center;
    width: 40px;
    /* auto, since non-WebKit browsers doesn't support input styling */
    height: auto;
    position: absolute;
    top: 0;
    bottom: 0;
    margin: auto 0;
    border: none; /* Mobile Safari */
    -webkit-appearance: none;
    appearance: none;
}
.todo-list li .toggle:after {
    content: url('data:image/svg+xml;utf8,<svg xmlns="http://www.w3.org/2000/svg" width="40" height="40" viewBox="-10 -18 100 135"><circle cx="50" cy="50" r="50" fill="none" stroke="#ededed" stroke-width="3"/></svg>');
}
.todo-list li .toggle:checked:after {
    content: url('data:image/svg+xml;utf8,<svg xmlns="http://www.w3.org/2000/svg" width="40" height="40" viewBox="-10 -18 100 135"><circle cx="50" cy="50" r="50" fill="none" stroke="#bddad5" stroke-width="3"/><path fill="#5dc2af" d="M72 25L42 71 27 56l-4 4 20 20 34-52z"/></svg>');
}
.todo-list li label {
    word-break: break-all;
    padding: 15px 60px 15px 15px;
    margin-left: 45px;
    display: block;
    line-height: 1.2;
    transition: color 0.4s;
}
.todo-list li.completed label {
    color: #d9d9d9;
    text-decoration: line-through;
}
.todo-list li .destroy {
    display: none;
    position: absolute;
    top: 0;
    right: 10px;
    bottom: 0;
    width: 40px;
    height: 40px;
    margin: auto 0;
    font-size: 30px;
    color: #cc9a9a;
    margin-bottom: 11px;
    transition: color 0.2s ease-out;
}
.todo-list li .destroy:hover {
    color: #af5b5e;
}
.todo-list li .destroy:after {
    content: '×';
}
.todo-list li:hover .destroy {
    display: block;
}
.todo-list li .edit {
    display: none;
}
.todo-list li.editing:last-child {
    margin-bottom: -1px;
}
.footer {
    color: #777;
    padding: 10px 15px;
    height: 20px;
    text-align: center;
    border-top: 1px solid #e6e6e6;
}
.footer:before {
    content: '';
    position: absolute;
    right: 0;
    bottom: 0;
    left: 0;
    height: 50px;
    overflow: hidden;
    box-shadow: 0 1px 1px rgba(0, 0, 0, 0.2),
                0 8px 0 -3px #f6f6f6,
                0 9px 1px -3px rgba(0, 0, 0, 0.2),
                0 16px 0 -6px #f6f6f6,
                0 17px 2px -6px rgba(0, 0, 0, 0.2);
}
.todo-count {
    float: left;
    text-align: left;
}
.todo-count strong {
    font-weight: 300;
}
.filters {
    margin: 0;
    padding: 0;
    list-style: none;
    position: absolute;
    right: 0;
    left: 0;
}
.filters li {
    display: inline;
}
.filters li a {
    color: inherit;
    margin: 3px;
    padding: 3px 7px;
    text-decoration: none;
    border: 1px solid transparent;
    border-radius: 3px;
}
.filters li a:hover {
    border-color: rgba(175, 47, 47, 0.1);
}
.filters li a.selected {
    border-color: rgba(175, 47, 47, 0.2);
}
.clear-completed,
html .clear-completed:active {
    float: right;
    position: relative;
    line-height: 20px;
    text-decoration: none;
    cursor: pointer;
}
.clear-completed:hover {
    text-decoration: underline;
}
/*
    Hack to remove background from Mobile Safari.
    Can't use it globally since it destroys checkboxes in Firefox
*/
@media screen and (-webkit-min-device-pixel-ratio:0) {
    .toggle-all,
    .todo-list li .toggle {
        background: none;
    }
    .todo-list li .toggle {
        height: 40px;
    }
    .toggle-all {
        -webkit-transform: rotate(90deg);
        transform: rotate(90deg);
        -webkit-appearance: none;
        appearance: none;
    }
}
@media (max-width: 430px) {
    .footer {
        height: 50px;
    }
    .filters {
        bottom: 10px;
    }
}
更新src\styles.css為如下
/* You can add global styles to this file, and also import other style files */
html, body {
    margin: 0;
    padding: 0;
}
button {
    margin: 0;
    padding: 0;
    border: 0;
    background: none;
    font-size: 100%;
    vertical-align: baseline;
    font-family: inherit;
    font-weight: inherit;
    color: inherit;
    -webkit-appearance: none;
    appearance: none;
    -webkit-font-smoothing: antialiased;
    -moz-osx-font-smoothing: grayscale;
}
body {
    font: 14px 'Helvetica Neue', Helvetica, Arial, sans-serif;
    line-height: 1.4em;
    background: #f5f5f5;
    color: #4d4d4d;
    min-width: 230px;
    max-width: 550px;
    margin: 0 auto;
    -webkit-font-smoothing: antialiased;
    -moz-osx-font-smoothing: grayscale;
    font-weight: 300;
}
:focus {
    outline: 0;
}
.hidden {
    display: none;
}
.info {
    margin: 65px auto 0;
    color: #bfbfbf;
    font-size: 10px;
    text-shadow: 0 1px 0 rgba(255, 255, 255, 0.5);
    text-align: center;
}
.info p {
    line-height: 1;
}
.info a {
    color: inherit;
    text-decoration: none;
    font-weight: 400;
}
.info a:hover {
    text-decoration: underline;
}
現(xiàn)在我們看看成果吧胜宇,現(xiàn)在好看多了
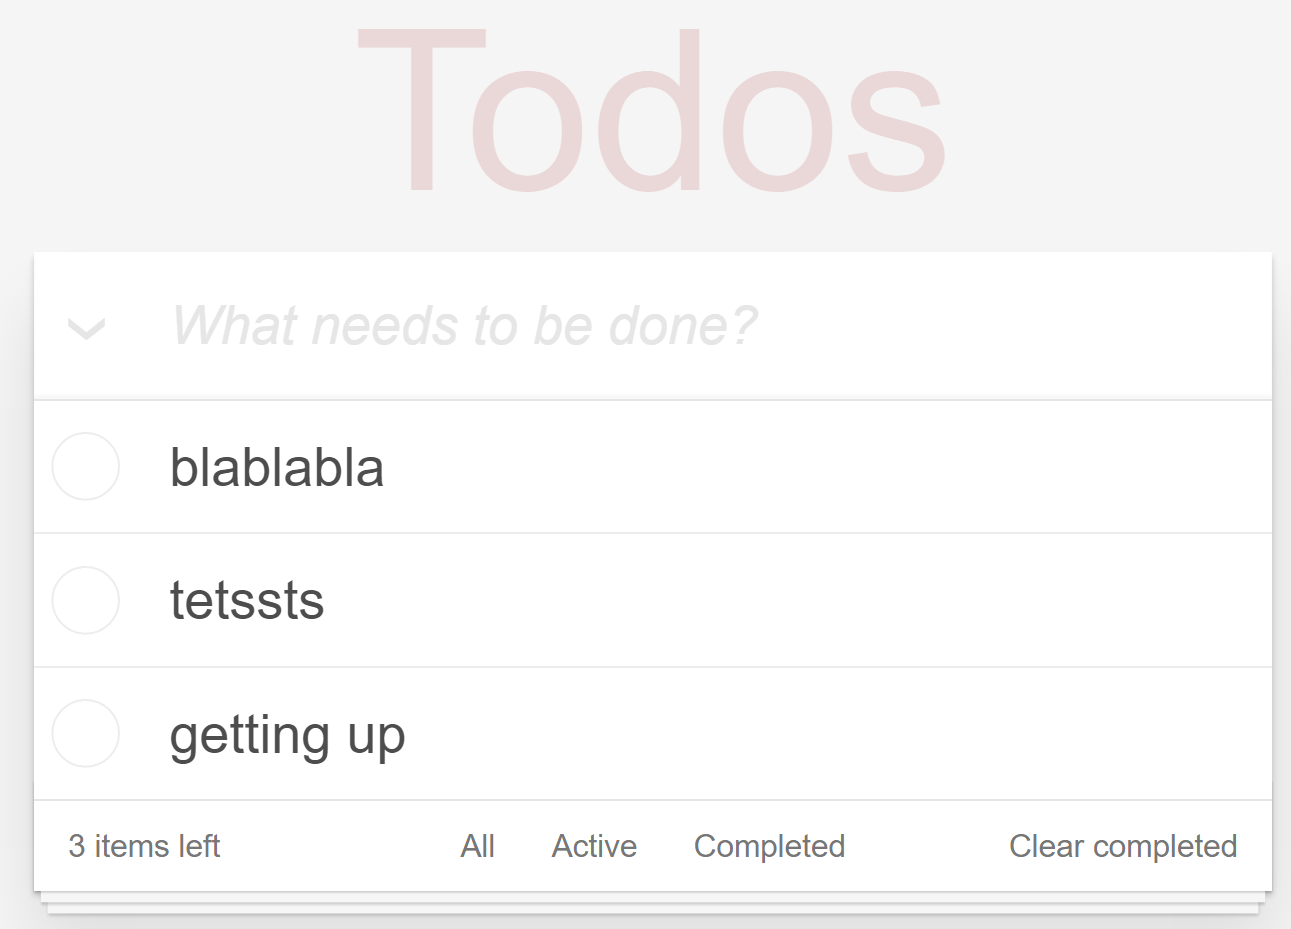
本節(jié)代碼:https://github.com/wpcfan/awesome-tutorials/tree/chap03/angular2/ng2-tut
紙書出版了耀怜,比網(wǎng)上內(nèi)容豐富充實(shí)了,歡迎大家訂購桐愉!
京東鏈接:https://item.m.jd.com/product/12059091.html?from=singlemessage&isappinstalled=0
第一節(jié):初識(shí)Angular-CLI
第二節(jié):登錄組件的構(gòu)建
第三節(jié):建立一個(gè)待辦事項(xiàng)應(yīng)用
第四節(jié):進(jìn)化财破!模塊化你的應(yīng)用
第五節(jié):多用戶版本的待辦事項(xiàng)應(yīng)用
第六節(jié):使用第三方樣式庫及模塊優(yōu)化用
第七節(jié):給組件帶來活力
Rx--隱藏在Angular 2.x中利劍
Redux你的Angular 2應(yīng)用
第八節(jié):查缺補(bǔ)漏大合集(上)
第九節(jié):查缺補(bǔ)漏大合集(下)