來源:從Chrome源碼看瀏覽器如何計算CSS
作者:李銀城
在《Effective前端6:避免頁面卡頓》這篇里面介紹了瀏覽器渲染頁面的過程:

并且《從Chrome源碼看瀏覽器如何構(gòu)建DOM樹》介紹了第一步如何解析Html構(gòu)建DOM樹笨枯,這個過程大概如下:
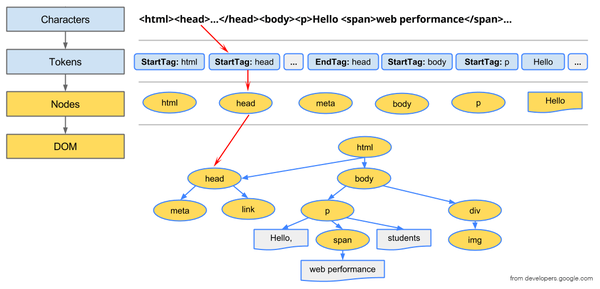
瀏覽器每收到一段html的文本之后,就會把它序列化成一個個的tokens爹袁,依次遍歷這些token毅否,實例化成對應(yīng)的html結(jié)點(diǎn)并插入到DOM樹里面。
我將在這一篇介紹第二步Style的過程又活,即CSS的處理苔咪。
1. 加載CSS
在構(gòu)建DOM的過程中,如果遇到link的標(biāo)簽柳骄,當(dāng)把它插到DOM里面之后团赏,就會觸發(fā)資源加載——根據(jù)href指明的鏈接:<link rel="stylesheet" href="demo.css">
上面的rel指明了它是一個樣式文件。這個加載是異步耐薯,不會影響DOM樹的構(gòu)建舔清,只是說在CSS沒處理好之前丝里,構(gòu)建好的DOM并不會顯示出來。用以下的html和css做試驗:
<!DOCType html>
<html>
<head>
    <link rel="stylesheet" href="demo.css">
</head>
<body>
<div class="text">
    <p>hello, world</p>
</div>
</body>
demo.css如下:
.text{
    font-size: 20px;
}
.text p{
    color: #505050;
}
從打印的log可以看出(添加打印的源碼略):
[DocumentLoader.cpp(558)] “<!DOCType html>\n<html>\n<head>\n<link rel=\”stylesheet\” href=\”demo.css\”> \n</head>\n<body>\n<div class=\”text\”>\n <p>hello, world</p>\n</div>\n</body>\n</html>\n”

[HTMLDocumentParser.cpp(765)] “tagName: html |type: DOCTYPE|attr: |text: “

[HTMLDocumentParser.cpp(765)] “tagName: |type: Character |attr: |text: \n”

[HTMLDocumentParser.cpp(765)] “tagName: html |type: startTag |attr: |text: “

…

[HTMLDocumentParser.cpp(765)] “tagName: html |type: EndTag |attr: |text: “

[HTMLDocumentParser.cpp(765)] “tagName: |type: EndOfFile|attr: |text: “

[Document.cpp(1231)] readystatechange to Interactive

[CSSParserImpl.cpp(217)] recieved and parsing stylesheet: “.text{\n font-size: 20px;\n}\n.text p{\n color: #505050;\n}\n”
在CSS沒有加載好之前体谒,DOM樹已經(jīng)構(gòu)建好了杯聚。為什么DOM構(gòu)建好了不把html放出來,因為沒有樣式的html直接放出來抒痒,給人看到的頁面將會是亂的幌绍。所以CSS不能太大,頁面一打開將會停留較長時間的白屏故响,所以把圖片/字體等轉(zhuǎn)成base64放到CSS里面是一種不太推薦的做法傀广。
2. 解析CSS
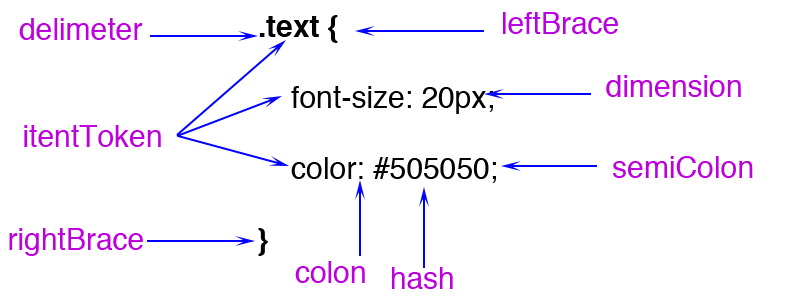
(1)字符串 -> tokens
CSS解析和html解析有比較像的地方,都是先格式化成tokens彩届。CSS token定義了很多種類型伪冰,如下的CSS會被拆成這么多個token:
經(jīng)常看到有人建議CSS的色值使用16位的數(shù)字會優(yōu)于使用rgb的表示樟蠕,這個是子虛烏有贮聂,還是有根據(jù)的呢?
如下所示:
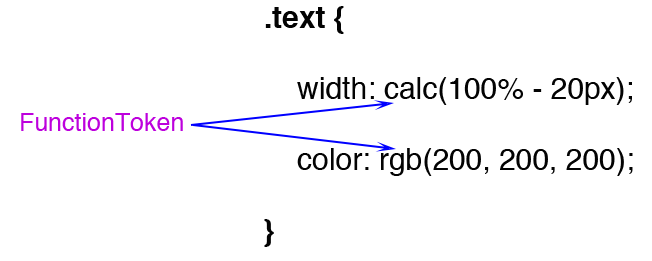
如果改成rgb寨辩,它將變成一個函數(shù)類型的token吓懈,這個函數(shù)需要再計算一下。從這里看的話捣染,使用16位色值確實比使用rgb好骄瓣。
(2)tokens -> styleRule
這里不關(guān)心它是怎么把tokens轉(zhuǎn)化成style的規(guī)則的,我們只要看格式化后的styleRule是怎么樣的就可以耍攘。每個styleRule主要包含兩個部分榕栏,一個是選擇器selectors,第二個是屬性集properties蕾各。用以下CSS:
.text .hello{
    color: rgb(200, 200, 200);
    width: calc(100% - 20px);
}

#world{
    margin: 20px;
}
打印出來的選擇器結(jié)果為(相關(guān)打印代碼省略):
selector text = “.text .hello”
value = “hello” matchType = “Class” relation = “Descendant”
tag history selector text = “.text”
value = “text” matchType = “Class” relation = “SubSelector”
selector text = “#world”
value = “world” matchType = “Id” relation = “SubSelector”
從第一個選擇器可以看出扒磁,它的解析是從右往左的,這個在判斷match的時候比較有用式曲。
blink定義了幾種matchType:
enum MatchType {
    Unknown,
    Tag,               // Example: div
    Id,                // Example: #id
    Class,             // example: .class
    PseudoClass,       // Example:  :nth-child(2)
    PseudoElement,     // Example: ::first-line
    PagePseudoClass,   // ??
    AttributeExact,    // Example: E[foo="bar"]
    AttributeSet,      // Example: E[foo]
    AttributeHyphen,   // Example: E[foo|="bar"]
    AttributeList,     // Example: E[foo~="bar"]
    AttributeContain,  // css3: E[foo*="bar"]
    AttributeBegin,    // css3: E[foo^="bar"]
    AttributeEnd,      // css3: E[foo$="bar"]
    FirstAttributeSelectorMatch = AttributeExact,
  };
還定義了幾種選擇器的類型:
enum RelationType {
    SubSelector,       // No combinator
    Descendant,        // "Space" combinator
    Child,             // > combinator
    DirectAdjacent,    // + combinator
    IndirectAdjacent,  // ~ combinator
    // Special cases for shadow DOM related selectors.
    ShadowPiercingDescendant,  // >>> combinator
    ShadowDeep,                // /deep/ combinator
    ShadowPseudo,              // ::shadow pseudo element
    ShadowSlot                 // ::slotted() pseudo element
  };
.text .hello的.hello選擇器的類型就是Descendant妨托,即后代選擇器。記錄選擇器類型的作用是協(xié)助判斷當(dāng)前元素是否match這個選擇器吝羞。例如兰伤,由于.hello是一個父代選器,所以它從右往左的下一個選擇器就是它的父選擇器钧排,于是判斷當(dāng)前元素的所有父元素是否匹配.text這個選擇器敦腔。
第二個部分——屬性打印出來是這樣的:
selector text = “.text .hello”
perperty id = 15 value = “rgb(200, 200, 200)”
perperty id = 316 value = “calc(100% – 20px)”
selector text = “#world”
perperty id = 147 value = “20px”
perperty id = 146 value = “20px”
perperty id = 144 value = “20px”
perperty id = 145 value = “20px”
所有的CSS的屬性都是用id標(biāo)志的,上面的id依次對應(yīng):
enum CSSPropertyID {
    CSSPropertyColor = 15,
    CSSPropertyWidth = 316,
    CSSPropertyMarginLeft = 145,
    CSSPropertyMarginRight = 146,
    CSSPropertyMarginTop = 147,
    CSSPropertyMarkerEnd = 148,
}
設(shè)置了margin: 20px恨溜,會轉(zhuǎn)化成四個屬性符衔。從這里可以看出CSS提倡屬性合并找前,但是最后還是會被拆成各個小屬性。所以屬性合并最大的作用應(yīng)該在于減少CSS的代碼量判族。
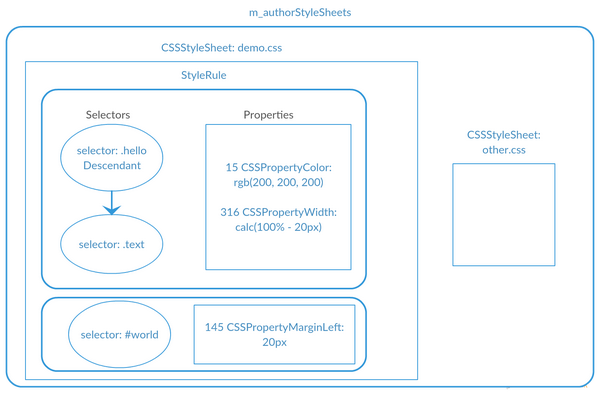
一個選擇器和一個屬性集就構(gòu)成一條rule躺盛,同一個css表的所有rule放到同一個stylesheet對象里面,blink會把用戶的樣式存放到一個m_authorStyleSheets的向量里面形帮,如下圖示意:
除了autherStyleSheet槽惫,還有瀏覽器默認(rèn)的樣式DefaultStyleSheet,這里面有幾張沃缘,最常見的是UAStyleSheet躯枢,其它的還有svg和全屏的默認(rèn)樣式表。Blink ua全部樣式可見這個文件html.css**槐臀,這里面有一些常見的設(shè)置,如把style/link/script等標(biāo)簽display: none氓仲,把div/h1/p等標(biāo)簽display: block水慨,設(shè)置p/h1/h2等標(biāo)簽的margin值等,從這個樣式表還可以看到Chrome已經(jīng)支持了HTML5.1新加的標(biāo)簽敬扛,如dialog:
dialog {
  position: absolute;
  left: 0;
  right: 0;
  width: -webkit-fit-content;
  height: -webkit-fit-content;
  margin: auto;
  border: solid;
  padding: 1em;
  background: white;
  color: black;
}
另外還有怪異模式的樣式表:quirk.css晰洒,這個文件很小,影響比較大的主要是下面:
/* This will apply only to text fields, since all other inputs already use border box sizing */
input:not([type=image i]), textarea {
    box-sizing: border-box;
}
blink會先去加載html.css文件啥箭,怪異模式下再接著加載quirk.css文件谍珊。
(4)生成哈希map
最后會把生成的rule集放到四個類型哈希map:
  CompactRuleMap m_idRules;
  CompactRuleMap m_classRules;
  CompactRuleMap m_tagRules;
  CompactRuleMap m_shadowPseudoElementRules;
map的類型是根據(jù)最右邊的selector的類型:id、class急侥、標(biāo)簽砌滞、偽類選擇器區(qū)分的,這樣做的目的是為了在比較的時候能夠很快地取出匹配第一個選擇器的所有rule坏怪,然后每條rule再檢查它的下一個selector是否匹配當(dāng)前元素贝润。
3. 計算CSS
CSS表解析好之后,會觸發(fā)layout tree铝宵,進(jìn)行layout的時候打掘,會把每個可視的Node結(jié)點(diǎn)相應(yīng)地創(chuàng)建一個Layout結(jié)點(diǎn),而創(chuàng)建Layout結(jié)點(diǎn)的時候需要計算一下得到它的style鹏秋。為什么需要計算style尊蚁,因為可能會有多個選擇器的樣式命中了它,所以需要把幾個選擇器的樣式屬性綜合在一起侣夷,以及繼承父元素的屬性以及UA的提供的屬性横朋。這個過程包括兩步:找到命中的選擇器和設(shè)置樣式。
(1)選擇器命中判斷
用以下html做為demo:
<style>
.text{
    font-size: 22em;
}
.text p{
    color: #505050;
}
</style>
<div class="text">
    <p>hello, world</p>
</div>
上面會生成兩個rule惜纸,第一個rule會放到上面提到的四個哈希map其中的classRules里面叶撒,而第二個rule會放到tagRules里面绝骚。
當(dāng)這個樣式表解析好時,觸發(fā)layout祠够,這個layout會更新所有的DOM元素:
void ContainerNode::attachLayoutTree(const AttachContext& context) {
  for (Node* child = firstChild(); child; child = child->nextSibling()) {
    if (child->needsAttach())
      child->attachLayoutTree(childrenContext);
  }
}
這是一個遞歸压汪,初始為document對象,即從document開始深度優(yōu)先古瓤,遍歷所有的dom結(jié)點(diǎn)止剖,更新它們的布局。
對每個node落君,代碼里面會依次按照id穿香、class、偽元素绎速、標(biāo)簽的順序取出所有的selector皮获,進(jìn)行比較判斷,最后是通配符纹冤,如下:
//如果結(jié)點(diǎn)有id屬性
if (element.hasID())
  collectMatchingRulesForList(
      matchRequest.ruleSet->idRules(element.idForStyleResolution()),
      cascadeOrder, matchRequest);
//如果結(jié)點(diǎn)有class屬性
if (element.isStyledElement() && element.hasClass()) {
  for (size_t i = 0; i < element.classNames().size(); ++i)
    collectMatchingRulesForList(
        matchRequest.ruleSet->classRules(element.classNames()[i]),
        cascadeOrder, matchRequest);
}
//偽類的處理
...
//標(biāo)簽選擇器處理
collectMatchingRulesForList(
    matchRequest.ruleSet->tagRules(element.localNameForSelectorMatching()),
    cascadeOrder, matchRequest);
//最后是通配符
...
在遇到div.text這個元素的時候洒宝,會去執(zhí)行上面代碼的取出classRules的那行。
上面domo的rule只有兩個萌京,一個是classRule雁歌,一個是tagRule。所以會對取出來的這個classRule進(jìn)行檢驗:
if (!checkOne(context, subResult))
  return SelectorFailsLocally;
if (context.selector->isLastInTagHistory()) {
    return SelectorMatches;
}
第一行先對當(dāng)前選擇器(.text)進(jìn)行檢驗知残,如果不通過靠瞎,則直接返回不匹配,如果通過了求妹,第三行判斷當(dāng)前選擇器是不是最左邊的選擇器乏盐,如果是的話,則返回匹配成功扒最。如果左邊還有限定的話丑勤,那么再遞歸檢查左邊的選擇器是否匹配。
我們先來看一下第一行的checkOne是怎么檢驗的:
switch (selector.match()) {
  case CSSSelector::Tag:
    return matchesTagName(element, selector.tagQName());
  case CSSSelector::Class:
    return element.hasClass() &&
           element.classNames().contains(selector.value());
  case CSSSelector::Id:
    return element.hasID() &&
           element.idForStyleResolution() == selector.value();
}
很明顯吧趣,.text將會在上面第6行匹配成功法竞,并且它左邊沒有限定了,所以返回匹配成功强挫。
到了檢驗p標(biāo)簽的時候岔霸,會取出”.text p”的rule,它的第一個選擇器是p俯渤,將會在上面代碼的第3行判斷成立呆细。但由于它前面還有限定,于是它還得繼續(xù)檢驗前面的限定成不成立八匠。
前一個選擇器的檢驗關(guān)鍵是靠當(dāng)前選擇器和它的關(guān)系絮爷,上面提到的relationType趴酣,這里的p的relationType是Descendant即后代。上面在調(diào)了checkOne成功之后坑夯,繼續(xù)往下走:
switch (relation) {
  case CSSSelector::Descendant:
    for (nextContext.element = parentElement(context); nextContext.element;
         nextContext.element = parentElement(nextContext)) {
      MatchStatus match = matchSelector(nextContext, result);
      if (match == SelectorMatches || match == SelectorFailsCompletely)
        return match;
      if (nextSelectorExceedsScope(nextContext))
        return SelectorFailsCompletely;
    }
    return SelectorFailsCompletely;
      case CSSSelector::Child:
    //...
}
由于這里是一個后代選擇器岖寞,所以它會循環(huán)當(dāng)前元素所有父結(jié)點(diǎn),用這個父結(jié)點(diǎn)和第二個選擇器”.text”再執(zhí)行checkOne的邏輯柜蜈,checkOne將返回成功仗谆,并且它已經(jīng)是最后一個選擇器了,所以判斷結(jié)束淑履,返回成功匹配隶垮。
后代選擇器會去查找它的父結(jié)點(diǎn) ,而其它的relationType會相應(yīng)地去查找關(guān)聯(lián)的元素秘噪。
所以不提倡把選擇器寫得太長狸吞,特別是用sass/less寫的時候,新手很容易寫嵌套很多層指煎,這樣會增加查找匹配的負(fù)擔(dān)捷绒。例如上面,它需要對下一個父代選器啟動一個新的遞歸的過程贯要,而遞歸是一種比較耗時的操作。一般是不要超過三層椭住。
上面已經(jīng)較完整地介紹了匹配的過程崇渗,接下來分析匹配之后又是如何設(shè)置style的。
(2)設(shè)置style
設(shè)置style的順序是先繼承父結(jié)點(diǎn)京郑,然后使用UA的style宅广,最后再使用用戶的style:
style->inheritFrom(*state.parentStyle())
matchUARules(collector);
matchAuthorRules(*state.element(), collector);
每一步如果有styleRule匹配成功的話會把它放到當(dāng)前元素的m_matchedRules的向量里面,并會去計算它的優(yōu)先級些举,記錄到m_specificity變量跟狱。這個優(yōu)先級是怎么算的呢?
for (const CSSSelector* selector = this; selector;
     selector = selector->tagHistory()) {
  temp = total + selector->specificityForOneSelector();
}
return total;
如上代碼所示户魏,它會從右到左取每個selector的優(yōu)先級之和驶臊。不同類型的selector的優(yōu)級級定義如下:
switch (m_match) {
    case Id:
      return 0x010000;
    case PseudoClass:
      return 0x000100;
    case Class:
    case PseudoElement:
    case AttributeExact:
    case AttributeSet:
    case AttributeList:
    case AttributeHyphen:
    case AttributeContain:
    case AttributeBegin:
    case AttributeEnd:
      return 0x000100;
    case Tag:
      return 0x000001;
    case Unknown:
      return 0;
  }
  return 0;
}
其中id的優(yōu)先級為0x100000 = 65536,類叼丑、屬性关翎、偽類的優(yōu)先級為0x100 = 256,標(biāo)簽選擇器的優(yōu)先級為1鸠信。如下面計算所示:
/*優(yōu)先級為257 = 265 + 1*/
.text h1{
    font-size: 8em;
}

/*優(yōu)先級為65537 = 65536 + 1*/
#my-text h1{
    font-size: 16em;
}
內(nèi)聯(lián)style的優(yōu)先級又是怎么處理的呢纵寝?
當(dāng)match完了當(dāng)前元素的所有CSS規(guī)則,全部放到了collector的m_matchedRules里面星立,再把這個向量根據(jù)優(yōu)先級從小到大排序:
collector.sortAndTransferMatchedRules();
排序的規(guī)則是這樣的:
static inline bool compareRules(const MatchedRule& matchedRule1,
                                const MatchedRule& matchedRule2) {
  unsigned specificity1 = matchedRule1.specificity();
  unsigned specificity2 = matchedRule2.specificity();
  if (specificity1 != specificity2)
    return specificity1 < specificity2;

  return matchedRule1.position() < matchedRule2.position();
}
先按優(yōu)先級爽茴,如果兩者的優(yōu)先級一樣葬凳,則比較它們的位置。
把css表的樣式處理完了之后室奏,blink再去取style的內(nèi)聯(lián)樣式(這個在已經(jīng)在構(gòu)建DOM的時候存放好了)火焰,把內(nèi)聯(lián)樣式push_back到上面排好序的容器里,由于它是由小到大排序的窍奋,所以放最后面的優(yōu)先級肯定是最大的荐健。
collector.addElementStyleProperties(state.element()->inlineStyle(),
isInlineStyleCacheable);
樣式里面的important的優(yōu)先級又是怎么處理的?
所有的樣式規(guī)則都處理完畢琳袄,最后就是按照它們的優(yōu)先級計算CSS了江场。將在下面這個函數(shù)執(zhí)行:
applyMatchedPropertiesAndCustomPropertyAnimations(
state, collector.matchedResult(), element);
這個函數(shù)會按照下面的順序依次設(shè)置元素的style:
  applyMatchedProperties<HighPropertyPriority, CheckNeedsApplyPass>(
      state, matchResult.allRules(), false, applyInheritedOnly, needsApplyPass);
  for (auto range : ImportantAuthorRanges(matchResult)) {
    applyMatchedProperties<HighPropertyPriority, CheckNeedsApplyPass>(
        state, range, true, applyInheritedOnly, needsApplyPass);
  }
先設(shè)置正常的規(guī)則,最后再設(shè)置important的規(guī)則窖逗。所以越往后的設(shè)置的規(guī)則就會覆蓋前面設(shè)置的規(guī)則址否。
最后生成的Style是怎么樣的?
按優(yōu)先級計算出來的Style會被放在一個ComputedStyle的對象里面碎紊,這個style里面的規(guī)則分成了幾類佑附,通過檢查style對象可以一窺:
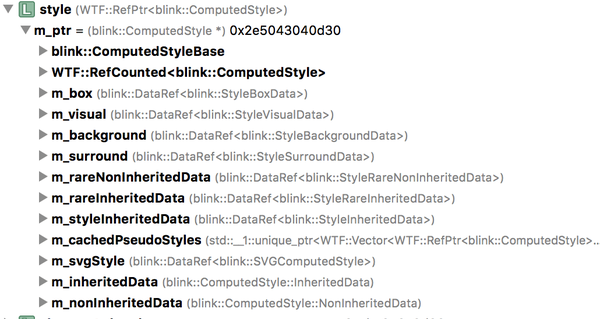
把它畫成一張圖表:
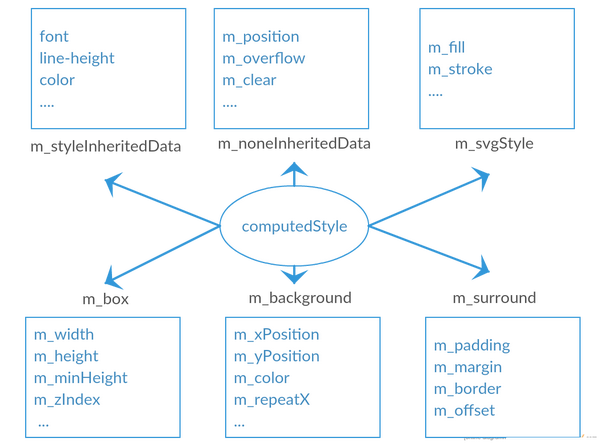
主要有幾類,box是長寬仗考,surround是margin/padding音同,還有不可繼承的nonInheritedData和可繼承的styleIneritedData一些屬性。Blink還把很多比較少用的屬性放到rareData的結(jié)構(gòu)里面秃嗜,為避免實例化這些不常用的屬性占了太多的空間权均。
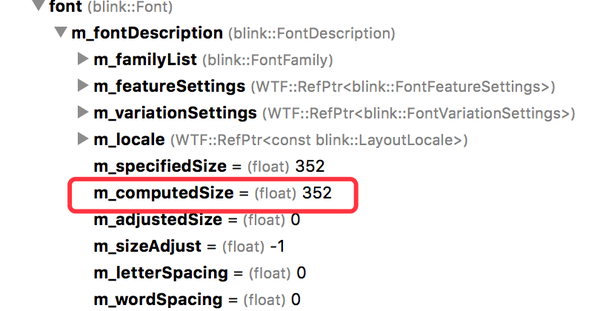
具體來說,上面設(shè)置的font-size為:22em * 16px = 352px:
而所有的色值會變成16進(jìn)制的整數(shù)锅锨,如blink定義的兩種顏色的色值:
static const RGBA32 lightenedBlack = 0xFF545454;
static const RGBA32 darkenedWhite = 0xFFABABAB;
同時blink對rgba色值的轉(zhuǎn)化算法:
RGBA32 makeRGBA32FromFloats(float r, float g, float b, float a) {
  return colorFloatToRGBAByte(a) << 24 | colorFloatToRGBAByte(r) << 16 |
         colorFloatToRGBAByte(g) << 8 | colorFloatToRGBAByte(b);
}
從這里可以看到叽赊,有些CSS優(yōu)化建議說要按照下面的順序書寫CSS規(guī)則:
- 1.位置屬性(position, top, right, z-index, display, float等)
- 2.大小(width, height, padding, margin)
- 3.文字系列(font, line-height, letter-spacing, color- text-align等)
- 4.背景(background, border等)
- 5.其他(animation, transition等)
這些順序?qū)g覽器來說其實是一樣的,因為最后都會放到computedStyle里面必搞,而這個style里面的數(shù)據(jù)是不區(qū)分先后順序的必指。所以這種建議與其說是優(yōu)化,倒不如說是規(guī)范恕洲,大家都按照這個規(guī)范寫的話塔橡,看CSS就可以一目了然,可以很快地看到想要了解的關(guān)鍵信息研侣。
(3)調(diào)整style
最后把生成的style做一個調(diào)整:
adjustComputedStyle(state, element); //style在state對象里面
調(diào)整的內(nèi)容包括:
第一個:把absolute/fixed定位谱邪、float的元素設(shè)置成block:
// Absolute/fixed positioned elements, floating elements and the document
// element need block-like outside display.
if (style.hasOutOfFlowPosition() || style.isFloating() ||
    (element && element->document().documentElement() == element))
  style.setDisplay(equivalentBlockDisplay(style.display()));
第二個,如果有:first-letter選擇器時庶诡,會把元素display和position做調(diào)整:
static void adjustStyleForFirstLetter(ComputedStyle& style) {
  // Force inline display (except for floating first-letters).
  style.setDisplay(style.isFloating() ? EDisplay::Block : EDisplay::Inline);
  // CSS2 says first-letter can't be positioned.
  style.setPosition(StaticPosition);
}
還會對表格元素做一些調(diào)整惦银。
到這里,CSS相關(guān)的解析和計算就分析完畢,筆者將嘗試在下一篇介紹渲染頁面的第三步layout的過程扯俱。
