TL;DR
源代碼 GitHub 地址:https://github.com/caiyue1993/Tiptoes
前言
靈感最初來源于 Unread 的 iOS 客戶端虑绵。
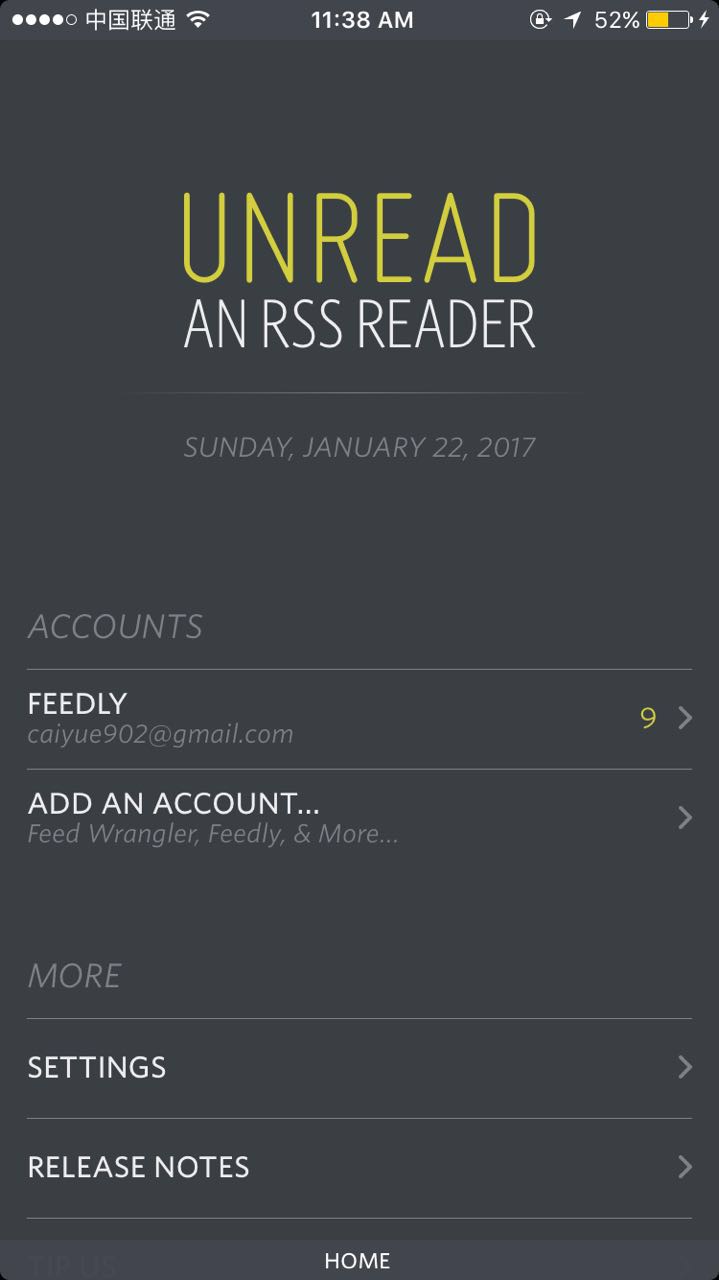
當(dāng)我第一次打開這個(gè)應(yīng)用時(shí)氧腰,我就被它的 UI 深深吸引了:和大多數(shù)國(guó)內(nèi) app 使用泛濫的 TNV (TabBarController -> NavigationController -> ViewController) 架構(gòu)不同买猖, Unread 它沒有使用 UITabBarController 也沒有使用系統(tǒng)自帶的 UINavigationController泻肯,界面沒有任何無關(guān)內(nèi)容海洼,讓用戶沉浸在應(yīng)用中,享受應(yīng)用提供的內(nèi)容信息流休里,這種體驗(yàn)簡(jiǎn)直完美蛆挫。
它的交互也幾乎都是通過手勢(shì)操作:下拉刷新,右滑(屏幕任何位置)返回妙黍,另外左滑和上提同樣會(huì)觸發(fā)相應(yīng)動(dòng)作悴侵。在小屏幕上可能感受不到這種便利,但是在稍微大些的屏幕上如果非要通過點(diǎn)擊左上角的返回鍵才能返回的話拭嫁,那真的是一件十分痛苦的事情可免。
Unread 位于底部的導(dǎo)航欄也很有意思,我以為這也是一種很大的創(chuàng)新做粤,它擯棄了系統(tǒng)自帶的 navigation bar浇借,將導(dǎo)航欄移到屏幕的最下方,交互同樣絲般順滑怕品,讓人贊不絕口妇垢。
所以,我就想模仿著實(shí)現(xiàn)這樣一個(gè)導(dǎo)航欄堵泽。
思路
當(dāng)時(shí)立馬腦海里想到的有三種大致的思路:
第一種,嘗試是否能直接更改系統(tǒng) navigation bar 的位置恢总,將其移至屏幕下方迎罗,并設(shè)置合理的大小和想要的外形。
第二種片仿,自己實(shí)現(xiàn)一個(gè) NavigationController:里面放置一個(gè) UIScrollView纹安,將棧上的 view controller 都放入其中,然后配置一個(gè)自定義導(dǎo)航欄砂豌,根據(jù) UIScrollView 的 contentOffset 來實(shí)現(xiàn)過渡效果厢岂。
第三種,直接繼承系統(tǒng)的 UINavigationController 并進(jìn)行私人定制阳距,滿足我們的需要塔粒。
篩選最優(yōu)解
針對(duì)第一種思路,翻看官方的 UINavigationController 的文檔筐摘,里面寫了這樣一句話:
The navigation controller manages the creation, configuration, and display of the navigation bar and optional navigation toolbar. It is permissible to customize the navigation bar’s appearance-related properties but you must never change its frame, bounds, or alpha values directly.
因此拋棄思路一卒茬。
第二種思路船老,很明顯實(shí)現(xiàn)這種思路工作量較大,我們既然有了系統(tǒng)提供的 UINavigationController圃酵,為什么不在它提供的接口上進(jìn)行些許的 tweak 柳畔,進(jìn)而滿足我們的需求呢?(其實(shí)在 GitHub 上已經(jīng)有人用第二種方法實(shí)現(xiàn)了郭赐,有興趣的讀者可以搜搜)
所以最終我選擇了短平快的第三種思路:對(duì)系統(tǒng)自帶導(dǎo)航控制器進(jìn)行定制薪韩,實(shí)現(xiàn)需求。
相關(guān)知識(shí)
關(guān)于 UINavigationController:
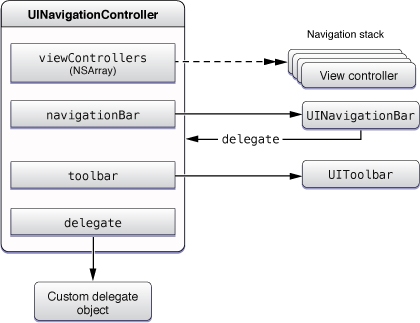
一個(gè) navigation controller 它自己會(huì)維護(hù)一個(gè) viewControllers 的數(shù)組捌锭,另外俘陷,navigation controller 有一個(gè)屬性 view ,該 view 中包含了 navigation bar舀锨,toolbar(可選)岭洲,另外還有一個(gè) content view。在視圖的前進(jìn)以及后退中坎匿,只有 content view 是一直在變的(等于 viewControllers 最上面的 view controller 的 view)盾剩,而 navigation bar 以及 toolbar(可選) 只有內(nèi)容會(huì)變(例如標(biāo)題),而它們本身作為視圖是不變的替蔬。
關(guān)于 UINavigationItem:
每個(gè)被壓入 navigation stack 中的 view controller 都必須有 UINavigationItem 告私,用來展示在 NavigationBar 上面。而 navigation controller 會(huì)根據(jù) stack 最上面的兩個(gè) view controller 生成 navigation bar 的內(nèi)容承桥。
關(guān)于 UINavigationBar, 看官方文檔中的一句話:
A navigation bar is most commonly used within a navigation controller. The UINavigationController object creates, displays, and manages its associated navigation bar, and uses attributes of the view controllers you add to control the content displayed in the navigation bar.
另外驻粟,我們可以通過 UINavigationBarDelegate 獲取當(dāng)前需要管理的 UINavigationItem,然后即可獲取 UINavigationItem 的 title 等信息凶异,展示在 NavigationBar 上蜀撑。
如何實(shí)現(xiàn)右滑返回時(shí)的過渡效果
首先,加上了兩個(gè) UILabel: currentTitleLabel 和 priorTitleLabel剩彬,分別用來記錄當(dāng)前 view controller 的標(biāo)題以及前一個(gè) view controller 的標(biāo)題酷麦。
另外,由于 UINavigationController 有一個(gè) UIGestureRecognizer 屬性喉恋,可以用來追蹤右滑的手勢(shì)沃饶,從而可以拿到在當(dāng)前視圖上的偏移量,進(jìn)而可以實(shí)現(xiàn)自定義的過渡效果轻黑。
還有糊肤,UINavigationBarDelegate 提供了四個(gè)代理方法 (shouldPush,didPush,shouldPop,didPop),可以通過這樣的四個(gè)節(jié)點(diǎn)來配置 currentTitleLabel 和 priorTitleLabel 的始末節(jié)點(diǎn)時(shí)的狀態(tài)氓鄙。
目前的效果是這樣的:

之后要做的
- 實(shí)現(xiàn)更多的過渡效果
- 找到更好的解決中途取消右滑返回的方案(現(xiàn)在采用的是一種 work around馆揉,具體可以看源代碼 TiptoesNavController.swift 中的 handleTiptoesDisplay(sender:) 方法)
個(gè)人精力有限,希望可以發(fā)揮開源社區(qū)的力量吧抖拦,最后再貼一下源代碼地址:https://github.com/caiyue1993/Tiptoes把介。
如果你單純喜歡本項(xiàng)目的想法勤讽,可以 ?Star 支持;如果你對(duì)項(xiàng)目代碼有更好的建議拗踢,可以直接提 issue 或者 pull request脚牍。謝謝:)
參考資料
關(guān)注我
- 微博:@CaiYue_
- GitHub: caiyue1993
- 郵箱:yuecai.nju@gmail.com
本文原地址:http://soledad.me/2017/01/18/about-tiptoes/
本文版權(quán)所有,如需轉(zhuǎn)載巢墅,請(qǐng)告知原作者并注明出處
