最近按声,在公司做登錄界面裹粤,需要用到導(dǎo)航欄隱藏终蒂,雖然很快就實現(xiàn)了功能,但是想起來遥诉,一些比較酷炫的UI效果拇泣,所以決定學(xué)習(xí)一下關(guān)于LTNavigationBar的源碼
代碼規(guī)范
之前看Effective Objective-C 52個高效法則的時候,就已經(jīng)學(xué)會了矮锈,通過用戶關(guān)聯(lián)來讓category中含有屬性對象霉翔,從而實現(xiàn)各種需求上的拓展,這次再看LTNavigationBar的時候苞笨,發(fā)現(xiàn)了更加方便的寫法债朵,以往還需要在.h文件書寫屬性,然后在.m文件通過get和set方法來對象關(guān)聯(lián)
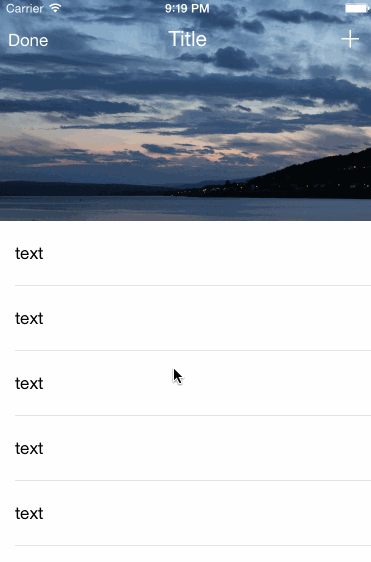
navigationBar透明度變化效果
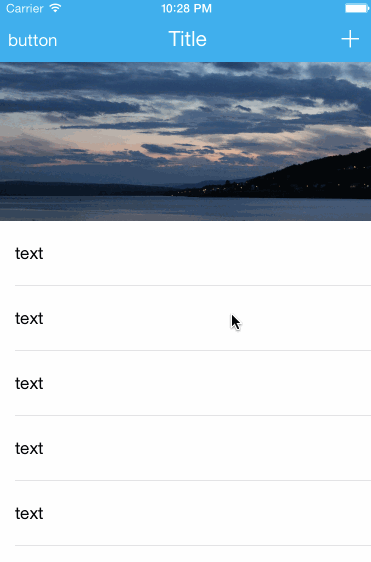
navigationBar的y坐標(biāo)變化效果
//UINavigationBar+Awesome.h

#import <UIKit/UIKit.h>

@interface UINavigationBar (Awesome)
- (void)lt_setBackgroundColor:(UIColor *)backgroundColor;
- (void)lt_setElementsAlpha:(CGFloat)alpha;
- (void)lt_setTranslationY:(CGFloat)translationY;
- (void)lt_reset;
@end
作者在.h文件中沒有設(shè)置屬性瀑凝,而是在.m文件直接對象關(guān)聯(lián).
首先了解UINavigationBar的subview有哪些東西
(lldb) po [self.navigationController.navigationBar subviews]
<__NSArrayM 0x60000005a010>(
<_UIBarBackground: 0x7fcabdd0ab30; frame = (0 -20; 375 64); userInteractionEnabled = NO; layer = <CALayer: 0x608000237200>>,
<_UINavigationBarBackIndicatorView: 0x7fcabdc22dc0; frame = (8 11.5; 13 21); alpha = 0; opaque = NO; userInteractionEnabled = NO; layer = <CALayer: 0x6000000376e0>>
)
核心代碼
//UINavigationBar+Awesome.m

#import "UINavigationBar+Awesome.h"
#import <objc/runtime.h>

#define SYSTEM_VERSION_LESS_THAN(v) ([[[UIDevice currentDevice] systemVersion] compare:v options:NSNumericSearch] == NSOrderedAscending)

@implementation UINavigationBar (Awesome)
static char overlayKey;

//直接getter和setter方法序芦,不需要加上屬性,也可以對象關(guān)聯(lián)粤咪,從而外部無法得出內(nèi)部技術(shù)實現(xiàn)谚中,只需要調(diào)用函數(shù)方法即可
- (UIView *)overlay
{
    return objc_getAssociatedObject(self, &overlayKey);
}

- (void)setOverlay:(UIView *)overlay
{
    objc_setAssociatedObject(self, &overlayKey, overlay, OBJC_ASSOCIATION_RETAIN_NONATOMIC);
}

//設(shè)置背景顏色
- (void)lt_setBackgroundColor:(UIColor *)backgroundColor
{
    if (!self.overlay) {
        //直接把NavigationBar背部的圖片替換,使用[UIImage new]來替換
        [self setBackgroundImage:[UIImage new] forBarMetrics:UIBarMetricsDefault];
        //初始化控件寥枝,設(shè)置frame
        self.overlay = [[UIView alloc] initWithFrame:CGRectMake(0, 0, CGRectGetWidth(self.bounds), CGRectGetHeight(self.bounds) + 20)];
        //取消傳遞事件
        self.overlay.userInteractionEnabled = NO;
        //設(shè)置自身autoresizing模式宪塔,不然會不能撐滿全屏的寬度
        self.overlay.autoresizingMask = UIViewAutoresizingFlexibleWidth;    // Should not set `UIViewAutoresizingFlexibleHeight`
        //遍歷UINavigationBar的subview可以發(fā)現(xiàn)有3個子控件,第一個就是_UIBarBackground脉顿,既是在我們核心需要替換的時候蝌麸,將自身綁定的view覆蓋在這上方,從而實現(xiàn)透明的視覺效果
        [[self.subviews firstObject] insertSubview:self.overlay atIndex:0];
    }
    //設(shè)置關(guān)聯(lián)的view的背景顏色
    self.overlay.backgroundColor = backgroundColor;
}

- (void)lt_setTranslationY:(CGFloat)translationY
{
    self.transform = CGAffineTransformMakeTranslation(0, translationY);
}

- (void)lt_setElementsAlpha:(CGFloat)alpha
{
    //左邊的導(dǎo)航欄的子控件
    [[self valueForKey:@"_leftViews"] enumerateObjectsUsingBlock:^(UIView *view, NSUInteger i, BOOL *stop) {
        view.alpha = alpha;
    }];

    //右邊的導(dǎo)航欄的子控件
    [[self valueForKey:@"_rightViews"] enumerateObjectsUsingBlock:^(UIView *view, NSUInteger i, BOOL *stop) {
        view.alpha = alpha;
    }];

    //導(dǎo)航欄的標(biāo)題欄的子控件
    UIView *titleView = [self valueForKey:@"_titleView"];
    titleView.alpha = alpha;
//    when viewController first load, the titleView maybe nil
    //遍歷自身的子控件艾疟,從上面可以看到_UIBarBackground,_UINavigationBarBackIndicatorView,核心讓這些透明度發(fā)生變化即可
    [[self subviews] enumerateObjectsUsingBlock:^(UIView *obj, NSUInteger idx, BOOL *stop) {
        if ([obj isKindOfClass:NSClassFromString(@"UINavigationItemView")]) {
            obj.alpha = alpha;
        }
        if ([obj isKindOfClass:NSClassFromString(@"_UINavigationBarBackIndicatorView")]) {
            obj.alpha = alpha;
        }
    }];
}

//重新設(shè)置回原來来吩,并且將自身綁定的view更新好
- (void)lt_reset
{
    [self setBackgroundImage:nil forBarMetrics:UIBarMetricsDefault];
    [self.overlay removeFromSuperview];
    self.overlay = nil;
}

@end
總結(jié)
雖然難度不大敢辩,但是學(xué)到了對象關(guān)聯(lián)的更好的寫法,并且進一步了解了UINavigationBar的處理弟疆,雖然代碼量不大戚长,但是對大部分開發(fā)者都有很多幫助,希望可以更好提升我們自己的代碼質(zhì)量怠苔,寫出更多高質(zhì)量的代碼~
