在寫作業(yè)項(xiàng)目處理網(wǎng)絡(luò)請求問題時了解了幾個框架恢准,比如Google的Volley钧椰,Square的OkHttp和Retrofit等怨愤,后來看到大家都在推薦使用Retrofit2寞缝。然后在實(shí)際使用中也發(fā)現(xiàn)使用起來很方便代碼很簡潔癌压,只需要定義接口然后調(diào)用即可。這也讓我對這個框架的原理感到了好奇荆陆。下面分享一下它的基本原理以及我對于其源碼學(xué)習(xí)的一些小小的心得體會滩届。
Retrofit2的使用
什么是Retrofit2
(這里就直接復(fù)制粘貼了)
Retrofit是針對于Android/Java的、基于okHttp的被啼、一種輕量級且安全的帜消、并使用注解方式的網(wǎng)絡(luò)請求框架。
Retrofit2的使用詳解
這里先放上Retrofit2的官方文檔趟据,其實(shí)看文檔對其的使用應(yīng)該就沒有什么問題了券犁,因?yàn)檎娴暮芎唵魏芎糜檬踅。∵@里就大致過一下它的使用步驟:
1)在gradle中加入依賴
    compile 'com.squareup.retrofit2:retrofit:2.3.0'
    compile 'com.google.code.gson:gson:2.8.1'
    compile 'com.squareup.retrofit2:converter-gson:2.3.0'
(如果要和rxjava整合可以再加入retrofit2:adapter-rxjava)
2)在AndroidManifest文件中打開訪問網(wǎng)絡(luò)的權(quán)限
<uses-permission android:name="android.permission.INTERNET"/>
3)創(chuàng)建Retrofit2實(shí)例
// 定義訪問的主機(jī)地址
retrofit = new Retrofit.Builder().baseUrl(BASEURL)
//解析方法
.addConverterFactory(GsonConverterFactory.create())  .build();
4)定義接口
public interface GitHubService {
  @GET("users/{user}/repos")
  Call<List<Repo>> listRepos(@Path("user") String user);
}
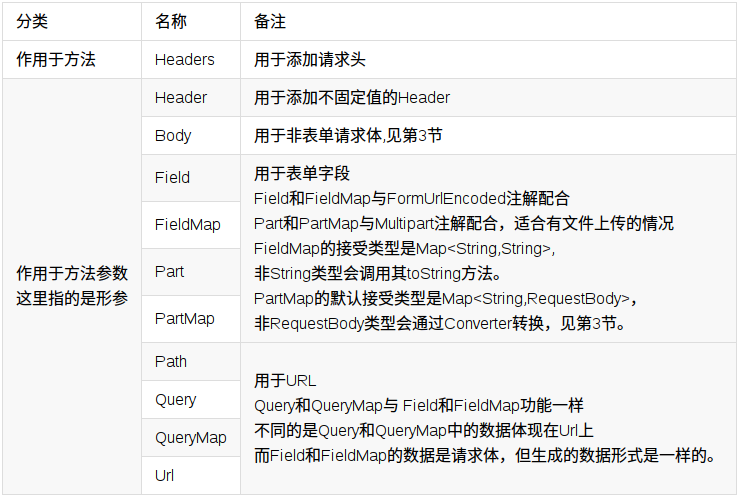
這里就直接使用官方文檔給出的例子了汹碱,注解的話參見下圖
5)創(chuàng)建對象調(diào)用接口
GitHubService service = retrofit.create(GitHubService.class);
Call<List<Repo>> repos = service.listRepos("octocat");
這段代碼的意思大概是首先獲取Retrofit對象,然后通過動態(tài)代理獲取到所定義的接口荞估,通過調(diào)用接口里面的方法獲取到Call類型返回值咳促,最后進(jìn)行網(wǎng)絡(luò)請求操作
Retrofit的原理
Retrofit的思想主要是動態(tài)代理稚新,看了幾個源碼的解析感覺ServiceMethod像一個中央處理器很重要,這里就主要解析一下ServiceMethod的創(chuàng)建過程跪腹,先看一段Retrofit的源碼(這是上面調(diào)用接口時的create方法源碼):
public <T> T create(final Class<T> service) {
  Utils.validateServiceInterface(service);
  if (validateEagerly) {
     eagerlyValidateMethods(service);
  }
  return (T) Proxy.newProxyInstance(service.getClassLoader(), new Class<?>[] { service },
    new InvocationHandler() {
      private final Platform platform = Platform.get();

      @Override public Object invoke(Object proxy, Method method, Object... args)
          throws Throwable {
        if (method.getDeclaringClass() == Object.class) {
          return method.invoke(this, args);
        }
        if (platform.isDefaultMethod(method)) {
          return platform.invokeDefaultMethod(method, service, proxy, args);
        }
        //轉(zhuǎn)換成ServiceMethod
        ServiceMethod serviceMethod = loadServiceMethod(method);
        //通過serviceMethod, args獲取到okHttpCall 對象
        OkHttpCall okHttpCall = new OkHttpCall<>(serviceMethod, args);
        //進(jìn)一步封裝okHttpCall并返回Call對象
        return serviceMethod.callAdapter.adapt(okHttpCall);
      }
    });
在接口調(diào)用的時候調(diào)用的這個create方法可以看到其實(shí)是用newProxyInstance()方法來返回一個類的代理實(shí)例褂删,它需要的參數(shù)有調(diào)用的方法名method、參數(shù)列表args冲茸。這兩者可以轉(zhuǎn)換成一個ServiceMethod對象屯阀。上面用到的方法的源碼如下
ServiceMethod loadServiceMethod(Method method) {
    ServiceMethod result;
    synchronized (serviceMethodCache) {
      result = serviceMethodCache.get(method);
      if (result == null) {
      //通過ServiceMethod.Builder()方法來構(gòu)建ServiceMethod
        result = new ServiceMethod.Builder(this, method).build();
        //放入緩存方便之后使用
        serviceMethodCache.put(method, result);
      }
    }
    return result;
  }

  public ServiceMethod build() {
      //構(gòu)建CallAdapter對象
      callAdapter = createCallAdapter();
      //構(gòu)建responseConverter轉(zhuǎn)換器對象(轉(zhuǎn)換成合適的類型)
      responseType = callAdapter.responseType();
      if (responseType == Response.class || responseType == okhttp3.Response.class) {
        throw methodError("'"
            + Utils.getRawType(responseType).getName()
            + "' is not a valid response body type. Did you mean ResponseBody?");
      }
      responseConverter = createResponseConverter();
      ...
      return new ServiceMethod<>(this);
    }
有了ServiceMethod后,下面的工作大致是OkHttpCall調(diào)用ServiceMethod獲得一個可以執(zhí)行的Request對象轴术,然后等到Http請求返回后难衰,再將response body傳入ServiceMethod中,ServiceMethod調(diào)用Converter接口將response body轉(zhuǎn)成一個Java對象
參考文獻(xiàn):
Android 網(wǎng)絡(luò)框架之Retrofit2使用詳解及從源碼中解析原理
你真的會用Retrofit2嗎?Retrofit2完全教程
Retrofit2 源碼解析
